To avoid these ads, REGISTER NOW!

Between 265 & 485 SQ/FT Ed's Pretty Good Garage

Workspaces sized between 265 and 485 squarefeet.

Not So Legendary

Well-known member
Joined
Nov 7, 2021
Messages
62
After a conversation with my coworker about my extensive collection of tools but at the same time I don't have a primary hobby associated with them, I just do "stuff". I've been a lurker on here with my alt account since 2014, and figured it would be a good time to start documenting what I'm doing.


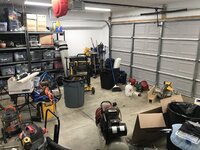
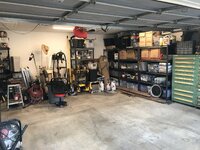
I have a significant volume of items that never really been sorted through, in college I had a 1600 sf garage so things accumulated. I'm now in what is probably the minimum to qualify as a two car garage, the typical 20x20 that comes with all new construction. While this space is adequate for a lot of what I do, my truck is 2ft too long to fit inside. On top of that I have one and a half outlets at my disposal, one on the back wall and one for the garage door opener.


IMG_5103.JPG

this picture is the first time it got the name "Ed's Pretty Good Garage" which has been passed down from my grandfather who had two 3-car garages and a gazebo filled with stuff. His garages had far fewer walking paths.
 
To avoid these ads, REGISTER NOW!
OP
N

Not So Legendary

Well-known member
Joined
Nov 7, 2021
Messages
62
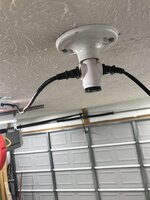
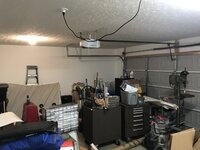
One of the first project I tackled was more lighting. Since it's a bare bones quick build duplex and a rental I had limited options. Here's what it came with, two 60w incandescent bulbs .
IMG_5031.JPG
I had a whole bunch of those Feit LED light bars from my old garage. They are light enough that I can mount with some drywall anchors. I ran the power from a socket to outlet adapter, like so...
IMG_5881.JPG
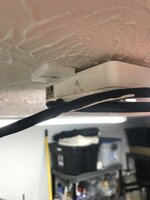
Unfortunately the vibrations from the garage door caused some lights to slide off of one anchor and rip out the other side.
RFQZ7935.JPG
Fortunately slathering spackle give it the same texture as the ceiling so no sanding needed. I 3D printed a little block to keep them in place. 3 months later and no issues.
IMG_5882.JPG
I put up 6 lights in total and have almost no shadows.
IMG_5031.JPGWUQK9217.JPG
And a little before and after on lighting.
 

Attachments

  • NFFX9453.JPG
    NFFX9453.JPG
    286.3 KB · Views: 11
OP
N

Not So Legendary

Well-known member
Joined
Nov 7, 2021
Messages
62
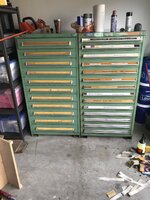
I found a pair of Vidmar Cabinets in pretty good shape on Facebook. In order to get them I had to drive from Louisville to Fort Wayne after work, so a quick 8 hour round trip I had these two.
JDIE0202.JPG
When I pull out the drawer I can manuever them on a handtruck and ramps.
LENZ6063.JPG
Both Cabinets moved in place, the shelving to the left is off the wall.
MGNU4224.JPG
I found a whole bunch of Carbine inserts in the right cabinet and have already recouped $100 by selling them off.
JNDW8536.JPG
I Ordered new labels and the new style end caps. It's not a perfect conversion, I needed longer screws and the caps have to be pushed in with some force. When bolted on the fit pretty tight.
JRMJ2412.JPG
Here's a glamour shot of it pretty well cleaned up. its since gotten worse as I've sold 4 toolboxes and moved that contents to the big vidmar cabinets.
LIFU1425.JPG
 

Chrisb62

Well-known member
Joined
Jul 30, 2019
Messages
1,093
Location
southwest fl
You will probably get offers for those cabinets from quite a few members. Smaller spaces require for more thought processes for saving space and multitasking on everything. Lots of members are proficient at that, as you have seen from being a lurker (most of us started that way), then there are guys like me who add a shed for more space. LOL
 
OP
N

Not So Legendary

Well-known member
Joined
Nov 7, 2021
Messages
62
@Chrisb62 I got a killer deal of less than $50 a drawer for these. I later picked up another 6 drawer cabinet at a more local auction but that ended up being too rough for the permanent collection. I don't think I can add a shed to a rental condo, but when I buy, garage space will be a big criteria.
 
OP
N

Not So Legendary

Well-known member
Joined
Nov 7, 2021
Messages
62
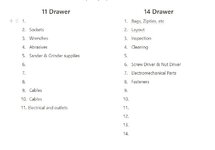
Working on filling up the cabinets I'd like to be "organized" so I came up with some method to what goes where. Even though I'm 6'4" the top drawer of a 59" cabinet is a little high up. Taking height into account to top drawer and the bottom couple will be used for less used stuff. this is the plan so far. Most drawers have something in them because I sold 4 Kennedy boxes and moved their contents over.
Capture.JPG
My first achievement was transferring 3 large bins into 3 drawers. I also emptied a tote full of Schaller bins that I had but that's kind of cheating.

Shamelessly trying to promote engagement here's some tidy drawers.
MEMI0073.JPG

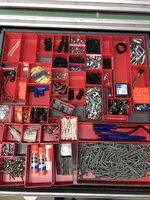
This is the top drawer of my right cabinet. It will mostly be zip ties and bags.
IMG_5890.JPG
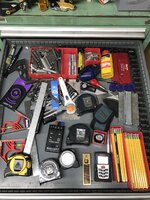
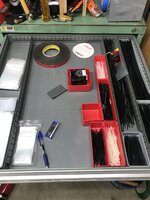
here's the "layout" drawer. Mostly measuring and marking. The set of letter stamps came with the cabinet which was in the tool room of a die shop. There's some odballs in here like my inductive sensor tester that I used in my old job but haven't since, and also my custom Koa wood square.
IMG_5891.JPG

IMG_5885.JPG

IMG_5887.JPG
The starts of a cleaning focused drawer.
IMG_5893.JPG
IMG_5888.JPGIMG_5889.JPG
 

Attachments

  • IMG_5886.JPG
    IMG_5886.JPG
    305.2 KB · Views: 8
OP
N

Not So Legendary

Well-known member
Joined
Nov 7, 2021
Messages
62
I have a thermal label printer that I'm using to print labels for bins and label bags. I'm currently using direct thermal labels and starting to have second thoughts on their longevity, I might have to pick up thermal transfer to use going forward. If anyone has thoughts on it, I'm open to input.
IMG_5883.JPG
 
OP
N

Not So Legendary

Well-known member
Joined
Nov 7, 2021
Messages
62
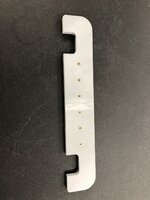
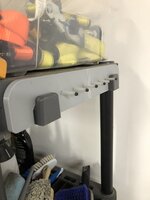
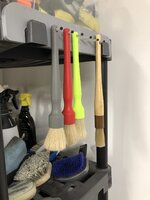
I decided to put together a little brush holder for my detailing brushes. I need to start on organization of my detailing supplies. I picked up a few new brushes from the rag company over black friday. It's currently on a cheap plastic rack that was inherited from a roommate. I threw together a quick 3D print hanger that will go over the hooks the side of each level on the shelfs.
IMG_5959.JPG
I've wanted to try out using threaded inserts for a while. The hanging hole on my brushes are 6mm I found some nylon spacers at home depot that are 3/16" OD and fit over a 3mm bolt.


IMG_5960.JPG
IMG_5961.JPG
Somehow I measure correctly on the first try and it fit perfectly on the rack.
IMG_5963.JPG
I have a few slots left for small brushes. I don't think it would be strong enough for the large ones.
 
To avoid these ads, REGISTER NOW!
OP
N

Not So Legendary

Well-known member
Joined
Nov 7, 2021
Messages
62
Those Q-tips were an impulse buy at Harbor freight. the long thin ones are good for gun cleaning. I'm thinking I could use the fat ones to apply cold blue to tools.
 
OP
N

Not So Legendary

Well-known member
Joined
Nov 7, 2021
Messages
62
Over the holidays I picked up a couple of cheaper cabinets off of marketplace. One is going to be for detailing supplies and the other is outdoors stuff. I also bought a mountain bike because my boss and coworker were pressuring me to ride with them, And then my girlfriend brought over her two bikes. All of a sudden I have to accommodate 3 bikes.
thumbnail_IMG_6086.jpg

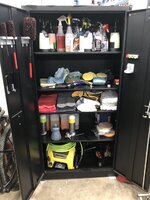
Here's the Start of the detailing locker. I got the pressure washer and a foam cannon for christmas. I think I need to make some more shelfs or divided the better organize the towels. My goal is to have enough to wash the cars 4 times with clean towels between washing them. I'm using an Ikea trashcan with the lid for my laundry hamper and that has worked well so far. Trying to keep the brushes and tools organized I'm working on printing holders for everything.
thumbnail_IMG_6087.jpg
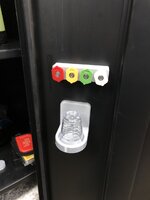
I made a little holder for the assorted nozzles. theres a small O-ring that provides a nice firm hold when a nozzle is pressed in. These two both use magnets to stick to the door, on the opposite door I'm using command strips. Not sure which is better but it's pretty easy to use the strips and they stay in place well.

thumbnail_IMG_6088.jpg

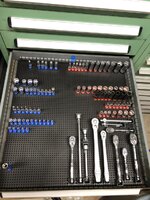
Wanting to organize my tools some more I tried out ToolGrid for my sockets. I have a very assorted collection. A bunch coming from an assorted Costco special tool set, and then wera and SK sockets. I had to replace the sparkplugs on my girlfriends car and that took way too long because I apparently don't have 3/8" extensions so I treated myself to some koken wobble fix. I figured I can spend what I saved from taking it to a shop to get the work done. I can't fit any deep 1/2" sockets in these drawers, I tried some and had less than 1/32" of clearance.
thumbnail_IMG_6089.jpg
I had to 3D print a holder for the 50mm extension because none of the standard holder were small enough for it to work nicely. I found that the Amazon Basics dark grey PLA is a close enough match color wise.
 
OP
N

Not So Legendary

Well-known member
Joined
Nov 7, 2021
Messages
62
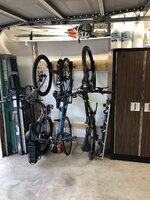
I've put together a couple of new project since my last update. I needed a spot to store my bikes, I found I could fit our 3 gaps in the space between my detailing cabinet and the garage door. IMG_6213.JPG
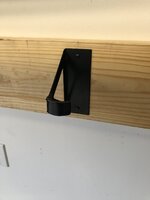
I put together a quick frame with some 2x4 and a 2x8 to mount a bike hanger that I found at menards. I put in a lower spreader bar to reduce the tire marks on the wall. I went to a bunch of hardware stores around town trying to find one that I like, naturally I found these at the last store I went to. I found some solid closet shelf brackets from the last closet project I did, these are some solid 12ga brackets from Stanley. I put up a cheap melamine shelf to store my truck bed ramps, helmets and floor jacks. the weight is a little much apparantly as it's already sagging, who woulda thunk it that **** materials are ****.
IMG_6214.JPG
A shot with my girlfriends two bikes and my Marlin 6 that I picked up over Christmas. I went with black to match my truck. My boss and coworker have been pressuring me to get a bike to go out with them. Does it count as playing hooky if your boss leaves early too?
IMG_6215.JPG
I wanted to add some work surfaces to the garage. The original plan was to use a bunch of 30" 2x4s that work was giving away because the fire marshall said you had to use wire mesh on pallet racks instead of the "deck" we had, there was probably 2 pallets of them. By the time I got around to having an Idea of what to do with it, they were gone. Oh well... I would have had to let them dry out for a month or two since they were outside all winter. The post covid lumber prices are crazy, I paid $200 for a sheet of axc and some 2x4s.
XRQC1660.JPG
Here's my new workbench. it has a fancy removable panel because my air compressor is a little too tall to fit without it. I made it on the taller side of the norm at 40", it works for me since I'm 6'4". I plan to grab some scrap plywood from the construction site next door out of their dumpster to make some more shelfs to store the chopsaw, tile saw, and planer. because my shop has to be flexible, I put retractable casters on it. It's a bit prone to overturning since the wheels are so inward. I hope with more weight down low this won't be a concern anymore.
 

Jayman17

Well-known member
Joined
Feb 6, 2017
Messages
3,815
Location
Seattle, Wa
Looking good, making some nice changes. Too bad you have to store 3 bikes they are real space hogs. I like your Vidmar cabinets.

Jay
 
OP
N

Not So Legendary

Well-known member
Joined
Nov 7, 2021
Messages
62
Storing bikes is a hard one to get away from. Unless I can find a place with a walkout basement for my next house, I think bikes will have to stay in the garage.
 
OP
N

Not So Legendary

Well-known member
Joined
Nov 7, 2021
Messages
62
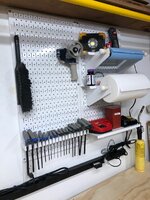
Long time with little progress, it's been pretty hot this summer so I haven't been spending much time in there. One of my recent additions was some wallcontrol peg board. I wanted to elevate some stuff off the workbench like; chargers, paper towels, and my T-handle allen wrenches.

thumbnail_IMG_6942.jpg


thumbnail_IMG_6943.jpg

One issue of these T-handles is they lean forward a touch from their center of gravity. I made up this rack for them, it's much better than the bent steel rack that these originally came with. I have it sitting on some of the hooks they make.

I picked up some more schaller bins to organize fasteners. I'm starting to fill them out, but that is a considerable expense, a small selection of M3 & M4 fasteners was over $100 from mcmaster. I was back and forth on whether I wanted a cheaper pre made assortment from unknown origin or getting consistent quality parts. So far the cohesive selection is focused on sizes that work with 3D printing. I bought an assortment pack of heat stake threaded inserts. I started to run out of the common size that I like, I didn't find any good domestic sources for these. I figured these were all coming from the same factory in China so I replenished off of Aliexpress.
thumbnail_IMG_6944.jpgthumbnail_IMG_6945.jpg

The labels are little hard to get on square, but they print super easily on the zebra label printer I have.
 
OP
N

Not So Legendary

Well-known member
Joined
Nov 7, 2021
Messages
62
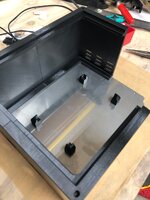
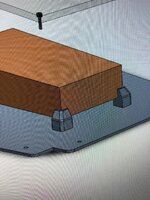
My dad had a special project where he wanted a lightbox to digitize old slides he has. I drew up a little box that holds a camera light, and is cooled with some computer fans. I had a stainless steel base plate cut from scrap at work. I printed the rest of the box in 4 sections, I glued it together with roll pins for alignment and used 3D gloop which works like pvc glue by melting the parts together.thumbnail_68513427017__DCB0FB3A-1E2A-409A-95C9-64C35D225DA8.jpgthumbnail_68513427963__CF95C2E7-C3ED-4FA7-BDBA-E02DE923CB57.jpgthumbnail_68410410732__095536D8-C216-4C33-BC41-E626120CC45F.jpgthumbnail_68404230848__85A1D76C-34B6-4463-8958-8353C44AE706.jpgIMG_8737 (1).jpg

The threaded inserts are super easy to use, just push them in with a soldering iron. I used them to hold the base plate to the rest of the box. We needed to use some heat shrink to keep the fan cables from coming loose and disconnecting from the usb adapter powering them.
 
OP
N

Not So Legendary

Well-known member
Joined
Nov 7, 2021
Messages
62
since the last update I've moved, the new house has fiber internet so I ran some cat6 to my office and had to put one in the garage for an AP because the wifi wouldn't go through the "exterior" wall. I picked up a really nice network rack off of ebay for a good price and just a quick 4 hour drive away. I tried to wire everything up nicely and organized, I have too many IOT bridges, and those tend to operate better if they are plugged into ethernet. I wanted to try a keystone patch panel and this one was $12 from monoprice, it's an absolute *************. I've probably broken more than $12 of keystones installing into the patch panel.

thumbnail_IMG_7596.jpg
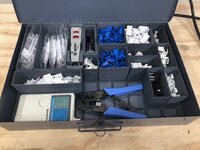
I wanted a storage system for tools and supplies that were more like a toolkit that had everything I needed for a specialized task. I picked up one of those systainers from milwaukee. I liked how tough it felt but had very little room to be customized the way I wanted, so that got returned. My Ideal solution would be some sortimo boxes but I can't justify $100 a box. There's a lot of buzz around gridfinity in the 3D printing world, so I made my one system that I call "Gridfinitimo" with an empty durham box.

thumbnail_IMG_7590.jpgthumbnail_IMG_7589.jpg
It's pretty easy to make new containers and organize all the small piece that I have for installing ethernet. Biggest downfall is this system is slow to print and consumes a fair bit of filament. The grid fills the box almost perfectly, with a little margin on the sides. That space does perfectly fit a pencil or driver bits. Next time I make a kit I'll have to add a raised section for storing those pieces.

I did some late night shopping and with a little persuasion from a certain mr Daniels I thought I needed a couple hundred bubble level vials. These are surprisingly cheap on aliexpress, about $0.04 each, so now I have $20 worth of them for projects. First project I used them for was a template to transfer the hole I needed to cut for a new work box when running ethernet. made a nice little pop in holder for the vial. Side view of it looks like a lego minifig hand.
thumbnail_img_7593-jpg.1893293
thumbnail_IMG_7576.jpg

I needed to clean the port on my phone, it was starting to get tempermental when plugging into the truck. These cleaning swabs were a reasonably priced for a big pack of them. I have started to notice that the minimum price for things on amazon are now like $10, so I am cross shopping a lot more. I printed a little divider for my schaller bins. My cleaning drawer is getting better.
thumbnail_IMG_7594.jpg
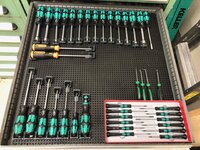
I pulled the toolgrid sheet from my wrench drawer, I didn't like how spaced out I had to arrange the SK x-frame wrenches. I clearly look like a Wera fanboy with my screw driver drawer. I feel like they had better value a few years ago, KC tools used to have some really good discounts for black friday and the sorts. I got those orange screwdrivers from Igus, If you request a sample of their cable chain, you get a nice box with a variety of sizes and this screwdriver. The chains make great fidget toys for your desk.

thumbnail_IMG_7595.jpg
 

Attachments

  • thumbnail_IMG_7593.jpg
    thumbnail_IMG_7593.jpg
    515.9 KB · Views: 135
OP
N

Not So Legendary

Well-known member
Joined
Nov 7, 2021
Messages
62
I've been running the 3D printer a lot lately and my girlfriend complained some about the noise. I have some professional experience with vibratory equipment and how to reduce base reactions, unfortunately those methods are designed for a single operating frequency and from my research 3D printers operate between 20-200 hz. That range doesn't work well for a solution like a tuned mass damper. It's currently sitting on some cheap Ikea desk top that has been cut down twice so it can fit in my office closet, it isn't much better than a thick piece of cardboard. To cut down on some of the noise being transmitted through the house I did the trendy squashball feet mod. I was surprised by how littler bounce a squash ball has. And then below that I have a 1/2" stainless plate that was scrap from a project at work, and then under everything I have 2" foam pad. This has helped a ton with making it quieter, it's now just driver and stepper noise.

thumbnail_IMG_7666.jpg

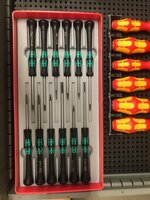
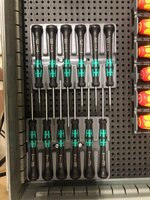
I moved over my precision screwdrivers from my old schaller bin insert to custom tray for tool grid. I really like the modular and put stuff wherever approach that it offers but the density of storage just isn't there for me, I feel like a lot of things are too spaced out. The engraving on these screwdrivers is indexed to a flat on the handles, I made the holders with a hex pattern so that I have the text face up.
thumbnail_IMG_7664.jpgthumbnail_IMG_7665.jpg

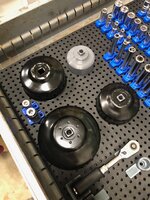
Some more custom holders for the CTA oil filter sockets. I don't think this model is quite there yet, I'd like to add a flat spot to label what size or vehicle it is for. I'm workshopping the idea of making socket rail that can be screw into the toolgrid but then has a way to adjust and add holders to a rail. I would like to have consistent spacing between sockets as opposed to some touch or being super far apart.

If I make a bunch more custom holders I may put them up on etsy.

thumbnail_IMG_7676.jpg

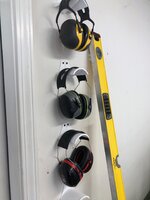
I got the model for these earmuff holders off of printables. I like the shape but the model was split for stronger layer orientation. They had a pretty small first layer so I had some curling when printed. If I was remaking these I would combine the two models and print in the weak direction. Ear muffs are so light the weaker orientation of layer lines has no impact.

thumbnail_70950623271__524D849C-FEAF-4317-902B-CE0EB606986E.jpg
 
To avoid these ads, REGISTER NOW!
Top Bottom