To avoid these ads, REGISTER NOW!

Electrical Wire Routing Help

Mr. Roboto

Well-known member
Joined
Dec 11, 2012
Messages
2,161
Location
New Hampshire
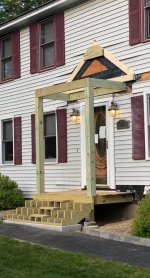
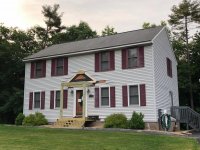
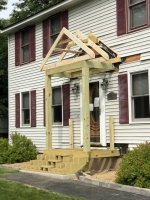
Not exactly garage related, but close enough. Wasn't sure where else to put this. I'm building this covered portico on the front of my house. I'm looking to eliminate the 2 light fixtures on either side of the door and replace them with 2 recessed lights in the portico roof. Without fully thinking it through, I originally thought I could just drill a hole in the side of the house above one of the fixtures within the roof area and snake a wire up from the electrical box... but I failed to realize that this area is now on the second story, so there is a top plate, rim joist, and bottom plate separating these 2 spaces. The header for the door is also blocking the area.

Does anyone have any clever ideas on how I could run the wire up to power the lights off one of the existing boxes? Its so close.... yet so far!


2jac0mr.jpg

k4jzty.jpg
 

Attachments

  • 4.jpg
    4.jpg
    115.9 KB · Views: 42
  • 3.jpg
    3.jpg
    154.7 KB · Views: 35
To avoid these ads, REGISTER NOW!

firebirdparts

Well-known member
Joined
Jun 8, 2016
Messages
10,666
Location
Kingsport, TN
You are the king of the stringers.

Anyway, I think your original plan cannot really change. You'll have to bore through all that. You can cut out a little chunk of sheetrock inside and drill both holes with a long drill extension.
 
OP
M

Mr. Roboto

Well-known member
Joined
Dec 11, 2012
Messages
2,161
Location
New Hampshire
You are the king of the stringers.

Anyway, I think your original plan cannot really change. You'll have to bore through all that. You can cut out a little chunk of sheetrock inside and drill both holes with a long drill extension.

Hah thanks. Technically those aren’t enough either. Fiberon, the mfg of the composite decking I’m using, actually specifies the stringers must be 7” OC. Those are installed 9” OC.

And I was afraid that was the answer. Was just hoping someone may have had an easier way of doing things.
 

Stuart in MN

Well-known member
Joined
Sep 8, 2005
Messages
23,157
Location
Minneapolis
They make flexible auger drill bits for that sort of thing - you may be able to use one to drill up through the plate from where the existing lights are mounted. Any big box store should have them, I just looked at the Home Depot website and they have several listed.
 

6768rogues

Banned
Joined
Nov 28, 2007
Messages
4,524
Location
Western NY
The fact that you have vinyl siding makes it easy. Remove some siding, cut away the plywood, drill and run wires, then patch the plywood and put the vinyl siding back on. I would remove enough to get to the switch if it is in that outside wall because if you tie into the existing boxes at the old lights those junction boxes need to remain accessible. Going to the switch eliminates those boxes.
I have done it lots of times. Remove the siding and start cutting, whatever you do the siding will cover it up and it will look like new. I built several entries like you are building, looks good.
 

Rbreddin

Well-known member
Joined
Jun 16, 2012
Messages
73
Location
Alpharetta, GA
They make flexible auger drill bits for that sort of thing - you may be able to use one to drill up through the plate from where the existing lights are mounted. Any big box store should have them, I just looked at the Home Depot website and they have several listed.

yup, flexible auger bit is made just for that purpose..
 

snyder

Well-known member
Joined
Dec 18, 2008
Messages
545
Location
Baltimore md.
What about boxing out a faux colum on each side , covering the existing boxes and providing easy acess up into the overhead. If not full lenght then maybe a bracket style.
 

Git

Well-known member
Joined
May 18, 2008
Messages
6,894
Location
S Cal
What kind of flooring do you have on the 2nd floor directly over that area? If it is carpet, perhaps you could pull it back, cut a small hole in the subfloor which would give you more room to work with and would be pretty easy to patch back up
 
OP
M

Mr. Roboto

Well-known member
Joined
Dec 11, 2012
Messages
2,161
Location
New Hampshire
Thanks for all the input. Lots of good ideas I hadn't thought of. I think I will try what 6768 suggested, and to just pull the siding and sheathing off an area on the side of the house and try to drill up through that opening. I'm just worried if I drill a hole up through the top plate of the wall, into the joist bay, then through the bottom plate of the wall upstairs, it may be rather tough to line up the 2 holes when snaking the wire though.

The area upstairs behind the porch roof is inaccessible. There used to be a little nook there in the bedroom on the top left, but the area was boxed in when the previous owners ran ducts for central air. I'd have to open up a hole in the sheetrock to get in there.

KBS "wireless" comment got me thinking a little though. I may be able to drill a hole in the top plate of the front wall in my attic and snake a wire down that way. I already have a wireless "Wemo" light switch controlling the current front lights. I could just relocate this into the attic where I make my splice, and keep on using the program I have set on the wemo switch to control them.


So... we'll see what I end up doing. Thanks for the feedback everyone. I at least now have some options I hadn't previously considered.
 

rburke65

Well-known member
Joined
Nov 10, 2007
Messages
12,349
Location
Canfield, Ohio
And do not forget, that the existing boxes for the original side lights, cannot be covered....they must not be buried. Have to be accessible.
 
OP
M

Mr. Roboto

Well-known member
Joined
Dec 11, 2012
Messages
2,161
Location
New Hampshire
And do not forget, that the existing boxes for the original side lights, cannot be covered....they must not be buried. Have to be accessible.

Thanks, understood. Like rogues suggested, I'm going to snake the wire back down to the switch on the inside which is a few feet under the left light box box, and then eliminate the right box all together to avoid having to keep access to the box.
 
To avoid these ads, REGISTER NOW!

eddieK

Well-known member
Joined
Mar 2, 2017
Messages
695
Location
Nampa Idaho
Thanks for all the input. Lots of good ideas I hadn't thought of. I think I will try what 6768 suggested, and to just pull the siding and sheathing off an area on the side of the house and try to drill up through that opening. I'm just worried if I drill a hole up through the top plate of the wall, into the joist bay, then through the bottom plate of the wall upstairs, it may be rather tough to line up the 2 holes when snaking the wire though.

The area upstairs behind the porch roof is inaccessible. There used to be a little nook there in the bedroom on the top left, but the area was boxed in when the previous owners ran ducts for central air. I'd have to open up a hole in the sheetrock to get in there.

KBS "wireless" comment got me thinking a little though. I may be able to drill a hole in the top plate of the front wall in my attic and snake a wire down that way. I already have a wireless "Wemo" light switch controlling the current front lights. I could just relocate this into the attic where I make my splice, and keep on using the program I have set on the wemo switch to control them.


So... we'll see what I end up doing. Thanks for the feedback everyone. I at least now have some options I hadn't previously considered.

Headers and joists should not be edge cut or drilled. The compression happens at the top and bottom of a support beam, this is why you only drill in the center, where compression does not take place. You may have enough plywood to gouge/cut or route out to make enough space for romex
 

Radix2

Well-known member
Joined
May 28, 2014
Messages
1,853
Location
the thumb!, MI
Pull the door trim and make a chase behind it to get to the ceiling.

Use a permanent/no access splice so that you don't have to keep access to the box.

Use the siding scraps from above to replace the siding where the lights are now.
 

The Cobbler

Super Moderator
Staff member
Joined
Oct 24, 2013
Messages
25,962
Location
Niagara Region, Ontario, Canada
if you take off some pcs of siding , cut a hole in the sheathing, you should be able to drill down at a heavy angle and get into the wall cavity without needing to go thru the rim, plates etc and connect to the existing box .as other said, the connection needs to be accessible
 

mm08822

Well-known member
Joined
Jan 13, 2012
Messages
6,040
Location
NJ
if you take off some pcs of siding , cut a hole in the sheathing, you should be able to drill down at a heavy angle and get into the wall cavity without needing to go thru the rim, plates etc and connect to the existing box .as other said, the connection needs to be accessible

Elaborating on Cobbler’s suggestion:
Remove exterior siding at 2nd floor level directly above inside switches.
Cut sheathing at studs (~14.5” wide) for easy replacement. Maybe 12 -18” high.

With this opening available, you can now drill thru the 2nd floor bottom plate and 1st floor top plate directly above the switches. You can now easily fish a new cable up to the porch rafter area from the switch box.

This also permits removal of the cable from the switch box to both fixture boxes. You can also remove the fixture boxes, close off resulting holes and install siding over these areas to eliminate any trace of former boxes.
Add a nailer to each stud and re-install sheathing previously removed above switch boxes.
 

mm08822

Well-known member
Joined
Jan 13, 2012
Messages
6,040
Location
NJ
Headers and joists should not be edge cut or drilled. The compression happens at the top and bottom of a support beam, this is why you only drill in the center, where compression does not take place. You may have enough plywood to gouge/cut or route out to make enough space for romex

If compression were occurring at the top, then tension would be occurring at the bottom of a beam. The neutral axis, is where tension and compression are zero/minimal. Since the discussion is about top/bottom plates and not beams where is this relevant for the OP?

Any gouging or route-out method would require nail plates as the cable needs to be otherwise protected with a min of 1.25" distance from edge.
 

bjcouche

Well-known member
Joined
Sep 11, 2010
Messages
509
Location
Ohio
Everyone else has good suggestions. I'll just add that if you use one of those long flex bits, here's a tip. IF you drill the hole and then the end of the bit extends to a location you have access to the end... They have a small hole in the end of the bit so that you can tie a string to the bit. Then when you pull the bit back out, you are pulling a pull string through your holes. Makes trying to fish your fish tape through multiple blind holes unnecessary.

Brian
 

eddieK

Well-known member
Joined
Mar 2, 2017
Messages
695
Location
Nampa Idaho
If compression were occurring at the top, then tension would be occurring at the bottom of a beam. The neutral axis, is where tension and compression are zero/minimal. Since the discussion is about top/bottom plates and not beams where is this relevant for the OP?

Any gouging or route-out method would require nail plates as the cable needs to be otherwise protected with a min of 1.25" distance from edge.

I'm referring to any gouging for instance, a 1" square up the face of the header. I've seen this done and it does compromise exactly like you described - compression and tension.

If you are starting from next to the door and up into the wall space above... isn't the path straight up Ie; thru the header into the plates and then into the joist bay? If not...then belay my last. Headers are not always just the size of the opening, without knowing where the king studs are it is blind work. You hope they are just outside the frame.
 
Last edited:

yeldogt

Well-known member
Joined
Jan 2, 2012
Messages
18,184
I'm wondering how he is going to frame the roof -- angle on wall looks too big ??
 

Dirtydan69

Well-known member
Joined
Nov 8, 2015
Messages
847
Location
San Tan Valley, AZ
Pull the door trim and make a chase behind it to get to the ceiling.

Use a permanent/no access splice so that you don't have to keep access to the box.

Use the siding scraps from above to replace the siding where the lights are now.

Something similar to this. I would kill those two light boxes. I’d then run form the switch box, provided that where power is, in a cut out channel up the the ceiling. The only issue I see is if you use anything but flexible metal conduit there is no protection from inadverdanlty piercing it in the future, by you or anyone else.
 
OP
M

Mr. Roboto

Well-known member
Joined
Dec 11, 2012
Messages
2,161
Location
New Hampshire
Thanks again everyone for the suggestions. Lots of great tips and words of caution. I should have a good idea of how to do this once I get some of the sheathing off the outside and see exactly what's going on behind the wall with regards to the header width and how much clearance I'll have to drill.

I'm wondering how he is going to frame the roof -- angle on wall looks too big ??

What do you mean? By angle of the wall, do you mean angle of the roof? Its a standard 12:9 pitch. Wanted to make sure there was enough angle there for snow loading reasons, and aesthetics, as I wanted to fill some of the void I had in the upper portion of the center of the house. For what it's worth, I finished framing the roof this weekend. Here it is:

fdf29h.jpg
 

Attachments

  • IMG_2437.jpg
    IMG_2437.jpg
    150.5 KB · Views: 6

yeldogt

Well-known member
Joined
Jan 2, 2012
Messages
18,184
Typically the roof rafters are cut in -- drops it down ... smaller "quieter" structure.
 
OP
M

Mr. Roboto

Well-known member
Joined
Dec 11, 2012
Messages
2,161
Location
New Hampshire
Oh I gotcha. I intentionally did it this way for a few reasons, the biggest being so that I could pre build the trusses as one unit and hoist them up there assembled, rather than cutting common rafters with birds mouths cut in to sit on the beams to drop the roof down. I also like the look of a larger eave.
 
To avoid these ads, REGISTER NOW!
Top Bottom