To avoid these ads, REGISTER NOW!

Electrican question for LED panel install

smalltown

Well-known member
Joined
Jul 9, 2015
Messages
985
Location
Western Maine
Finally installing my first 2 LED 2x4 panels. If all goes as planned I'll order the rest.
I wanted see if this will pass "electrical muster"

I will be installing the surface mount fed with 1/2" EMT conduit.
Each side of the fixture will be drilled to accept an EMT connector.
That gets me into the mount, and out of the mount to the next fixture down the line.
Since the panel is installed last I will leave two ~2 foot long coils of the 12 Ga, THHN wire in the mount area to be able to wire the panel before I slide it into place.

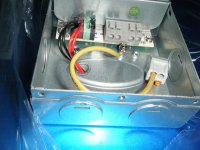
The first picture is the driver box that sits on top of the panel. There is one knockout on each side, and two on the rear. I intend to use the two rear to help avoiding the wire kinking.

Lastly I am going to try the dimmer wires in the same conduit. Do I need particular specs such as temp or insulation if I commingle the dimmer, and the power feed in the conduit ?

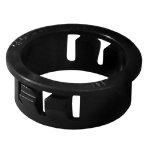
In an effort to protect the wires passing thought the rear knockouts are these bushings acceptable?
https://www.lowes.com/pd/Gampak-1-2-in-NM-SE-Bushing/3389588
 

Attachments

  • DSCF1879a.jpg
    DSCF1879a.jpg
    64.9 KB · Views: 92
  • 031857493912a.jpg
    031857493912a.jpg
    24.9 KB · Views: 47
To avoid these ads, REGISTER NOW!

DieselNut88

Well-known member
Joined
Dec 14, 2016
Messages
453
Location
Northern,IL
You can buy wire with a tracer stripe to identify the dimmer wire. No special wire that i know of. Those grommets will work fine. With ballasts the ballasts have to be matched to the dimmer. I dont know if your LEDs are the same. The manufacture should have a list of compatible ones. Posts some pictures when your done.
 

cybrdyke

Well-known member
Joined
Sep 9, 2014
Messages
3,442
Location
USA
Maybe it's the way you described it...
The surface mount is not an electrical enclosure and if you are using conduit, it should run all the way into the wiring compartment of the driver. There shouldn't be any exposed wires inside the surface mount kit.
CD
 
OP
S

smalltown

Well-known member
Joined
Jul 9, 2015
Messages
985
Location
Western Maine
Sparse as they are here is the instruction sheet. Even if I had conduit from above there would still be exposed wires from the conduit connector to the led panel.
 

Attachments

  • Lumegen-instructionsa.jpg
    Lumegen-instructionsa.jpg
    72.2 KB · Views: 96

Bad Habit

Well-known member
Joined
Mar 19, 2014
Messages
1,978
Location
Chumstick WA
You need to extend the approved wiring all the way and into the driver enclosure. You would transition to flex or some other approved raceway from the EMT. Excess gets pushed back into the surface enclosure.

It's the Inflatable Colloidal Particle that has me worried, is there a treatment for that?
 

Platonic Solid

Well-known member
Joined
Nov 29, 2014
Messages
3,587
Location
CT-USA
I would use a quick disconnect to make life a little easier. Here's a video from superbrightleds. Looks to me like they're using the box as an electrical enclosure. Not sure there's any other way to do it.
 

Wrigley

Active member
Joined
Dec 1, 2017
Messages
41
Location
SE IA
Full disclosure, I’m not an electrician, but thought I would throw out a thought for discussion. Can you go in each side as you described with your conduit adapter and then continue the conduit to a 4 square box somewhere inside the surface mount. Then come out of that with armored cable to your driver. Just a thought. You could do most of this work on the ground, then mount the whole assembly to the ceiling. I guess it would also depend how deep the mount is, that might be a really tight squeeze.

I went to lightups site and their video link on the 2x4 is broken but it plays on the 2x2 premium 5200 lumen. They show armored cable going into the driver box. I will be using Romex when I finally move forward with my project so this had not occurred to me.
 
Last edited:
OP
S

smalltown

Well-known member
Joined
Jul 9, 2015
Messages
985
Location
Western Maine
Plan B just for thinking out loud.
If I were to punch holes in the ceiling. (didn't want to)
Install a shallow flush mounted 4x4 box within the surface mount
Use short coils of Carlon 1/2" flexible conduit https://www.lowes.com/pd/CARLON-Common-1-2-in-Actual-0-5-in-Non-Metal-Flex-25-ft-Conduit/1000380299
Install (glue on) Carlon 1/2" adapters https://www.lowes.com/pd/CARLON-1-2-in-PVC-Adaptor/1000382277

Run the short lengths of flex conduit between the 4x4 box and the LED panel driver knockout.

Short coils to give me room/play to wire, and insert panel into mount.
Then from above run EMT or armored cable to the 4x4 box.

My head hurts !:lol_hitti
 

Wrigley

Active member
Joined
Dec 1, 2017
Messages
41
Location
SE IA
Smalltown, I am curious what you decided to do? Will continuing the conduit within the box as I suggested above not work? Is the flush mount to shallow? Wondering why you have decided to now go through the ceiling.
 

Radix2

Well-known member
Joined
May 28, 2014
Messages
1,853
Location
the thumb!, MI
I'm going with a ton of led panels for my shop, initially I was going to do the surface mount as well - but the cost of those brackets is nuts ! $35 for a sophisticated 2x2 LED Panel and then $25-30 for a couple pieces of sheet metal????

You need a bunch of loose slack to get those lights into those frames - I don't see any way to do it other than some very very long slack armored cable or just Romex. The only way I would do it is just dropping Romex from above and fasten to driver box. Push the wire in as the panel slides.

I decided that the best for me is to go with a grid ceiling eliminating the brackets and complexity of feeding 30 panels through drywall.

Have you tried mocking up putting a panel in the surface mount frame?

What am I missing? emt seems completely impossible to those fixtures
 

Radix2

Well-known member
Joined
May 28, 2014
Messages
1,853
Location
the thumb!, MI
Plan B just for thinking out loud.
If I were to punch holes in the ceiling. (didn't want to)
Install a shallow flush mounted 4x4 box within the surface mount
Use short coils of Carlon 1/2" flexible conduit https://www.lowes.com/pd/CARLON-Common-1-2-in-Actual-0-5-in-Non-Metal-Flex-25-ft-Conduit/1000380299
Install (glue on) Carlon 1/2" adapters https://www.lowes.com/pd/CARLON-1-2-in-PVC-Adaptor/1000382277

Run the short lengths of flex conduit between the 4x4 box and the LED panel driver knockout.

Short coils to give me room/play to wire, and insert panel into mount.
Then from above run EMT or armored cable to the 4x4 box.

My head hurts !:lol_hitti

That carlon conduit is much stiffer than you think, no way you can coil it under one of those led frames imo. Some thin armored cable might be it, but why the concern with armoring all this stuff in an inaccessible protected space, just use nm-b..?
 
OP
S

smalltown

Well-known member
Joined
Jul 9, 2015
Messages
985
Location
Western Maine
Radix2 thanks waned to keep it away from any mice that might chew things.
Just writing out loud trying to come up with an acceptable plan.

Going to Home Depot today and while there going to look at the Carlon, and also the armored cable.
 
OP
S

smalltown

Well-known member
Joined
Jul 9, 2015
Messages
985
Location
Western Maine
Wrigley Rethinking things. Don't know what to do if I drill the hole in the surface mount, and just let the conduit go through to a 4x4 box. Just thinking it will look like **** going in and out like that. Was thinking there ought to be some sort of fitting that I could use, that tightens against the fixture but allows the conduit to go through to the box. Haven't found anything yet.
 

Radix2

Well-known member
Joined
May 28, 2014
Messages
1,853
Location
the thumb!, MI
Radix2 thanks waned to keep it away from any mice that might chew things.
Just writing out loud trying to come up with an acceptable plan.

Going to Home Depot today and while there going to look at the Carlon, and also the armored cable.

do you have different mice in Maine than Michigan?

in 30 years of renovating and maintaining buildings -including some so infested with mice that they built foot deep nests in kitchen soffits and inside breaker panels, I have never seen even one wire chewed by them. Pole barns, houses, sheds, never seen it.

Peed and crapped all over yep, chewed no.

There was an issue with automotive wiring that I think has soy plastics or something in it that mice ate the heck out of, but never seen it with house wiring -new or 50 years old.

you need a very flexible wire to get those panels in, make a mock up of what you have with some scrap drywall to try out your ideas.
 
Last edited:

Radix2

Well-known member
Joined
May 28, 2014
Messages
1,853
Location
the thumb!, MI
I think you're making this way too complicated. Just run the condiut to the surface box - pull extra-long leads - install Ideal 102 power plug - connect ground lead - Done.

I like the Wago version - you get 2 sets of wires in and one set out to the fixture so you can use it for daisy chaining too. Id like to see a version that has the dimming circuits too.

I t looks like his connection box actually has double terminals to allow daisy chaining inside the box - but it would be really hard with the slide in surface mount.
 

cybrdyke

Well-known member
Joined
Sep 9, 2014
Messages
3,442
Location
USA
I think you're making this way too complicated. Just run the condiut to the surface box - pull extra-long leads - install Ideal 102 power plug - connect ground lead - Done.
That's not gonna pass. You cant have exposed wiring inside the surface mount kit. It's not an electrical enclosure. Any failure would be right up against the drywall. No go.
In this case, you would need to have a long whip of MC cable from the EMT entry in the frame to the driver box. It would have to be long enough so that it would allow you to pull the panel out of the frame. Of course, this is getting kind of silly, so an alternate method of connection would probably be best.
Entering from above is a PITA also. You still have the issue of exposed wiring, which is a fail, or the issue of a fairly long whip, although not quite as long as with the side entry.

Ask the manufacturer if they have a mud-in kit instead of a surface kit. Then there's no issue. Also, we're starting to see clip in kits. These solve some of these issues.

Good luck,
CD
 
To avoid these ads, REGISTER NOW!

Platonic Solid

Well-known member
Joined
Nov 29, 2014
Messages
3,587
Location
CT-USA
Radix2 - Agree with the Wago (that's actually what I use on production fixtures). Here's a link to that one.

CD - I understand that it doesn't pass as an electrical enclosure as defined in UL1598, but we both know that's what everyone is doing and has been doing for decades. Think of all those pendant and flush mount fixtures where the canopy is much larger than the electrical box. The drywall ceiling is being used as part of the electrical enclosure. If this is unacceptable practice, then every house in the U.S. is in violation of the NEC.
 

Radix2

Well-known member
Joined
May 28, 2014
Messages
1,853
Location
the thumb!, MI
That's not gonna pass. You cant have exposed wiring inside the surface mount kit. It's not an electrical enclosure. Any failure would be right up against the drywall. No go.
In this case, you would need to have a long whip of MC cable from the EMT entry in the frame to the driver box. It would have to be long enough so that it would allow you to pull the panel out of the frame. Of course, this is getting kind of silly, so an alternate method of connection would probably be best.
Entering from above is a PITA also. You still have the issue of exposed wiring, which is a fail, or the issue of a fairly long whip, although not quite as long as with the side entry.

Ask the manufacturer if they have a mud-in kit instead of a surface kit. Then there's no issue. Also, we're starting to see clip in kits. These solve some of these issues.

Good luck,
CD

Where is the open wiring?,

that fixture box has a cover, bring the wires in with appropriate bushing, fasten, close box. Slide in.

Only problem I see is the desire for emt or stiffness of cable.

I think most places would pass with NM through drywall into enclosed connection box.

Untrue?

They definitely need a better method than slide in. And 4 pieces of tin for almost the same price as the fixture...here I go again...:lol_hitti
 

cybrdyke

Well-known member
Joined
Sep 9, 2014
Messages
3,442
Location
USA
Where is the open wiring?,

that fixture box has a cover, bring the wires in with appropriate bushing, fasten, close box. Slide in.

Only problem I see is the desire for emt or stiffness of cable.

I think most places would pass with NM through drywall into enclosed connection box.

Untrue?

They definitely need a better method than slide in. And 4 pieces of tin for almost the same price as the fixture...here I go again...:lol_hitti

NM would pass as a sheathed cable, if it was not spliced, but unless I'm mistaken Platonic was suggesting a connector in there which would require cutting back the sheath and exposing wires.
 

Radix2

Well-known member
Joined
May 28, 2014
Messages
1,853
Location
the thumb!, MI
NM would pass as a sheathed cable, if it was not spliced, but unless I'm mistaken Platonic was suggesting a connector in there which would require cutting back the sheath and exposing wires.

ahh, yes, hard to use the luminaire connectors in these new fixtures compared to the giant space inside old troffers.

Using the provided terminations would be easiest if he can give up on all the armoring.. else wire to fixed boxes, then wire to fixture box.
 
OP
S

smalltown

Well-known member
Joined
Jul 9, 2015
Messages
985
Location
Western Maine
Sorry to be such a pain in the ***
Hope I don't wear out my welcome.

Just another thought. What if I was to drill my 7/8" holes, and install a grommet like this in the drilled holes, and bring the EMT right inside the surface mount to a 4x4 box screwed to the ceiling ?

Not sure if the 1/2 EMT will fit inside of the grommet so I will drive back to Home Depot, and buy a couple to try. So far I see only black not sure if white is available.

Then perhaps I could run a small piece of romex from the 4x4 box to the driver box with the appropriate clamps ?


Or what if I installed a section of sheet metal between the mount and the drywall ?

P.S. Thought it best to test the 2x4 led panel on the bench, just to be sure they work ok. Wow
 

Attachments

  • 031857493912a.jpg
    031857493912a.jpg
    24.9 KB · Views: 6

Platonic Solid

Well-known member
Joined
Nov 29, 2014
Messages
3,587
Location
CT-USA
NM would pass as a sheathed cable, if it was not spliced, but unless I'm mistaken Platonic was suggesting a connector in there which would require cutting back the sheath and exposing wires.
I'm suggesting conduit end at surface mounting box then standard THHN/THWN from there to the wago connector in between the driver box and surface mounting box. Run 18Ga AWG wire between the driver and wago. There's nothing wrong with that. It's no different than using a wire nut or push in wire connector in the same space - nothing wrong with that either.
 

Radix2

Well-known member
Joined
May 28, 2014
Messages
1,853
Location
the thumb!, MI
Sorry to be such a pain in the ***
Hope I don't wear out my welcome.

Just another thought. What if I was to drill my 7/8" holes, and install a grommet like this in the drilled holes, and bring the EMT right inside the surface mount to a 4x4 box screwed to the ceiling ?

Not sure if the 1/2 EMT will fit inside of the grommet so I will drive back to Home Depot, and buy a couple to try. So far I see only black not sure if white is available.

Then perhaps I could run a small piece of romex from the 4x4 box to the driver box with the appropriate clamps ?


Or what if I installed a section of sheet metal between the mount and the drywall ?

P.S. Thought it best to test the 2x4 led panel on the bench, just to be sure they work ok. Wow

What is the advantage over just using the emt clamp?

I would caution against trying to drill into the fixture box at all, just use the knock out as it is or buy a punch. Keeping metal shavings out of the fixture is going to be hard and the possibility of damage due to binding or forces during drilling is high.

Have you had personal problems with mice and household wiring? There are 100s of millions out there without all this effort you are putting yourself through.

Run the Romex fixture to fixture above the ceiling, terminate in the fixture box, looks the best, meets code, you live to fight another day (all this overhead work is killer). :bounce:

Otherwise create this entire surface network with emt, 4x4s for each fixture, then run cable from the 4x4 to the fixture box...fitting it all under the thing and looking good? You will be trailblazing on that.


Edit- I see you are talking about the surface mount metal, not the fixture box. No need for a grommet or anything there unless it is for visuals, emt is safe to pass through holes.
 
Last edited:

cybrdyke

Well-known member
Joined
Sep 9, 2014
Messages
3,442
Location
USA
I'm suggesting conduit end at surface mounting box then standard THHN/THWN from there to the wago connector in between the driver box and surface mounting box. Run 18Ga AWG wire between the driver and wago. There's nothing wrong with that. It's no different than using a wire nut or push in wire connector in the same space - nothing wrong with that either.
That's what I thought you were saying.
No, that wont pass. Cant run THHN in non electrical enclosure and cant splice wire in non electrical enclosure.
CD
 

Platonic Solid

Well-known member
Joined
Nov 29, 2014
Messages
3,587
Location
CT-USA
That's what I thought you were saying.
No, that wont pass. Cant run THHN in non electrical enclosure and cant splice wire in non electrical enclosure.
CD
Then please explain how the exact same condition exists for pendant and flush mount fixtures and that's acceptable.
 

cybrdyke

Well-known member
Joined
Sep 9, 2014
Messages
3,442
Location
USA
Then please explain how the exact same condition exists for pendant and flush mount fixtures and that's acceptable.

Give me an example.
The pendants I'm familiar with, if they're mounted to a ceiling box, will have all the connections inside the box and a steel cover (probably somewhat decorative ) over it. The flush mounts that I'm familiar with, if they're mounted to a ceiling box, will have all the connections inside the box, a threaded rod and an insulated foil covering.
CD
 

cybrdyke

Well-known member
Joined
Sep 9, 2014
Messages
3,442
Location
USA
Then please explain how the exact same condition exists for pendant and flush mount fixtures and that's acceptable.

The pendants and flush mounts have an electrical box recessed into the ceiling. The electrical connections are supposed to be made and then shoved up into the box where they are contained. The box is covered by the fixture's canopy cover so there are no exposed wires or connections. That's quite different from open wires underneath the ceiling with a connection that's not in an electrical box.
CD
 

Platonic Solid

Well-known member
Joined
Nov 29, 2014
Messages
3,587
Location
CT-USA
I don't see that as different. In both cases drywall makes up part of the electrical enclosure. I'd like to hear a sparky chime in here.

I suppose an alternate method would be to close off the back of the surface mounting box with a thin steel or aluminum sheet. Then it would fully qualify as an electrical enclosure by UL1598 definition.
 

Platonic Solid

Well-known member
Joined
Nov 29, 2014
Messages
3,587
Location
CT-USA
How about this - Run rigid surface conduit to a surface mounted electrical box near the inside end of the fixture box, notching ends to fit over the conduit. Run #18 AWG solid wire from driver to Wago (note: The 2 hole end of the Wago only accepts #18 AWG solid wire - link to spec sheet). Slide LED panel into surface box, connect Wago and push into electrical box.
 
Last edited:
OP
S

smalltown

Well-known member
Joined
Jul 9, 2015
Messages
985
Location
Western Maine
Latest surprise. Surface mount kit was advertised as 2 1/2" deep. Measures only 2"
Looking everywhere trying to find a shallow junction box that will fit, and not interfere with the led panel. I did locate Gavin Electrical that states box is 1 1/4 deep, but not sure if that is including the cover screws when a cover is installed. 1 1/4 would be the maximum I think will fit. E-mailed Gavin asking dimentions.
 
OP
S

smalltown

Well-known member
Joined
Jul 9, 2015
Messages
985
Location
Western Maine
Last evening I was searching the web for info that might help me.
I saw something that made me think "could I have been that stupid" ! (please don't answer that I'm beating myself up enough)

Cybrdyke has been stressing that I needed an enclosure within which to do the splicing etc. So I ran tying to find a junction box that would fit inside the surface mount, and still allow the panel to slide in. I should have included these photos mea culpa on my part again.

The slap on my forehead was (and I hope this is right) doesn't the driver box itself constitute the enclosure. Granted the driver box metal is not thick, but there are knockouts, and inside are the "wago" type connection points inside that Platonic mentioned.

Here are three photos with the driver box cover removed.
If this is acceptable then all I need is something maybe romex, and bell wire or plastic conduit to be able to push a wired panel into the fixture.
 

Attachments

  • DSCF1887a.jpg
    DSCF1887a.jpg
    74 KB · Views: 16
  • DSCF1888a.jpg
    DSCF1888a.jpg
    71.6 KB · Views: 15
  • DSCF1879a.jpg
    DSCF1879a.jpg
    87.1 KB · Views: 18

Radix2

Well-known member
Joined
May 28, 2014
Messages
1,853
Location
the thumb!, MI
That's what I have been saying all along.

What is kicking your **** so bad is the desire to do surface mounted wiring below, then needing two connection boxes at every fixture - no chance on reconsidering ?

After all this work, and the lights being an industry standard size it seems extremely unlikely you will ever need to change the layout..?
 

cybrdyke

Well-known member
Joined
Sep 9, 2014
Messages
3,442
Location
USA
Last evening I was searching the web for info that might help me.
I saw something that made me think "could I have been that stupid" ! (please don't answer that I'm beating myself up enough)

Cybrdyke has been stressing that I needed an enclosure within which to do the splicing etc. So I ran tying to find a junction box that would fit inside the surface mount, and still allow the panel to slide in. I should have included these photos mea culpa on my part again.

The slap on my forehead was (and I hope this is right) doesn't the driver box itself constitute the enclosure. Granted the driver box metal is not thick, but there are knockouts, and inside are the "wago" type connection points inside that Platonic mentioned.

Here are three photos with the driver box cover removed.
If this is acceptable then all I need is something maybe romex, and bell wire or plastic conduit to be able to push a wired panel into the fixture.

Yes, that is the electrical connection box for the driver. The issue is that you have a distance between the end of the EMT conduit and the driver box. In that distance, you cant have unprotected wire.
Some of the suggestions in the thread were to help cover that distance. Someone suggested EMT all the way thru the surface kit into the driver box. Someone suggested MC cable from the EMT to the driver box. Others suggested trying to come from overhead into a ceiling box, but you still would have a short distance from there to the driver box.
I've talked to 3 different manufacturer's engineering departments about this. They all know and are aware of the challenges of using a surface kit. As soon as I bring it up, they know exactly what I'm asking because they get this call all the time. None of them has a good answer. At this point, they are relying on the ingenuity of the installer and the approval of the AHJ, both of which can be scary.
That's why I dont bother with surface kits. There are better ways to do it. There is a snap in kit from one manufacturer that uses the same kind of tension springs that you find in a wafer light. Some manufacturers offer a mud-in bracket that gives you a truly flush mount. Still others offer fixtures that are surface mount that are even slimmer than a panel surface kit. Problem is that none of these things are "cheap", and that's one thing this forum has a problem with.
Here's some examples:
Super Thin surface mount flat panel:
https://assets.slvlighting.com/fileadmin/SLV_Lighting_N.A/Service/Catalogs_and_Brochures/FLYERS/PRODUCT%20INFORMATION/SLV_FLATZ_Flyer_180206.pdf
Mud-ring kit for flat panel:
https://www.liteline.com/20000339-master_ledp-mud/trimless-adapter/trimless-adapter-for
Tension clips for flat panel:
https://www.liteline.com/20000341-master_ledp-clips/clips/forum-recessed-mount

CD
 
Last edited:
OP
S

smalltown

Well-known member
Joined
Jul 9, 2015
Messages
985
Location
Western Maine
Thanks for hanging in there with me, Could I at the very least bring romex through the ceiling drywall, and right in to the driver box ? Isn't the romex considered protected as long as it's out of harms way?
That way no splices are done within the surface mount just the connections inside the driver connection box.

Or again from above use some ENT conduit, and place THHN and the driver wire in that ?
 

cybrdyke

Well-known member
Joined
Sep 9, 2014
Messages
3,442
Location
USA
Thanks for hanging in there with me, Could I at the very least bring romex through the ceiling drywall, and right in to the driver box ? Isn't the romex considered protected as long as it's out of harms way?
That way no splices are done within the surface mount just the connections inside the driver connection box.

Or again from above use some ENT conduit, and place THHN and the driver wire in that ?

Yes, you can bring the romex into the driver box and put a little romex connector in one of the knockouts. You'll need some slack so that you can slide the panel in and out of the frame.
CD
 
To avoid these ads, REGISTER NOW!
Top Bottom