To avoid these ads, REGISTER NOW!

Elevated scale stands. redux.

Vicegrip

Well-known member
Joined
Mar 9, 2007
Messages
1,187
Location
NoVA.
I have been doing my own alignment setups and corner balancing in the home shop. I use a set of 12 inch pad Longacre scales in homemade scale levelers, a camber gauge and a set of Smart Strings from SRP. One dislike I had with doing alignments and corner-balancing was having to kneel down during setup and while making adjustments. In addition to my getting up and kneeling down 2,389 times during each, perhaps slightly obsessive alignment with the floor level scales I had to reach under the car and fumble around while making adjustments. This is no fun but better than lifting the car up to make some changes and then try and resettle the car. Being lazy and having come into possession of a scale set that had 15 inch plates I decided this was a good time to move up to a set of elevated scale platforms. I had a good idea of what I wanted and wandered around the internet for a day or two looking for reasonably priced off the shelf scale platforms. The Pre-made units I found were not what I was looking for at all. They were a mix of expensive, poorly made or both with no roll off area or very expensive and bulky. The very expensive ones that had roll off areas had no provision for storage and were shorter than I had envisioned a set should be. This ruled out the clickety click credit card quick cure. Bulky was not going to work regardless of cost. I needed to be able to store the scale platforms in a small area of floor space when not in use.

Pencil and paper in hand and 43 revisions later I had a set of cut and build plans. After working up a materials list a call and visit was made to my metal mecca, Potomac steel in Springfield VA. $300 worth of 1/4 inch thick steel, each stick 20 feet long in various profiles hanging on the side of the truck and I was in business.

My shop is too small to be able to manipulate a 20 foot stick of steel and feed it through a standard metal cutting band saw so I lay the steel out on saw horses and bring a portable band saw to it. Using a small mechanics square held to the metal by a strong magnet and a carbide tipped scribe to mark makes it easy to get the measurements and lines relatively accurate. If you take some care this setup of saw and lines makes surprisingly straight reproducible cuts. Mark, check, cut, check the piece and move the rolling table to catch the next cut as it drops. Mark, cut, check, mark, cut, check, count cuts off the list, repeat until cuts list runs out.
 

Attachments

  • 1stand-cut-start.jpg
    1stand-cut-start.jpg
    87.5 KB · Views: 49
  • 2stand-cut-tools.jpg
    2stand-cut-tools.jpg
    75.5 KB · Views: 48
  • 3stand-cutting-finished.jpg
    3stand-cutting-finished.jpg
    79.9 KB · Views: 48
Last edited:
To avoid these ads, REGISTER NOW!
OP
V

Vicegrip

Well-known member
Joined
Mar 9, 2007
Messages
1,187
Location
NoVA.
The scales have a connector on the side and the needed hole in the stand frame was much easer to drill prior to the stand being welded together. A standard bimetal hole saw chucked up in a drill press works well on steel. Clear water was sprayed on the bit to cool the bit and base metal while cutting. This kept the bit from overheating and dulling the cutting edges. I prefer water or water based cutting fluid rather than oil for this type of cutting. It only takes 20 seconds or so to drill an 1 1/2 inch diameter hole in 1/4 steel and the bits often last well over 50 cuts when used in roll bar notching. Water also leaves no residue that must be removed prior to welding.

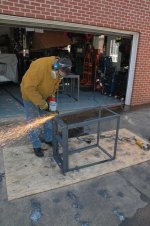
Once all the cuts were made and the parts checked for length the ends needed to be checked for trueness and then chamfered for the welds. For storage design reasons I intended to grind the exterior side welds flush but needed to be sure the joints were as strong as the base metal itself. The welds had to be full penetration and by cutting the mating surface corners back with a 45 deg angle this helped ensure good strong 100% depth welds. Big grinder pinned down on its back, everything shuttled outside, a full complement of personal protective equipment and sparks fly. By the way. The craft should be called Grinding not Welding. As with many crafts preparation is 90%.
 

Attachments

  • 4stand-drilling-hole.jpg
    4stand-drilling-hole.jpg
    54.7 KB · Views: 35
  • 5stand-weld-prep.jpg
    5stand-weld-prep.jpg
    80.5 KB · Views: 38
OP
V

Vicegrip

Well-known member
Joined
Mar 9, 2007
Messages
1,187
Location
NoVA.
Once the pieces were all edge prepped the next step was to jig the deck frame components true and square in all dimensions. After the component were clamped down, squared up and checked they were tack welded together. Once the tack welding was finished the dimensions were rechecked.

Welds need to be planned out and laid down in a careful order or they can cause the components to distort, go out of true and in the case of roll cages even distort the car chassis itself. The problem is that the base metal expands while being heated and the base and filler metal then contracts as it cools. This can pull carefully squared up components well out of position. By clamping things tight, tacking everything together and carefully skipping around while laying down the full welds you can reduce this unwanted effect.
By cutting a deep V in the edges being joined the welds bit deeply into the base metal but left less filler metal above the surface. All the filler metal that was proud of the base metal was to be ground flush later.

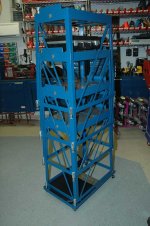
Once the deck frames were fully welded it was time for the legs to be jigged up and welded to the deck frames. I designed the stands to be able to be stacked one into the other like paper cups. In order to do this the legs needed to be at a slight outward angle. The base of each stand was laid out to be two inches larger than the top. This moves each leg out one inch in each outward direction. In order to get the legs and base tacked up true I lifted the top deck frame up one inch and propped the leg on a shelf. The deck was set and held true in relation to the table. The legs were then angled out one inch. A base section of 1 1/2 X 1/4 flat steel was clamped in place and everything was tacked in place.
 

Attachments

  • 10stand-inch-up-over.jpg
    10stand-inch-up-over.jpg
    32 KB · Views: 36
  • 9stand-legs-jig.jpg
    9stand-legs-jig.jpg
    69.1 KB · Views: 38
  • 8stand-weld-sample.jpg
    8stand-weld-sample.jpg
    51.6 KB · Views: 39
  • 7stand-welding.jpg
    7stand-welding.jpg
    53.4 KB · Views: 37
  • 6stand-weld-jig.jpg
    6stand-weld-jig.jpg
    66 KB · Views: 37
OP
V

Vicegrip

Well-known member
Joined
Mar 9, 2007
Messages
1,187
Location
NoVA.
The stand was rotated 90 deg and the process repeated. Once all four legs and base sections were tacked together the stand was set upright. The base was clamped square and the full welds laid down. After I made up two stands I tested the fit and stack depth. I wanted to be sure the plans were good and to see for sure where to weld the stops. I planned for stops to be made from 1/4-20 nuts welded inside each leg so the stands would nest but not jam tight together.

Once I got the stack depth for sure and was sure the design was going to work as planed I welded up the other two stands and a roller base made from leftovers and called it a night.

Back outside with the 9 inch grinder and the full complement of personal protective equipment it is time to grind the outside welds flush and round off the corners. Grinding spews burned metal and gritty dust everywhere. I can easily contain welding fumes in the shop via a cardboard hood connected to a vacuum that vents outside. I have not figured out how to contain grinding stink and debris and have to plan large grinds to be done outside. A good 15 min per stand and it is back inside the nice warm shop for some feet.

The stands must be level to each other and stable. I used some all thread connector nuts which look like long nuts and fully threaded 5/8 bolts for leveler feet. Each bolt had a slot cut in the threaded end and a Teflon chair foot slider epoxy bonded in place on the hex bolt end. The chair sliders are a super slippery trick I like to add to scale frames. I think they help remove suspension bind when the car is lowered onto the scales and when adjustments are made to the suspension.
The connector nuts are plated and the plating both interferes with the weld and the fumes can make you sick. I belt sanded the flats that were to accept the weld clean and clamped the nice clean nuts to the stands. Once trued up they were tacked up then welded full length to the stands.

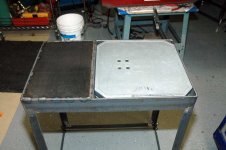
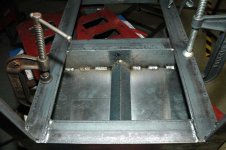
Now that the stand frames were welded up it was time to add the roll off area decking. I used some scrap 1/8 stainless steel with a center rib to reinforce the stainless. This was the time to check that the roll off deck and the scale pads were true to each other as well.
 

Attachments

  • 17stand-topside.jpg
    17stand-topside.jpg
    60.5 KB · Views: 37
  • 16stand-deck-weld.jpg
    16stand-deck-weld.jpg
    68.9 KB · Views: 33
  • 15stand-ajust-weld.jpg
    15stand-ajust-weld.jpg
    45.1 KB · Views: 33
  • 14stand-ajustable-leg-parts.jpg
    14stand-ajustable-leg-parts.jpg
    62.6 KB · Views: 35
  • 13stand-grinding-welds.jpg
    13stand-grinding-welds.jpg
    83.8 KB · Views: 35
  • 12stand-four.jpg
    12stand-four.jpg
    72.6 KB · Views: 31
  • 11stand-stack-test.jpg
    11stand-stack-test.jpg
    69.8 KB · Views: 32
Last edited:
To avoid these ads, REGISTER NOW!
OP
V

Vicegrip

Well-known member
Joined
Mar 9, 2007
Messages
1,187
Location
NoVA.
The stands were far stiffer than I expected but I planned to add triangles into the stands for added strength and stiffness so I already had the metal stock in hand. I used 3/4 X 1/8 steel stock for this. I bulk cut the stock and then finished them in blocks of eight.
Two long and two short lengths per stand and back to jigging, tacking and full welding.
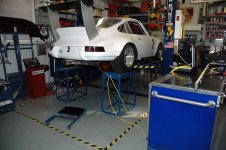
When the car is on the scales I keep the lift arms under the car just far enough below the car to prevent them from interfering with the work but still able to catch the car from falling to the floor. I did not want the car to roll too far one way or the other and fall off the stands. Some 1 1/2 X 1/4 was cut to size and welded in place for tire stops. Finally the welding, grinding and thinking was done.

After knocking off all the little weld splatter balls and some sanding here and there it was time to make them look all nice and purty like. I thinned out some regular Rustoleum paint so it would lay down and not leave a thick easily scuffed up film and painted them up.
The stand storage dolly also doubles as an under car scooter The stands are tall enough that I can now roll around and not have to slide under on my back anymore.
The stands are almost but not quite too heavy to stack alone. I can see myself using the lift to pick and place the top stand if I get old.
 

Attachments

  • 24stands-in-use-back.jpg
    24stands-in-use-back.jpg
    80.2 KB · Views: 61
  • 23stand-stacked.jpg
    23stand-stacked.jpg
    86.6 KB · Views: 45
  • 22stand-rollbase-scooter.jpg
    22stand-rollbase-scooter.jpg
    52.2 KB · Views: 40
  • 21stand-painted.jpg
    21stand-painted.jpg
    67.2 KB · Views: 41
  • 19stand-gusset-weld.jpg
    19stand-gusset-weld.jpg
    60.6 KB · Views: 34
  • 18stand-bulk-cut-gusset.jpg
    18stand-bulk-cut-gusset.jpg
    66.2 KB · Views: 176
  • 25stands-in-use2.jpg
    25stands-in-use2.jpg
    65.8 KB · Views: 45

RbrtAWhyt

Well-known member
Joined
Aug 25, 2008
Messages
5,154
Location
North East Georgia
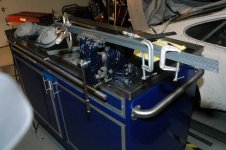
This workbench looks awesome. Did you make it yourself?

attachment.php
 
OP
V

Vicegrip

Well-known member
Joined
Mar 9, 2007
Messages
1,187
Location
NoVA.
Sort of. Took a Shure brand tall tool box that had no drawers I purchased for real cheap on craigs list and cut a section out. Welded the now shorter cabinet back onto the base and used some of the left over to make doors. added thick slab of plywood stack under the stainless top to firm it up and built a drop down wing table for more surface when needed. There is a build thread somewhere here on GJ
 
To avoid these ads, REGISTER NOW!
Top Bottom