To avoid these ads, REGISTER NOW!

EMERGENCY Compressor Help PLEASE!!!

OverkillYJ

Well-known member
Joined
Aug 7, 2013
Messages
262
Location
Harleysville, PA
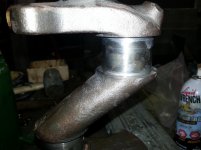
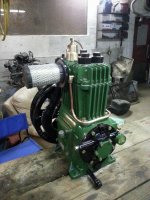
So my Quincy 310 ROC 22 built in 64 blew the crancase gasket at the cylinders and oil went all over. Instead of just ordering gasket I ordered a full tune up kit, and after taking it apart, I also ordered two suction valves. I have $300 in this now.

I just mounted it and it ran for a minute, but felt like it was struggling. It was going slow and harder to start than normal. I would stop it and turn it by hand and it would feel like it was freeing up, then turn it back on adjusting the oil pressure. I attributed it being slightly harder to turn to the fact that it had no lubrication. I figured once it ran for a few minutes it would break in. The high pressure cylinder seems fine, the low pressure one seems to be getting hot though. It does not seem to be getting lubrication (guessing).

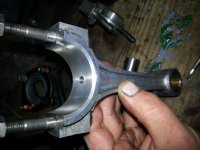
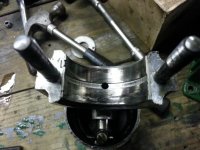
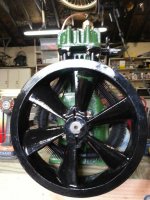
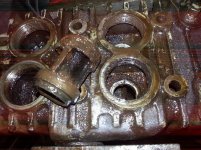
IT IS NOW RUNNING FOR SECONDS AT A TIME AND SLAMMING TO A STOP. I can free it up by hand, and it will turn again. I can feel warmth from the low pressure larger cylinder though, and the pulley is sticking to wear I need to turn it backwards before it will start turing over again. It is sticking. I cannot figure out why it is not getting lubrication. That is the only reason I can think of causing this problem. All of the orafices are free of debris and were properly aligned when reassembled. This was not a complicated thing to take apart and tune up (didnt until now anyway).

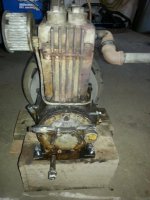
Thing is, this compressor is about 12ft up over a bathroom. I had to pay some guys to put it back up there for me after I put it back together. It is in a very tight space, but not yet piped to the compressor. I obviously wanted to make sure it was going to run ok first.

Where do I start in regards to troubleshooting? What is most likely the cause of this problem? Please help me figure this out. This thing controls my vehicle lift, and is now starting to cost me money. I cannot afford to go buy another 2 stage or I never would have bought the rebuild kit and spent the time one this one. Plus, this thing ran for 50 years and looked horrible when I took it apart. I doubt I would find anything of this quality for a reasonable price.

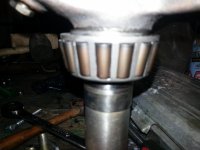
BTW, when turning it is properly sucking and blowing. I could take off the inspection plate to check the crank, but I went over it repeatedly before putting it back together, and it is now filled with oil. Also, the crank is turning the oil pump in the back of the crank case like it is supposed to and the high pressure cylinder appears to be fine.
 
Last edited:
To avoid these ads, REGISTER NOW!

AndyA

Well-known member
Joined
May 23, 2011
Messages
514
Location
Texas Near Dallas
Could you have possibly installed the gasket backwards and blocked an oil passage?

BTW, I know nothing about this particular compressor. I'm just taking a stab in the dark.
 

G_P

Well-known member
Joined
Jul 11, 2010
Messages
7,135
Location
Central CT
Sounds like you need to tear it back down and go over everything very carefully. Make sure no foreign debris got in there while it was apart.

Try removing just the pump instead of lowering the whole compressor back down 12'. Also if its mounted up high like that, get an automatic drain for it.
 

larry_g

Well-known member
Joined
Apr 28, 2007
Messages
16,874
Location
oregon
First thought to cross my mind is "did you put the check valve in backwards?" Second is " Is the crankcase vent working?" Is the CC vent the reason that the gasket blew in the first place? If this is a 3 phase unit is it turning the correct direction?

lg
no neat sig line
 
OP
O

OverkillYJ

Well-known member
Joined
Aug 7, 2013
Messages
262
Location
Harleysville, PA
At this point I am competent enough not to make rookie mistakes like gaskets and wrong assembly.

I ripped it apart on the tank and took it down. For some reason the low pressure cylinder piston race on the crankshaft was what seized. It looked perfectly fine, but when assembling it I was semi frustrated while getting the rings compressed and into the cylinders. I re-removed the piston rods from the crankcase and put the pistons in the cylinders on my bench before bolting the cylinders back onto the crankcase housing, and then bolting the rods to the crankshaft with little room to work in the housing because the cylinders were on. I am guessing a small piece of aluminum chipped into the race and screwed me. When separating the lower half of the piston rod I have been using a long punch to tap it off alternating sides after unbolting. Where it is is a real ***** to get to with any real tools. It was kinda hard to turn the crank after assembly was complete. Since it was not lubricated and has all new rings I figured once it cranked and the oil pump did its job it would be real easy to turn again. And lubricate itself. So apparently I was wrong and this suspected tiny shaved piece of aluminum did its damage.
There is another possibility though I am going to explore before making decisions. Leading up to this, I had to buy my own crankshaft seal since the one they sent which they insisted is the correct seal for the ROC22 version of this pump didn't fit. It was too narrow. The new races for both piston rods were the exact same part (Keep in mind different size cylinders). Now I am going to have the stamp at the end of crankshaft itself checked with Quincy to make sure that is correct and that they did not send me a race that was really close in size but not correct. If that is the scenario I will raise hell (only if needed) with the company I bought everything from to send me what I need to fix it.

So here is what I need help with now. I have never had to have the precision machine work done to repair a crankshaft that is out of spec. The rods are unscathed under the races, so I know I need new races, but not rods. The locations they connect to one the crankshaft still feel extremely smooth, and any imperfections I feel are minuscule. I am not sure if I should shell out the cash and take the crankshaft to a machine shop or not and pay them to measure it and tell me if it is still within spec. Once I get the races I can reassemble it in about an hour since the heads are done and everything else is now like new. It just a question mark on if I should roll the dice with the crankshaft.

The main crankshaft bearings were also squeaking when I ripped it back apart from the stresses of turning that bad race on the piston rod. The races for the crankshaft bearings are ok though, and the wear from the heat when the compressor was seizing didn’t seem to damage them too much. The piston to rod pin is a little beat now, but snug. I am thinking I will clean it all with fine brillo, and maybe a get away with running it again if the pin is crazy expensive.

When I took this thing apart though, it was the single toughest piece of equipment I have ever seen working fine. It looked destroyed internally and had about ½” layer of oil sludge in the bottom of the crankcase. Pieces of valves and all kinds of **** were destroyed and spit out the high pressure cylinder over the years, but I was able to clean it all up real good inside as well as out.

Here are pics of the parts after I just tore it back apart.

Any advice from some guys who have had to go through this process before would be great. The reason I took the time to write this is because this old Quincy 310 is hard to find detailed info about.
 

Attachments

  • 20140925_220301.jpg
    20140925_220301.jpg
    139.3 KB · Views: 53
  • 20140925_220702.jpg
    20140925_220702.jpg
    137.7 KB · Views: 41
  • 20140925_220623.jpg
    20140925_220623.jpg
    139.7 KB · Views: 44
  • 20140925_220610.jpg
    20140925_220610.jpg
    138.3 KB · Views: 46
  • 20140925_211920.jpg
    20140925_211920.jpg
    144.9 KB · Views: 50
  • 20140925_220307.jpg
    20140925_220307.jpg
    126.4 KB · Views: 47
  • 20140925_220252.jpg
    20140925_220252.jpg
    131.1 KB · Views: 50
OP
O

OverkillYJ

Well-known member
Joined
Aug 7, 2013
Messages
262
Location
Harleysville, PA
Here are some before and after pics of the work I have been doing on it. I took it down about 3 weeks ago and just got it back together. Since it has been running for 50 years already and is all heavy cast iron I figured it was worth the work. They don’t make them like this anymore. Once I get it running again I should never need to bother with the compressor itself again beside oil changes. Now just to figure out what I am going to do with the crankshaft.
 

Attachments

  • 20140924_201439.jpg
    20140924_201439.jpg
    147.4 KB · Views: 34
  • 20140924_154805.jpg
    20140924_154805.jpg
    145.8 KB · Views: 28
  • 20140916_134611.jpg
    20140916_134611.jpg
    142.4 KB · Views: 32
  • 20140909_170649.jpg
    20140909_170649.jpg
    152.5 KB · Views: 35
  • 20140904_141757.jpg
    20140904_141757.jpg
    144.2 KB · Views: 31
  • 20140904_140847.jpg
    20140904_140847.jpg
    142.1 KB · Views: 33
  • 20140924_154716.jpg
    20140924_154716.jpg
    148.4 KB · Views: 30
To avoid these ads, REGISTER NOW!

A_Pmech

Well-known member
Joined
May 8, 2007
Messages
8,002
Location
IL
The crankshaft can probably be polished by hand to an acceptable level.

Once you have a new set of bearing shells, test the fit with Plastigauge. If it's within specification in several locations around the journal, I'd run it.
 

AndyA

Well-known member
Joined
May 23, 2011
Messages
514
Location
Texas Near Dallas
The crankshaft can probably be polished by hand to an acceptable level.

Once you have a new set of bearing shells, test the fit with Plastigauge. If it's within specification in several locations around the journal, I'd run it.

+1.

From the pictures I couldn't really see damage caused by chips. It does look like there might be an step worn into it at the top in picture 2. Again, it's hard to tell what's really going on from the pictures.

The bushing on the small end of the rod might need a quick hone to remove any burrs. The picture shows a few marks there.
 
OP
O

OverkillYJ

Well-known member
Joined
Aug 7, 2013
Messages
262
Location
Harleysville, PA
Awesome. I have a dremel I just bought a couple months ago for polishing intake manifolds. It is what I used to clean up the valves and things on this compressor as well.

I will hit it with some 300 grit and call it done. Thanks for the help. I will post up what happens when I put it back together later this week or next.
 

OLEJOE

Member
Joined
Sep 28, 2014
Messages
14
Location
In my shop
Install bearing halves in rod off the crankshaft and measure the size with a mic. Measure crank journal to see if you have proper clearance. Also check for roundness or flat spots on crank journal.
 

Carla

MEMBER EMERITUS
Joined
Nov 27, 2010
Messages
672
Hmmm........'tune-up klit' included rings for the pistons?

Did you verify ring gaps, placing rings in the cylinder and 'squaring' them with the piston.

(I'd have to go find a Quincy manual to be certain, but I'd think you'd need .006-.008 min on the LP).....

Also.....cast iron or multi-oiece oil-ring?.....if the latter, having the thin individual top and bottom rings with their 'cage' accidentally mis-asembled, you could have a bind when the piston warms even a little.

Possibly damaged rings from the ring compressor slipping just a little as the rings entered the cylinder?

I've had that problem with the multi-piece oil-rings, with them wanting to 'spring out' just as the left the ring compressor. The cure was to bore a block of aluminium to piston diameter, facing one side at an accurate 90deg. to the bore, split it, and clamp up firmly on the rings.

Whatever it is, you really need to have the pump down again, and inspect everything.....that rod insert being scarred on one side is a clue.....mis-assembly, a chip or dirt....or something......look carefully, you will find it.

As has been mentioned, re-assemble the rod, and inspect for roundness, or rod mis-alignment.......even, worst case, the rod cap reversed.....some will be marked, some not, in which case you should mark before disassembly. Usually, the insert tangs should be on the same side, but someone before you may have mis-assembled and honed that rod bore, so 'play safe' and inspect for roundness......should be less than half a thou at the worst.

One thing I've always done when reconning any pump is to give it several hours of 'running-in time with the head off, then draining the oil used for run-in, and refilling with best quality compressor oil, before putting the head on and putting it back to work.

During run-in, I do check the unit for warming up normally....they will warm a bit just from ring friction in the bores, but not so much so that you can't put your hand on the crankcase......the idea is to have the rings and bearings 'settle-in' under a no-load condition, and 'smooth-out' before any load is applied.

Do let us know what you find.......

cheers

Carla
 
Last edited:
OP
O

OverkillYJ

Well-known member
Joined
Aug 7, 2013
Messages
262
Location
Harleysville, PA
After thinking about it and inspecting this thing to death I have decided to order new race inserts. I should have them by Monday. I just emailed the seller to give me a call.

The rod was not square with the crankshaft and piston. The reason I believe this to be the issue is because of the way it was rfe-assembled by hand. My father in law and I put it together by hand due to the different size cylinders and tapers. I asked him if I should double shack the one that failed and he had the attitude of having done a bunch of engine to where it was "fine". I did not feel like arguing with him or trust my gut. I called him out on it over the past weekend though.

He brought over an air brad nailer to install some carpet he had extra on my basement stairs and asked for an air line from the garage. First thing I said to him? "Hey Jim, remember that race I asked if we should double check? Well....". LOL

It was my equipment so I was the one responsible for it calling the final shots. Semi expensive, but very time consuming lesson well learned.
 
To avoid these ads, REGISTER NOW!
Top Bottom