To avoid these ads, REGISTER NOW!

Engine test stand completed

e-tek

Well-known member
Joined
Dec 19, 2007
Messages
10,690
Location
Saskatoon, SK
While I've posted this ENGINE TEST STAND in parts in different threads, I thought I'd post the finished stand in case someone wanted to build something similar. I've revamped the "console", adding a Momentary Toggle to engage the Starter, a toggle for power to the Distributor/Coil and one for testing chokes, etc. These stands sell for up to $1000.00. Mine cost about $50 in parts and some scrap. Now that I've built the "prototype", there's only one thing I'd do differently - which is, to make SLIDING arms to hold engine instead of welding them to the base (I made the rear legs sliding). Maybe I'll still do that. Thanks for looking!:beer:

img_1819.jpg


img_1824.jpg


img_1768.jpg


I built this EXHAUST SYSTEM, which ***** the exhaust out rather than passively allowing it out (under, or holes, in door), because whenever I've done that I've had a lot of exhaust still in the shop. This setup ***** it all out, plus much of the burning paint and oils from the rebuild!

img_1763.jpg


IMPORTANT NOTE: Much thanks to the boys on the GJ Board who offered tips, advise and suggestions for the build, the wiring and getting the engine started on the stand!! A couple more test and tunes and I'lll be able to insert the mill into the Challenger and not have to lean over my fresh fenders for hours doing it there!
 
Last edited:
To avoid these ads, REGISTER NOW!

mmg440

Well-known member
Joined
Oct 24, 2008
Messages
360
Location
Dixion, Missouri
So looks like you are ready to fire it up:thumbup: Manifolds don't look like they were heated up yet. Hope every thing goes good for you on your first firing and breaking in of the cam. Did you get the supplement from GM yet?? how much is that stuff I should get some for the future. I have many flat tappet cam engines I will someday be getting to.
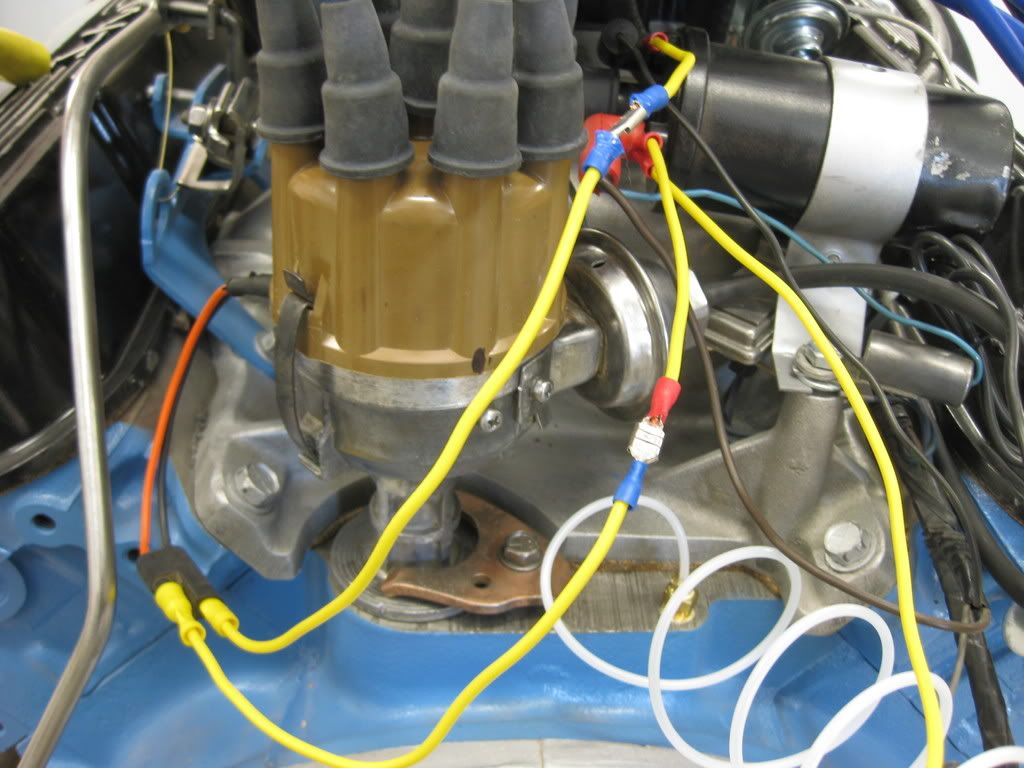
Saw yow over at hotrodders (I think you got most of your answers here anyway)

Oh by the way don't forget to put in your ****** fluid. Ideally on the old mopars you should have it in neutral for initial start up if your trans was rebuilt to so you get converter flow right away other wise the pump bushing can run dry. This may spin the output a little (with very little force) so you may not be able to move to park wile running because the pawl does not like going on when moving. Just put a drain pan back there to help prevent a mess if any fluid gets way back to the tail seal.
 
Last edited:

larry4406

Well-known member
Joined
Jan 27, 2006
Messages
19,089
Location
Northern Virginia
Also on the mopar ******'s, don't you need the drive shaft yoke engaged on the rear to provide a seal? I know when I have pulled automatics, I have had ATF dumped on me from this rear seal.
 

mmg440

Well-known member
Joined
Oct 24, 2008
Messages
360
Location
Dixion, Missouri
Also on the mopar ******'s, don't you need the drive shaft yoke engaged on the rear to provide a seal? I know when I have pulled automatics, I have had ATF dumped on me from this rear seal.

Problem is on a test stand it may want to spin being started in neutral. Really ideally just a cap that would not touch the spines. Used to call them **** plugs but some may not see that title appropriate. I think just a drain pan like I said would suffice. But something like http://www.pitstopusa.com/detail.aspx?ID=61500 would work better. If he has a yoke that is not on a drive shaft that would be ok but still might spin out on him. Do not put the drive shaft and let it free hang on a test stand. The risk of the unit being in gear or spinning in neutral is not worth it. Imagine the drive shaft unattached to anything in the rear flaying around at RPM banging onto everything around it, including the guy trying to get to the shutdown switch.
 
OP
E

e-tek

Well-known member
Joined
Dec 19, 2007
Messages
10,690
Location
Saskatoon, SK
Of course I got everything hooked up, added gas, cranked it over.....wouldn't ya know it - NO SPARK.....that's why I've been to the various sites looking around for info. Seems so basic..... NO SPARK - even from coil to distributor...I've got 12V to dist and coil, so I'll have to get a new coil and try it....engine ran when I removed it of course, so I thought all would be OK....

Here's a photo of the wiring I rigged up - maybe you see something I don't. (Red Pertronix to (+) Coil, Black Pertronix to (-) coil, 12V to coil(yellow coming from coil off camera).....

img_1830.jpg
 

AlanD

Well-known member
Joined
Aug 5, 2008
Messages
87
Location
Virginia Beach, VA
Got a good ground from the battery to the distributor? The pertronix needs that to operate. Guess how long I troubleshot a Ford 390 with a similar problem. :)
Al
 

mmg440

Well-known member
Joined
Oct 24, 2008
Messages
360
Location
Dixion, Missouri
Probably NOT your coil. If you were to put a test light or dwell meter on your neg side of the coil you can test to be sure. It should pulse when cranked. a test light would flash and a dwell meter should read some type of dwell.

Your connector looks like the basic electronic pick up connector used for many years. Are you sure you have a Pertronix in it. I it is a pickup only you would need a module to fire this. The distributor has a reluctor wheel in it an's a magnetic pickup. It needs a amplifier something like a msd 6a or similar. If I were you I would use the module you probably have mounted to your fire wall of the car. Unless you plan to run something else. A MSD or similar would hook up with very little hassle and no longer use the ballast resistor for your ignition.

I am afraid if that is the case you might of burnt the pickup coil in the dist with a direct short across it coil. I don't know the resistance spec if you have a ohm meter it should have continuity threw the leads out of you distributor. and a small voltage most likely milli volt) reading when cranking.


Can you pull off the cap and rotor and take use a photo of what is in your unit. :headscrat

If it is a magnetic pickup I am attaching a schematic on how to hook that up.
 

Attachments

  • mopar ig.JPG
    mopar ig.JPG
    45 KB · Views: 184

JDMopar

Well-known member
Joined
May 6, 2007
Messages
176
Location
Asheville,NC
The wires coming out of your distributor look like they are from a stock Mopar electronic ignition module. If that's the case, the motor isn't going to get any spark without the factory electronic ignition box being wired into the circuit. It won't work by giving it 12 volts. Be sure that the box gets a good ground if you install one, and do the same when everything gets put in the car. I used to have a bunch of mopar electronic ignition boxes I'd saved over the years, and got the big idea to test them. I unplugged the harness from the box on my 84 D350 and plugged the spare boxes into the harness and let them rest on the inner fender. They all appeared bad, so I tossed them. I found out later that they have to be grounded to the body......DUH-HUH! LOL. Good luck.:thumbup:
 
OP
E

e-tek

Well-known member
Joined
Dec 19, 2007
Messages
10,690
Location
Saskatoon, SK
Obviously :bowdown: you guys know your (crazy) Mopars! And you are right - it's NOT a Pertronix, now that you've described it! It's the stock reluctor wheel/pickup set up....of course not seeing points I thought "Pertronix" - like my 390 Ford...:wtf:

So now that you've mentioned the spark box on the firewall I could KICK myself! (Insert LIGHT BULB here!)

Oh well, back to the drawing board!!! It seems as though it might be hard to test this pig on an engine stand :( right? Unless I pull the spark box and ballast resistor off the firewall again...
 
Last edited:

sam 8

Well-known member
Joined
Jan 6, 2008
Messages
253
Location
Sierra Foothills, Nor. Calif.
Etek I know I'm late to the show, but the boys have it, I think.

Your stand is sweet. I am glad to see a mechanical oil pressure gauge, while the electric ones are sometimes okay, firing a fresh engine with one is a chance I will not take.
If I lose access to my local race engine shop, where they have a very nice dyno cell, I will build one following your pattern.
 

JDMopar

Well-known member
Joined
May 6, 2007
Messages
176
Location
Asheville,NC
Oh for craps sake:mad:!!!!!!!!!!Obviously :bowdown: you guys know your (crazy!!) Mopars!! And you are right - it's NOT a Pertronix, now that you've described it! It's the stock reluctor wheel/pickup set up....of course not seeing points I thought "Pertronix" - like my 390 Ford...:wtf:

So now that you've mentioned the spark box on the firewall I could KICK myself!!:mad: (HELLO!! Insert LIGHT BULB here!)

Oh well, back to the drawing board!!! It seems as though it might be hard to test this pig on an engine stand :)( boo-hoo) right? Unless I pull the spark box and ballast resistor off the firewall again...

And THANKS for not rubbing my face in it!!! Appreciate the knowledge and info - and the effort to attach the schematic - very cool.:beer:

You can buy a premade wiring harness from Mopar Performance for like $20 US, and a factory style box is about the same at a parts store. If you get that stuff to make your test stand work, it would be money well spent if it keeps you from scratching a fender, or leaving elbow dents in it. Also, the ignition box could be kept under the seat for a spare after you use it on the stand to test the engine. An ignition box and a spare ballast resistor are kept under the seat by most all of us long time Mopar guys....lol. Oh.....and I'll be needing some hush money to not go rat you out on Moparts....LOL :beer:
 

tatra

Well-known member
Joined
Dec 2, 2007
Messages
4,785
Location
pirate contest city
the spare parts thing makes good sense, especially the ballast resistor.........and now that the seed has been planted to buy an extra box, now you have the rationalization to buy the best for the project, so rip out the one on the car, fire that puppy up and install the nice shiny one when you get it on the car.............btw, what did you do to prelube the engine............made one doh!.....if we can help you from making another, that's what we're here for................:beer:
 

mmg440

Well-known member
Joined
Oct 24, 2008
Messages
360
Location
Dixion, Missouri
jdmopar's link looks a bit simpler to follow. then the schematic I took and cleaned up. :thumbup: Having the module body shown with the pinout's also will help keeping it straight for you. They are right about carrying spare parts. I always had a spare ballast. (not always a module though) A spare ballast you can just plug in on the side of the road if your ever fails. The ignition module needs to be GROUNDED for it to work and would not go out as often. I have purchased many a old mopar that already had a spare ballast in the glove box. That's just how it was. Kinda like a ford starter sol just a nice part to have a spare. and canbe a road side fix if you got on with you:)

E tek you have gotten this far so go ahead and get it wired up and see if you can get some spark out of the coil. Once you do go ahead and get it fired up and run it in!! :bounce:
Hopefully you don't need to replace your distubtor pickup now but it's better to find out before you get this sucker in the car anyway..
 

mmg440

Well-known member
Joined
Oct 24, 2008
Messages
360
Location
Dixion, Missouri
gotta love chrysler distributers tho..............either its in right or not...........

Yes and no on this one. If you put you oil pump drive in wrong you will not have you placement right on a the slot no matter witch way you put it. Engine still will work fine but you will never get number one were it's suppose to be on the cap. I have ran them this way many times for various reasons. Mechanically sound just doesn't follow the pics and diagrams.
 

tatra

Well-known member
Joined
Dec 2, 2007
Messages
4,785
Location
pirate contest city
i was assuming the gear was installed correctly and have expeienced this same scenario that i would prefer to forget..........let's just say buddy wasn't careful on his pump replacement once..............course he paid in beer that weekend...............:lol_hitti
 
OP
E

e-tek

Well-known member
Joined
Dec 19, 2007
Messages
10,690
Location
Saskatoon, SK
I got the book "Rebuild your Small Block Mopar" and followed the drive install to the letter - of course that means little!!! I'm hoping it's right - but just in case it isn't right (hedging my bets here ;)) what's the procedure for finding out and re-setting the wiring?

I spent all day in the shop yesterday, so now it's "Family Day" and I won't be in there today (&^$%^**!!):bounce: But the more info I get now, the more likely it'll be I can get it fired when I do get back to it (maybe one night this week if I'm lucky - God, I can't wait for retirement - 13 years and counting!!).

Thanks again boys!!

And JD - I also posted this at Cuda-Challenger disclosing all my shortcomings...but if you ant to keep it out of Moparts ;), I'll send you some "Canadian Only" Strawberry Shake Pop-Tarts - Mrs E-tek is a Kellogg's rep!:beer:
 
To avoid these ads, REGISTER NOW!

mmg440

Well-known member
Joined
Oct 24, 2008
Messages
360
Location
Dixion, Missouri
I got the book "Rebuild your Small Block Mopar" and followed the drive install to the letter - of course that means little!!! I'm hoping it's right - but just in case it isn't right (hedging my bets here ;)) what's the procedure for finding out and re-setting the wiring?

I spent all day in the shop yesterday, so now it's "Family Day" and I won't be in there today (&^$%^**!!):bounce: But the more info I get now, the more likely it'll be I can get it fired when I do get back to it (maybe one night this week if I'm lucky - God, I can't wait for retirement - 13 years and counting!!).

Thanks again boys!!

And JD - I also posted this at Cuda-Challenger disclosing all my shortcomings...but if you ant to keep it out of Moparts ;), I'll send you some "Canadian Only" Strawberry Shake Pop-Tarts - Mrs E-tek is a Kellogg's rep!:beer:


After you get spark at your coil wire. I would static time the engine. This is done by putting #1 cyl on tdc COMPRESION stroke. You can tell it is coming up on this because air is forced out the spark plug hole. Line up your timing marks about 10 degrees or so BTC. Then with a plug or spark tester on the coil wire rotate the distributor a little each way until it sparks the coil. Find the halfway point of both directions. Snug the dist bolt down. Now your distributor is in position for number one on the engine to fire. Pull your cap see were your rotor is pointed. If at #1 your all set. If somewhere else then you ether make the somewhere else #1 by redoing you plug wires to start at that spot for #1 or you pull the dist and oil pump drive and reposition until you get number 1 were you want it. When I started untaught years ago I did the first way of just moving plug wires plenty of times even on chevys and fords as well as imports I it drives others crazy to know its not were the book said to put it so I had started to put them were they are suppose to be for aesthetic reasons alone. Some motors you could run into issues if you cannot turn the distributor enough to achieve proper timing. The motor doesn't know the difference. along as you can use the timing light to re-check you timing after you are fine.
 
OP
E

e-tek

Well-known member
Joined
Dec 19, 2007
Messages
10,690
Location
Saskatoon, SK
Oh by the way don't forget to put in your ****** fluid. Ideally on the old mopars you should have it in neutral for initial start up if your trans was rebuilt to so you get converter flow right away other wise the pump bushing can run dry. This may spin the output a little (with very little force) so you may not be able to move to park wile running because the pawl does not like going on when moving. Just put a drain pan back there to help prevent a mess if any fluid gets way back to the tail seal.


I filled the converter to the max before slipping it back on, then topped up the ******, so it shouldn't take too much more should it? I didn't even consider the gear...I'll have to check that too.

Do not put the drive shaft and let it free hang on a test stand. The risk of the unit being in gear or spinning in neutral is not worth it. Imagine the drive shaft unattached to anything in the rear flaying around at RPM banging onto everything around it, including the guy trying to get to the shutdown switch.

I could see that happening :shocking: Luckily I hadn't thought of it!

I used to have a bunch of mopar electronic ignition boxes I'd saved over the years, and got the big idea to test them. I unplugged the harness from the box on my 84 D350 and plugged the spare boxes into the harness and let them rest on the inner fender. They all appeared bad, so I tossed them. I found out later that they have to be grounded to the body......DUH-HUH! LOL.

Now THAT *****! But I appreciate the story - it'll sear it into my mind that they need a good ground....

...and SAME for a Pertronix- which I REALLY DO HAVE in my 390FORD, as Al found out:

Got a good ground from the battery to the distributor? The pertronix needs that to operate. Guess how long I troubleshot a Ford 390 with a similar problem.
Al

Shows ya how much I know - I posted the Engine Test Stand to show off my skills, then ended up learning about MOPAR and Pertronix Ignition systems!!!:beer:
 
OP
E

e-tek

Well-known member
Joined
Dec 19, 2007
Messages
10,690
Location
Saskatoon, SK
Tonight I spent some time hooking up the ECU and BALLAST to the Engine test stand and wiring it all up.....and I GOT SPARK!!!! YEaaY!

But I didn't want to run it yet 'cause once it's going I'll need 30min to an hour to break it in and tune it, so I'll save it for Saturday.

Anyone start up a fresh Thermoquad before?? How much fuel to pour down the carb? The Thermoquad is friggin' HUGE...and very dry after the rebuild!!
 

Torque1st

MEMBER EMERITUS
Joined
Sep 14, 2008
Messages
5,668
Location
KC Metro, Kansas
An electric fuel pump will fill the carb before you fire it up. I like to let a carb soak for a while in the gas so that all of the dry seals and gaskets swell back up before trying to start the engine. Watch for gas keaking down into the engine tho.
 
OP
E

e-tek

Well-known member
Joined
Dec 19, 2007
Messages
10,690
Location
Saskatoon, SK
An electric fuel pump will fill the carb before you fire it up. I like to let a carb soak for a while in the gas so that all of the dry seals and gaskets swell back up before trying to start the engine. Watch for gas keaking down into the engine tho.

:headscratDo you let is soak on bench, or are you filling it with gas?
 

Torque1st

MEMBER EMERITUS
Joined
Sep 14, 2008
Messages
5,668
Location
KC Metro, Kansas
Depending on what I am doing I will soak a carb in a bucket of gas and then install it or just hook up an electric pump while it is on the engine. When the pump is powered up it will fill the carb with gas. Then I turn off the pump and let the carb soak for 30 minutes or so.
 

mmg440

Well-known member
Joined
Oct 24, 2008
Messages
360
Location
Dixion, Missouri
Tonight I spent some time hooking up the ECU and BALLAST to the Engine test stand and wiring it all up.....and I GOT SPARK!!!! YEaaY!

But I didn't want to run it yet 'cause once it's going I'll need 30min to an hour to break it in and tune it, so I'll save it for Saturday.

Anyone start up a fresh Thermoquad before?? How much fuel to pour down the carb? The Thermoquad is friggin' HUGE...and very dry after the rebuild!!


The twin float bowls do take some gas. The idea is to get enough fuel to make the initial start so you don't have to crank real long (provided you primed your oil system so the engine is ready for safe start.) here is a area were I do different things. Many times I just give a squirt of gas down the intake and run the engine off this to let the fuel pump prime it. With a good fuel pump they should fill pretty fast. However I think you stated you have a new cam. So what I would recommend is to fill the bowls up some first. You can fill the bowls threw the bowl vent tube. That is the large tube that comes up a about a inch in your air horn area. You would want I guess about 1/16th to 1/8th quart of gas. What would work good is a empty cleaned out gear lube bottle with the end ****** cut relatively small. Just slowly squirt fuel into the vent until when you pump the gas you can see some spray from the accelerator pump. I believe it will spray from the center of the primary throttle bores (small ones). At that point you should have enough fuel to start and run the motor.

As always starting a new motor know were your fire extinguisher is and that is good for a fuel fireand in working order! (just a note on a motor fire. If you do have a running engine fire for some reson, try and keep your cool and kill the power to the ignition so your intake won't **** a lot of the powder inside the motor from the fire extinguisher) Obviously if it is a big fire just put it out and forget about the motors safety and same the shop. I think it may be a bit more important with one of these Thermo Quads. They can perform and work great however they can also be fussy bastards and do sometimes make flames.

just for your a reference on the TQ
http://www.imperialclub.com/~imperialclub/Repair/Lit/Master/290/index.htm
 
Last edited:

JDMopar

Well-known member
Joined
May 6, 2007
Messages
176
Location
Asheville,NC
I use a squirt bottle also to fill the carb before startup. Down the vent tube works good, or rig up something temporarily to the carb where the gas line hooks up. But down the vent tube will be fine...really:) On a small block Mopar, your biggest potential for oil leaks are the oil filter adapter, the cam plug in the back of the block, and rear main seal. Those are the places for gushers...lol. Other spots to watch are the corners of the intake and front seal for smaller leaks if there are any. Canadian only Pop Tarts huh ? :drool::headscrat
 
OP
E

e-tek

Well-known member
Joined
Dec 19, 2007
Messages
10,690
Location
Saskatoon, SK
I posted this up at the other MOPE sites, but you've been a damn helpful bunch here, so here goes:

It was an exciting day to say the least!! I got the motor firing and actually running for a few seconds at a time....as long as I poured gas in of course! But then she would die. When I look down the carb primary and work the throttle lever I can see gas coming out the pump jets (mostly right side...I'll have to resoak and blow it out), but not as much as you'd think should come out and not enough to keep it running. Isn't there an idle circuit that should keep enough gas in the carb to run it?
As well, there's a wire that goes to the Bowl Vent - is it critical that that is powered? Is it a constant 12V? Is that part of my problem?
I'm going to go through the carb again and re-check all the adjustments you have to make to these, then try again. Anything elseyou can add would be great!

BTW, JD- I did have a leak at the filter adaptor - but found I had forgotten that gasket...hopefully the only one I forgot!!:headscrat Other than that no other leaks -so far!!!
 

mmg440

Well-known member
Joined
Oct 24, 2008
Messages
360
Location
Dixion, Missouri
It could easily be the carb. BTW I don't believe that wire needs to be hooked up. Maybe get a close up pic of it just to make sure it is what I am thinking and not something else.
How are you feeding fuel, a poor supply could also make a low bowl level causing problems? are you feeding threw the pump and is the pump working good. Somthing that is easy to test. Take the line off the carb and run it into a bottle or something and crank the motor over (with the igniton diabled no sparks)and see if it pumps a good volume. If it does then you could check pressure it should be about 5-10 psi for a old style mechanical fuel pump.
If your fuel supply is good then the next step would be to check your fuel in the carb. (I would put the top of and see if the body has fuel about 1/3 up. I most likely would do this on the motor but would highly recommend NOT to do like me. If you drop anything in the carb well it could end up in your motor so pull the thing off. If your bowls do not have much fuel in the you would have to recheck your floats and needle and seats for proper operation. I have seen the needles stick one in a while. The TQ is not the best DIY carb and they can be tricky, finicky and a real PITA. But still has it's place. good luck.


A little side note :)
I enjoyed threw the years the Carter Thermo Quads capability's and mystic.
However I found many a unit that I could not do a good rebuild on for one reason or another sometimes unseen and unfound reasons. Many store bought rebuilds were **** as well.
The over 1000 CFM capability always was a plus and Adjustable main metering rod height for fine tuning the main mixture was always a plus.

I have ran a few in the past. I had a 73 dart 340 and a 76 Cordoba 400 that cam stock with thermo quads. I put them on small block chevy in a 71 Chevy van hat I had a bored over 350 with a 700r4 and a 3800 stall converter in it. It was kinda fun ripping a set of tires off of it. Racing in that day (about 87 or so) the stock factory hot rods and them shakin there heads what the f-ck did this van just do?? Beat or run close with most on the street. I also had a 73 Buick century I took the quadra jet off of and adapter a thermoquad on to.

I still remember tunning the motor in the van. I had the dog house off and turned the metering rod screw while WOT down a open road till I felt the "sweet" spot. That I did the same with the dist timing. I went back and forth between the dist and metering rods until I could no longer feel any improvement this thing really liked the WOT at that point. After a little mishap with the van trying to climb a off road hill. I had the retire the old van and dropped this motor into a 78 jeep cj5. This thing was a scary ride. Under full throddle the front end was to light to steer and I would have to let off a bit to turn into the traffic on a freeway.

Well that was the good part of the memory lane of the thermo quad. I don't know were any of the pics are now but I had a 400 in the Cordoba burn (got the fire out but what a wiring mess it was) I like to blame that one on the lean burn and not the thermo quad. but the jeep did caught fire one and I remember putting the dart out at least once also.

So in a nut shell they can run like a bat out of hell. However they can be finicky bastards and cause a flame up in a heart beat. Some of them CANOT be rebuilt from warppage or just plain magic. If fuel injection pieces were not so available I would still consider one of these beasts. ,
Matt
 
Last edited:
OP
E

e-tek

Well-known member
Joined
Dec 19, 2007
Messages
10,690
Location
Saskatoon, SK
Hey Dave - ya, the stand is awesome. It's so much easier to figure it all out on a stand, with a switch vs in the car!!
I took the carb off and went through it again. Blew out all passages and adjusted the floats.The foam floats where way high, had to bend them down a fair bit. Also went through all the other adjsutments, re-checked the choke links and vaccuum pull-offs. All good. Put it back on and cranked it over - same thing. Fires hard, but only for one round off the distributor... As well, got lotsof Fuel pressure - sprays out hard.
Tomorrow I'm going to go through the electrical again. There's just so many damn connections from the ECU and balllast, maybe something's amiss there...
 

JDMopar

Well-known member
Joined
May 6, 2007
Messages
176
Location
Asheville,NC
If it keeps beating you up, let me know and I'll send you an old Mallory dual point I have. That would eliminate a lot of wires just to get it running and be able to check it out. Then you could swap the electronic back in when you get it in the car. I'll PM you my number:thumbup:
 

mmg440

Well-known member
Joined
Oct 24, 2008
Messages
360
Location
Dixion, Missouri
Did you end up static timing it yet? maybe the timing is way off?? just a thought. I think I posted how you could static time it earlier if not I can post somthing again. Sometimes it has to go a little more or less depending how the pickup responds with RPM but it should get you close. Just move a little each way before or after and try.

Just a thought.

Is your accelerator pump spraying better after you took care of your float leval??
 

rothsleep

New member
Joined
Jul 9, 2011
Messages
1
Hi folks! I'm posting this as a hello to the community and to let you all know that I am currently working on a refurbishment of :lol2:my two-car garage while doing a ground up "restomod" build of a 1960 Corvette. The engine test stand sounds like something I could really use, as I've had to spend much time and money getting my rebuilds to an automotive repair shop and pay "shop rates" to use their equipment. Will there be a material list for this build in the near future?
 
Last edited:

Kev442

Well-known member
Joined
Jan 15, 2009
Messages
5,386
Location
Wi
Some threads are worthy of resurrection, this is one of them.
Now, everyone think hard at E-tek until he gives us some more pics, dimensions and a parts list.:eyecrazy:
 
To avoid these ads, REGISTER NOW!
Top Bottom