To avoid these ads, REGISTER NOW!

Epoxy Bubbles - done by a "pro"

farrbar

Well-known member
Joined
Jul 28, 2007
Messages
148
Location
Chicagoland
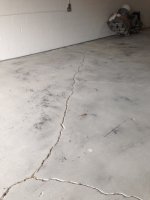
Two weeks ago I had the garage floor at my house epoxied. Went with a full flake system (base coat, lots of flakes, then a clear on top). I was very pleased with result.

So this past week, I had the same company come and do my workshop (will be primarily collector car storgae). They suggested a single stage product, which saved me 40%.

When they had done the work at my house they indicated that some bubbles may form, but that they should go away. Sure enough, I looked in the garage before I went to bed and saw 2 or 3 bubbles, which were gone in the morning.

They did a full diamond grind/

When they did my workshop it looked great as soon as they were done (and paid).... I waited 3 days before going back to walk on it or park a car on it.

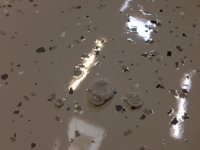
Much to my surprise, the dry floor has hundreds of bubbles.

I have done some searching of forums that indicate that this was gas escaping the concrete.

Interested in input on can/should the "pro" come back and fix this?

Anyone have this type of problem solved to satisfaction?

I was thinking they could sand the bubbles down (most have a hard raised ring around them), apply more epoxy, then perhaps clear the entire thing to make it blend better?

Appreciate feedback.
 

Attachments

  • floor grinder.JPG
    floor grinder.JPG
    98.1 KB · Views: 333
  • floor before.JPG
    floor before.JPG
    104.6 KB · Views: 306
  • floor after.JPG
    floor after.JPG
    88.1 KB · Views: 344
  • floor after closeup.JPG
    floor after closeup.JPG
    101.2 KB · Views: 382
  • floor i.JPG
    floor i.JPG
    67.1 KB · Views: 541
  • floor ii.JPG
    floor ii.JPG
    88.7 KB · Views: 404
To avoid these ads, REGISTER NOW!
OP
F

farrbar

Well-known member
Joined
Jul 28, 2007
Messages
148
Location
Chicagoland
Primer?


Sent from my iPhone using Tapatalk

They grinded the floor, took lunch to let the dust settle (although the vacuumed as they went), did another vacuum job, then mixed epoxy and applied flakes. So I don't believe there was a separate primer coat.

The product they used was in a Sherwin Williams bucket "General Polymers High Performance CR Epoxy GP3744"
 

jaye944

Banned
Joined
Nov 26, 2013
Messages
1,077
Location
GTA, Ontario, Canada
the guy's who've been here longer than me will be best placed to chime in.. but I'm not liking this paragraph

"When they had done the work at my house ]they indicated that some bubbles may form, but that they should go away. Sure enough, I looked in the garage before I went to bed and saw 2 or 3 bubbles, which were gone in the morning. "

From what I've read, bubbles can for, for several reason's

* being to energetic with the stirring of the epoxy
* high humidity
* incorrect rolling technique/rollers etc,
* There is a tool that apparently can get pop the bubbles, like a roller, but that NEEDS to be done, at the time, I think usually just as it's setting
* I've also heard something called out gassing? where gas escapes from the concrete

But thoes bubbles are pretty damn big

I don't know about the SW product, either way, they need to come back and fix it
 

shaun oriold1

Well-known member
Joined
Oct 9, 2011
Messages
288
Location
Burlington,Ontatio
You better get them back to fix that. Its ugly. Its not right, and as mentioned there could be a number of reasons for it forming. I'm confused though. They did your garage without problems? Then came back for your workshop ( separate building? above ground?) Was it in direct sunlight when they were coating? I'm guessing, no primer as mentioned (which isnt the end of the world) but either they mixed it too much, introducing air into the mixture. OR it got super hot, and its off gassing.

Your options are 3.... 1. Live with it, and ask for a hefty deal. 2. Get them to sand the floor and re-coat. You could get away with a cleat topcoat, and flake the ugly areas slightly heavier to conceal the,. 3. Cut each bubble out with a razor blade, and hope you can make it level with surrounding area.


I'm not sure what dust is going to settle.. They should be collecting it as they go, and blowing it out before coating... The dust is heavy, and its on the ground already. There is no lower place for it to settle....
 

thegarageguy

Well-known member
Joined
Oct 24, 2007
Messages
1,489
Location
NJ
no primer, and no top coat(s)...this is what happens when you take short cuts in our business....as a "pro", he should of never offer or have applied such a system
 
OP
F

farrbar

Well-known member
Joined
Jul 28, 2007
Messages
148
Location
Chicagoland
They are coming back out today, will be interesting to see if/how they can fix it.

To address of few of the questions/comments - This space is an industrial space a few miles from my house that I got to store my toys/projects and work. Will do some light work on my cars, along with detailing. Will also house memoribillia and other stuff that our house can't accomodate.

Given that this area will be low traffic (will mainly only use the cars kept here on weekends) - they offered the single step process to save a decent chunk of $, as compared to the full flake system they had done at my house (which has full topcoat). Interestingly, he claims they do the single step in hangars and car dealer service areas all the time.

Unfortunately I am out of town on business, so I will be relying on my wife for updates.

I appreciate the input from the forum.
 

BlackTalon

Well-known member
Joined
Aug 22, 2014
Messages
183
Location
Alexandria, VA
Don't let them off the hook until the coating system is repaired to your satisfaction. The lack of primer was likely the killer here.
 
OP
F

farrbar

Well-known member
Joined
Jul 28, 2007
Messages
148
Location
Chicagoland
After looking at it, they plan to abrade the surface and apply a second coat.

Pros - given the current status does this sound like the right plan?
 

BlackTalon

Well-known member
Joined
Aug 22, 2014
Messages
183
Location
Alexandria, VA
I think that is all you can do at this point. If the problem was caused by moisture in the slab blisters may form again; if that happens, you will likely need to have the coating removed (at lest locally) so the concrete surface can be sealed with an appropriate primer.
 

shaun oriold1

Well-known member
Joined
Oct 9, 2011
Messages
288
Location
Burlington,Ontatio
Sanding it, and recoating it is fine. Ask your wife to inspect it before coating. There should be no gloss, and no bubbles. They'll also need to wipe it clean with xylene ( Or similar) before coating. They'll maybe put some extra flake into it to conceal.

It *****, but nice to see they're standing behind it. Every pro has screwed up a floor at one point or another. They learn from mistakes, and wont do it again. Its not the end of the world - Just a hassle.
 

thegarageguy

Well-known member
Joined
Oct 24, 2007
Messages
1,489
Location
NJ
sanding and top coating with clear will not hide those craters in the pics. The only way to hide them is by pre-patching the craters, then applying a new pigmented coat and rebroadcasting, then re-sealing.

FYI, no pro that I know would offer a sprinkle broadcast like that or not prime, or not top coat. His "PRO" status is very questionable.
 
To avoid these ads, REGISTER NOW!
OP
F

farrbar

Well-known member
Joined
Jul 28, 2007
Messages
148
Location
Chicagoland
So I have not seen it in person.... But per my wife and owner of floor co, looks great, no bubbles and can't tell....

They sanded while floor, patched the little craters with base. Then cleared and flaked the whole thing.

Will post pics when I can. Not a wonderful experience, but seems like the owner did what he could (other than getting it right first time).
 

Swisstrax

Banned
Joined
Sep 30, 2014
Messages
14
Location
Indio, CA
I cant tell you how many times we hear this story when customers call in looking for a flooring solution!

I hope they got it correct this time and the floor lives up to your expectations.
 

James-W

Well-known member
Joined
Feb 3, 2013
Messages
12,432
Location
Southeastern Wisconsin
Obviously, it should have been done correctly the first time, but they are not just saying leaving you high and dry, they are doing something to try and resolve the problem. If nothing else, you have to give them good marks for at least trying to correct the problem.
 

ahkim

Active member
Joined
Apr 9, 2008
Messages
28
Location
Minneapolis, MN
I've got those little bubbles as well (shown in pic 4 of 6). Do you know what caused it? Glad to hear they are taking care of it. I just did Rocksolid and it's been a real PITA, I'm thinking I should've paid but it's too late now! Now back in the garage for me...
 

thegarageguy

Well-known member
Joined
Oct 24, 2007
Messages
1,489
Location
NJ
A bubble here or there is typical and normal. Remember we are working on an organic compound that is porous like a sponge, breathes, expands and contracts. Sometimes there are reactions from the ingredients of the resin material and the minerals in the concrete. It's not a perfect science. Don't ever expect your floor to come out flawless like a plastered and painted wall.
 
OP
F

farrbar

Well-known member
Joined
Jul 28, 2007
Messages
148
Location
Chicagoland
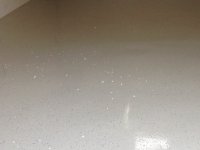
So the sanding and additional epoxy application was a huge help. There are no more bubbles. There are a few (perhaps 5) spots where they didn't totally sand down the hard ridge that had formed around the bubble - the result of this is a little ring under the epoxy, about the size of a nickel, however, the floor is smooth as they applied clear over the top, so it is stictly visual, and with the random flakes you would have to really be looking for this - I'm probably the only one who will ever notice it.

Overall, as pleased as I can be with the fix. I have attached a before (with lots of bubbles) and after of the same corner of the garage. As you can see, the bubbles are gone.
 

Attachments

  • bubbles b4.JPG
    bubbles b4.JPG
    94.1 KB · Views: 144
  • bubbles after.JPG
    bubbles after.JPG
    82.6 KB · Views: 150

shaun oriold1

Well-known member
Joined
Oct 9, 2011
Messages
288
Location
Burlington,Ontatio
Gotta give them credit, they seem to have done a good job of fixing the problem.

In addition to other reasons, this is one part of why a pro will price out higher then the true cost of epoxy. WE have to build a very small buffer into the price for f-ups. It might sound harsh, or unnecessary, but if you're not happy. We fix it! -opposed to mr. fly-by-night. who wont come back once you've paid him.

Every pro will have screwed up ( And will continue to - just less frequent) at some point, but its how you handle it which makes you a good company or not.
 
OP
F

farrbar

Well-known member
Joined
Jul 28, 2007
Messages
148
Location
Chicagoland
In addition to other reasons, this is one part of why a pro will price out higher then the true cost of epoxy. WE have to build a very small buffer into the price for f-ups. It might sound harsh, or unnecessary, but if you're not happy. We fix it! -opposed to mr. fly-by-night. who wont come back once you've paid him.

Every pro will have screwed up ( And will continue to - just less frequent) at some point, but its how you handle it which makes you a good company or not.

I agree... I'm an accountant. Part of a pro bid includes putting a couple $ into warranty reserves.
 

CHEBANSE

Well-known member
Joined
Feb 2, 2012
Messages
49
Location
Illinois
I had the same issue although I was not able to see what the installer did to solve. I believe my installer did not wait long enough for the self leveling compound to dry. He was in a hurry and had to travel about 60 miles so he did not want extra trips. I believe he sanded them down and added a drop of epoxy in the divot and coated with several layers of URESEAL. All the products used were from POLYGEM.

On an up note. It was repaired in the spring of 2013 and has held up well. Especially after a brutal winter in 2013/14.

I circled all the bad spots with a dry erase marker for the installer to fix.
 

Attachments

  • garage floor 007.jpg
    garage floor 007.jpg
    147.3 KB · Views: 38
  • garage floor 009.jpg
    garage floor 009.jpg
    145.1 KB · Views: 42
  • garage floor 005.jpg
    garage floor 005.jpg
    149.7 KB · Views: 38
Last edited:
To avoid these ads, REGISTER NOW!
Top Bottom