

windward
Well-known member
A few weeks ago I finished my epoxying my floor and have been slow to getting a write up done.
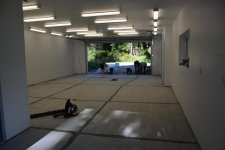
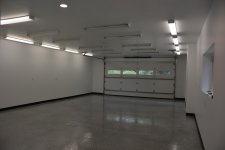
910 sq ft of new concrete (3 months old) with no sealer
Leading up to this project, profiling the floor is what probably gave me the most worry. I ground a few spots with my angle grinder and a diamond cup wheel (harbor freight). It worked, but I could not believe how much dust it put up. If using a diamond brush was anything like that cup wheel, I was going to have a mess and pissed off neighbors. I ended up finding a guy who would profile it with a dual head Enco for $0.40 sq ft. He had great vacuums and there was hardly any dust left when he was done. He also ground a small notch at the garage doors for me to run my epoxy to. To me it was worth it.
I ended up getting a gallon of HD-821 crack sealant from Legacy Industrial to fill my saw cuts. Scotty warned me that it may crack, but the crack would likely be a hairline, not a big gap that was always going to be full of sawdust. I could live with that. I filled the cuts with dry play sand from Home Depot leaving about 3/8" from the top. This limited the amount of sealant I would need. I wanted to put it in heavy and have it ground flush when the guy profiled the floor, but he was worried the sealant would gum up his heads, which it probably would have. It does not get rock hard, but still has some give to it. The one problem I did have was the stuff settled a bit. I am not sure if it was because of the sand, or if it is the nature of the stuff. So I cam back and put a second coat on. Scotty said that it would chemically bond if within 24 hours. After it cured I scrapped off some high spots with a carbide paint scraper. If you are not using flakes, or are doing for a thin broadcast, you will want to get the cracks filled all the way and grind it back down flush. The epoxy will not hide much, in fact, it probably highlights stuff.
I opted to go with the primer from Legacy. Not sure if it was needed, but I have always believed in primer coats, why would a floor be any different? It was also a good test run at mixing/laying out/spreading the epoxy. The primer has a pot life of about 45 min, so you have more time than you do with the epoxy. I advice anyone get a large squeegee. A notched one might have been nice, but I was fine with a 24" in squeegee from Menards.
My epoxy came from Epoxy-Coat. Seemed to be a good value for what you got. Lowes has better pricing, but when I called E-C said they could match the prices and include shipping. The base coat went down easy.
I knew that I wanted to go with a heavy broadcast of flakes, but I was always amazed at the prices($10 lb was common). I found that the company who make the chips, Torginal, is right in my back yard. They would not sell to me directly, but I was able to order them from Sherwin Williams and pick them up at the Torginal will call. SW charged me $2.25 lb when I ordered 50lb. They quoted me $3.00 lb if I only wanted to order 30lb. I think 50lb was about right for me. I would not have wanted to go lighter.
The clear coat went on just as easy as the base. Before you start the clear, I recommend blowing out all the loose flakes, as well as getting all the flakes that end up on garage door rails and everything else. You don't want that stuff falling into your clear coat when you go to shut your door. Speaking of, I just used a couple 2.5" drywall screws to hold the garage door up off the epoxy. This worked great. The clear does not go on as thick as one might expect. I was putting a top coat of urethane, so I was not too worried about it. If you have a heavy flake coat, you might want to consider getting extra clear to really fill everything in.
My clear coat went on in the morning so I wasn't too worried about cats and raccoons getting into the garage, so I did not put anything to cover the opening. Here is where Murphy's law stuck. My wife peeked in on progress and yelled that there was a chipmunk stuck in the middle of the floor. The clear had probably been down for 3-4 hours and was still tacky. The chipmunk could walk across the floor, but as soon as his tail hit that epoxy, it stuck fast. I doned on my spiked shoes, and heavy leather gloves. It was not a pretty picture. He left part of his tail there and I was forced to dispatch him. I then took a putty knife to get the furry bits out of my clear coat. I got most of it, but there was still some blood and a bit of fur. There was just a little bit of left over clear, so I mixed up a small batch rolled it down, threw down some flakes, then back rolled it some more. The next day I could see where the patch was so I sanded out the edges to blend it in with the rest of the floor. Advice - put some landscaping fabric or something to prevent critters from getting in.
Finally, I had 3 gallons of urethane and the anti-slip from Legacy because I have a glass garage door and wanted to prevent ambering as long as I could. The good thing is that it hid the sanding marks where I blended in the patch. The bad thing is urethane is difficult to get laid down properly. If I had to do it over I would have put it down thicker and used an 18" roller to back roll it. After 2.5 coats I can still see roller marks where some places look glossy and some are more matte. It really shows up because of the light coming in from the glass garage doors. Maybe down the road I will sand it and recoat, but for now I am ready to get moved in. This total build has taken me 12 months and I am wiped out.
Also, if you are using the anti-slip, don't try to get the last of the urethane from the bottom of the roller pan or you will probably get a lot of the anti-skid in one place. It is helpful to have someone keep stiring stuff to keep it from settling.
All in all, I am happy with the floor. It is not super difficult to do. Get organized, get some help with the mixing, and watch out for chipmunks!

910 sq ft of new concrete (3 months old) with no sealer
Leading up to this project, profiling the floor is what probably gave me the most worry. I ground a few spots with my angle grinder and a diamond cup wheel (harbor freight). It worked, but I could not believe how much dust it put up. If using a diamond brush was anything like that cup wheel, I was going to have a mess and pissed off neighbors. I ended up finding a guy who would profile it with a dual head Enco for $0.40 sq ft. He had great vacuums and there was hardly any dust left when he was done. He also ground a small notch at the garage doors for me to run my epoxy to. To me it was worth it.
I ended up getting a gallon of HD-821 crack sealant from Legacy Industrial to fill my saw cuts. Scotty warned me that it may crack, but the crack would likely be a hairline, not a big gap that was always going to be full of sawdust. I could live with that. I filled the cuts with dry play sand from Home Depot leaving about 3/8" from the top. This limited the amount of sealant I would need. I wanted to put it in heavy and have it ground flush when the guy profiled the floor, but he was worried the sealant would gum up his heads, which it probably would have. It does not get rock hard, but still has some give to it. The one problem I did have was the stuff settled a bit. I am not sure if it was because of the sand, or if it is the nature of the stuff. So I cam back and put a second coat on. Scotty said that it would chemically bond if within 24 hours. After it cured I scrapped off some high spots with a carbide paint scraper. If you are not using flakes, or are doing for a thin broadcast, you will want to get the cracks filled all the way and grind it back down flush. The epoxy will not hide much, in fact, it probably highlights stuff.
I opted to go with the primer from Legacy. Not sure if it was needed, but I have always believed in primer coats, why would a floor be any different? It was also a good test run at mixing/laying out/spreading the epoxy. The primer has a pot life of about 45 min, so you have more time than you do with the epoxy. I advice anyone get a large squeegee. A notched one might have been nice, but I was fine with a 24" in squeegee from Menards.
My epoxy came from Epoxy-Coat. Seemed to be a good value for what you got. Lowes has better pricing, but when I called E-C said they could match the prices and include shipping. The base coat went down easy.
I knew that I wanted to go with a heavy broadcast of flakes, but I was always amazed at the prices($10 lb was common). I found that the company who make the chips, Torginal, is right in my back yard. They would not sell to me directly, but I was able to order them from Sherwin Williams and pick them up at the Torginal will call. SW charged me $2.25 lb when I ordered 50lb. They quoted me $3.00 lb if I only wanted to order 30lb. I think 50lb was about right for me. I would not have wanted to go lighter.
The clear coat went on just as easy as the base. Before you start the clear, I recommend blowing out all the loose flakes, as well as getting all the flakes that end up on garage door rails and everything else. You don't want that stuff falling into your clear coat when you go to shut your door. Speaking of, I just used a couple 2.5" drywall screws to hold the garage door up off the epoxy. This worked great. The clear does not go on as thick as one might expect. I was putting a top coat of urethane, so I was not too worried about it. If you have a heavy flake coat, you might want to consider getting extra clear to really fill everything in.
My clear coat went on in the morning so I wasn't too worried about cats and raccoons getting into the garage, so I did not put anything to cover the opening. Here is where Murphy's law stuck. My wife peeked in on progress and yelled that there was a chipmunk stuck in the middle of the floor. The clear had probably been down for 3-4 hours and was still tacky. The chipmunk could walk across the floor, but as soon as his tail hit that epoxy, it stuck fast. I doned on my spiked shoes, and heavy leather gloves. It was not a pretty picture. He left part of his tail there and I was forced to dispatch him. I then took a putty knife to get the furry bits out of my clear coat. I got most of it, but there was still some blood and a bit of fur. There was just a little bit of left over clear, so I mixed up a small batch rolled it down, threw down some flakes, then back rolled it some more. The next day I could see where the patch was so I sanded out the edges to blend it in with the rest of the floor. Advice - put some landscaping fabric or something to prevent critters from getting in.
Finally, I had 3 gallons of urethane and the anti-slip from Legacy because I have a glass garage door and wanted to prevent ambering as long as I could. The good thing is that it hid the sanding marks where I blended in the patch. The bad thing is urethane is difficult to get laid down properly. If I had to do it over I would have put it down thicker and used an 18" roller to back roll it. After 2.5 coats I can still see roller marks where some places look glossy and some are more matte. It really shows up because of the light coming in from the glass garage doors. Maybe down the road I will sand it and recoat, but for now I am ready to get moved in. This total build has taken me 12 months and I am wiped out.
Also, if you are using the anti-slip, don't try to get the last of the urethane from the bottom of the roller pan or you will probably get a lot of the anti-skid in one place. It is helpful to have someone keep stiring stuff to keep it from settling.
All in all, I am happy with the floor. It is not super difficult to do. Get organized, get some help with the mixing, and watch out for chipmunks!


