steve392
Well-known member
I just put down Epoxy-Coat in my shop last week and wanted to let everyone know my experience with the product.
First off, this is the product from www.epoxy-coat.com, just so there is no mis-understanding what product I'm referring to.
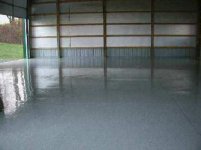
I learned about Epoxy Coat thru this board, and decided to go with it for my shop. I have a 24' x 32' shop with concrete floor that is one year old.
After talking to salesperson on phone, I ordered two kits.
Before I get into specifics, I would recommend this product highly, you just need to know about a few "quirks" in using this, or any epoxy product.
Kits:
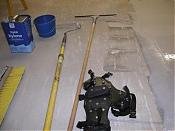
The kits were ordered on a Friday, and the following Tuesday I had two 6-gal buckets filled with all of the necessary stuff. Everything arrived in good shape with nothing missing. Parts included 2 gal's of "Part A" paint, 1 gal of "Part B" epoxy hardener, 1 qt. Muriatic Acid for etching, mixing paddle for electric drill, gloves, instructions, cut-in brush, color flakes, and anti-slip grit, and "squeegee".
I've read other comments regarding quality of mixer and squeegee, but the mixer worked fine for me on my drill, seemed to mix real well and didn't break. The squeegee was meant to be put on the end of a pole somehow (a couple of zip-ties were included, but that didn't work. In practice, I used the squeegee with my hand like a trowel and everything went well.
Kit contents and quality were OK, no complaints.
Acid Etching
This was probably the biggest problem that I encountered with the kit. The etch solution was not nearly enough to do the job. The 1 quart that was supplied was supposed to do 500 sq. ft. No way. I went by directions and mixed the acid with 4 quarts warm water and applied with a garden sprinkilig can. I had barely enough to cover and adequately wet the floor. Ended up going out to local hardware store and purchasing another gallon of acid. The store stuff worked a lot better. It seemed stronger that the acid supplied with the kit. Another important step was to neutralize the acid where it sat before rinsing off. This is mentioned in the instructions and I think was the right way to go. I sprinkled baking soda (get lots of it!) over the acid after it stopped working, then brushed it around before rinsing. Neautralized the acid on the spot, and I didn't have to worry about acid getting on driveway, shrubs, or into drains. Other than that, etching worked out well, and has been covered before on this board.
Mixing/Applying
Each kit is supposed to do 500 sq. ft. and it seems to hold up to that claim. I had just over 750 sq. ft. to do, but I decided to put it on thick and use all of the product to cover the floor. I had a total of 24 quarts of epoxy to use, and being that the shop floor is divided into 4 parts by the saw cuts, I decided to use 6 quarts of mixed epoxy for each section. I first combined the "Part A" containers together and mixed well to ensure a constant color throughout the application. I used some plastic mixing pails and marked the sides in 1 qt. increments. I went by the instructions and mixed up only 3 quarts at a time. At first, this seemed to be a small amount, but actually worked out well. It gave me enough time to apply, roll out and fleck each area without being rushed, thinking that the stuff was going to set-up in the pail.
Again, following directions, I poured out the epoxy directly onto the floor, used the squeegee to spread it around, and used the roller only to even out the surface. After a while, I developed quite a knack for using the squeegee, and was able to move and trowel out the epoxy to an even thickness. After I troweled out the epoxy, my wife used the roller and evened out the area. While she was doing that, I was busy mixing another batch of epoxy. This assembly-line procedure worked out well, and we were able to do the whole floor, start to finish in 3 hours.
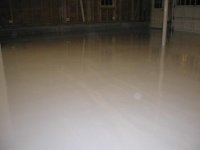
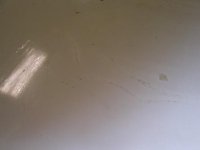
The one thing that I did not do as often as I should have, was to keep mixing up the "Part A" paint between each section of floor I did. I have a section or two of finished floor where I can see a slight shade difference in the color. I can only attribute this to the "Part A" starting to settle-out between mixes. It would have been better to re-mix the paint for each batch before adding the "Part B". Its barely noticeable, but I know its there. I ended up using all 6 gallons for the floor, and have a heavy coat. This probably would do the 1000 sq. ft as advertised.
Flecks
What can I say? Go for it! I ended up putting on the flecks after each 3 qt. section of epoxy I put down. It worked well for me to take very small amounts into my hand (this stuff goes far) and throwing it as high up in the air, hitting the ceiling sometimes, and letting it fall to the floor. Its just one of those things you need to try and come up with your own system. There were plenty of flakes supplied in the kit to do the job. They stuck real well, and leveled out with the paint.
Anti-Slip
I didn't use it. I wanted the ease of cleaning with a mop and besides, the flecks give a surprising amount of "roughness" anyway.
Curing/Cleanup
Cleanup was easy. I just threw everything away. The brushes are disposable as well as the roller covers. I did have a little of the paint and hardener left over, so I kept them in the original containers. If I need to do any touch up, I guess I could still mix up another small batch. I let the epoxy cure for 3 days before I walked on it and a full week before I moved everything back into the shop. The only thing I noticed was that there seemed to be a "film" on top of the cured epoxy that was still quite sticky even after a week. I washed down the floor with some diluted simple green, and that seemed to work. The floor is good to go, and I'm quite satisfied with the overall project.
Summary
1. Read the instructions and follow them. They work.
2. Get more acid for etching. Not enough supplied in kit to do a good job.
3. Neutralize acid with baking soda before rinsing off.
4. Pre-mix all of the "Part A" paint before starting, and mix again prior to making each batch.
5. Thoroughly mix hardener/ paint before application.
6. Change roller covers often if epoxy seems to be "setting-up" on roller.
7. Read the instructions and follow them. They work.
8. Do only small sections. This will give you plenty of time to squeege, roll out, and fleck.
9. Try not to overlap new epoxy section too much over previously applied section. Yes, you want to work to a wet edge just like in every kind of paint application, but if you overlap too much, the epoxy will be a lot thicker in that area, and it will be noticeable later on.
10. Give plenty of time to cure and use a mild cleaner if floor feels sticky after curing.
11. Read the instructions and follow them. They work.
Thats about it. I know this was an extremely long post, but I hope it was helpful to anyone wanting to use this product. Good luck with your painting!
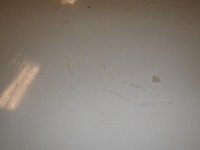
I've attached a picture of the finished job.
Steve
First off, this is the product from www.epoxy-coat.com, just so there is no mis-understanding what product I'm referring to.
I learned about Epoxy Coat thru this board, and decided to go with it for my shop. I have a 24' x 32' shop with concrete floor that is one year old.
After talking to salesperson on phone, I ordered two kits.
Before I get into specifics, I would recommend this product highly, you just need to know about a few "quirks" in using this, or any epoxy product.
Kits:
The kits were ordered on a Friday, and the following Tuesday I had two 6-gal buckets filled with all of the necessary stuff. Everything arrived in good shape with nothing missing. Parts included 2 gal's of "Part A" paint, 1 gal of "Part B" epoxy hardener, 1 qt. Muriatic Acid for etching, mixing paddle for electric drill, gloves, instructions, cut-in brush, color flakes, and anti-slip grit, and "squeegee".
I've read other comments regarding quality of mixer and squeegee, but the mixer worked fine for me on my drill, seemed to mix real well and didn't break. The squeegee was meant to be put on the end of a pole somehow (a couple of zip-ties were included, but that didn't work. In practice, I used the squeegee with my hand like a trowel and everything went well.
Kit contents and quality were OK, no complaints.
Acid Etching
This was probably the biggest problem that I encountered with the kit. The etch solution was not nearly enough to do the job. The 1 quart that was supplied was supposed to do 500 sq. ft. No way. I went by directions and mixed the acid with 4 quarts warm water and applied with a garden sprinkilig can. I had barely enough to cover and adequately wet the floor. Ended up going out to local hardware store and purchasing another gallon of acid. The store stuff worked a lot better. It seemed stronger that the acid supplied with the kit. Another important step was to neutralize the acid where it sat before rinsing off. This is mentioned in the instructions and I think was the right way to go. I sprinkled baking soda (get lots of it!) over the acid after it stopped working, then brushed it around before rinsing. Neautralized the acid on the spot, and I didn't have to worry about acid getting on driveway, shrubs, or into drains. Other than that, etching worked out well, and has been covered before on this board.
Mixing/Applying
Each kit is supposed to do 500 sq. ft. and it seems to hold up to that claim. I had just over 750 sq. ft. to do, but I decided to put it on thick and use all of the product to cover the floor. I had a total of 24 quarts of epoxy to use, and being that the shop floor is divided into 4 parts by the saw cuts, I decided to use 6 quarts of mixed epoxy for each section. I first combined the "Part A" containers together and mixed well to ensure a constant color throughout the application. I used some plastic mixing pails and marked the sides in 1 qt. increments. I went by the instructions and mixed up only 3 quarts at a time. At first, this seemed to be a small amount, but actually worked out well. It gave me enough time to apply, roll out and fleck each area without being rushed, thinking that the stuff was going to set-up in the pail.
Again, following directions, I poured out the epoxy directly onto the floor, used the squeegee to spread it around, and used the roller only to even out the surface. After a while, I developed quite a knack for using the squeegee, and was able to move and trowel out the epoxy to an even thickness. After I troweled out the epoxy, my wife used the roller and evened out the area. While she was doing that, I was busy mixing another batch of epoxy. This assembly-line procedure worked out well, and we were able to do the whole floor, start to finish in 3 hours.
The one thing that I did not do as often as I should have, was to keep mixing up the "Part A" paint between each section of floor I did. I have a section or two of finished floor where I can see a slight shade difference in the color. I can only attribute this to the "Part A" starting to settle-out between mixes. It would have been better to re-mix the paint for each batch before adding the "Part B". Its barely noticeable, but I know its there. I ended up using all 6 gallons for the floor, and have a heavy coat. This probably would do the 1000 sq. ft as advertised.
Flecks
What can I say? Go for it! I ended up putting on the flecks after each 3 qt. section of epoxy I put down. It worked well for me to take very small amounts into my hand (this stuff goes far) and throwing it as high up in the air, hitting the ceiling sometimes, and letting it fall to the floor. Its just one of those things you need to try and come up with your own system. There were plenty of flakes supplied in the kit to do the job. They stuck real well, and leveled out with the paint.
Anti-Slip
I didn't use it. I wanted the ease of cleaning with a mop and besides, the flecks give a surprising amount of "roughness" anyway.
Curing/Cleanup
Cleanup was easy. I just threw everything away. The brushes are disposable as well as the roller covers. I did have a little of the paint and hardener left over, so I kept them in the original containers. If I need to do any touch up, I guess I could still mix up another small batch. I let the epoxy cure for 3 days before I walked on it and a full week before I moved everything back into the shop. The only thing I noticed was that there seemed to be a "film" on top of the cured epoxy that was still quite sticky even after a week. I washed down the floor with some diluted simple green, and that seemed to work. The floor is good to go, and I'm quite satisfied with the overall project.
Summary
1. Read the instructions and follow them. They work.
2. Get more acid for etching. Not enough supplied in kit to do a good job.
3. Neutralize acid with baking soda before rinsing off.
4. Pre-mix all of the "Part A" paint before starting, and mix again prior to making each batch.
5. Thoroughly mix hardener/ paint before application.
6. Change roller covers often if epoxy seems to be "setting-up" on roller.
7. Read the instructions and follow them. They work.
8. Do only small sections. This will give you plenty of time to squeege, roll out, and fleck.
9. Try not to overlap new epoxy section too much over previously applied section. Yes, you want to work to a wet edge just like in every kind of paint application, but if you overlap too much, the epoxy will be a lot thicker in that area, and it will be noticeable later on.
10. Give plenty of time to cure and use a mild cleaner if floor feels sticky after curing.
11. Read the instructions and follow them. They work.
Thats about it. I know this was an extremely long post, but I hope it was helpful to anyone wanting to use this product. Good luck with your painting!
I've attached a picture of the finished job.
Steve
Attachments

Last edited: