So we applied epoxy coat to my single car garage yesterday. My house is a new construction property in Phoenix AZ. The house is about 20 months old.
The garage we worked on had only been used to store boxes, there has never been a car driven in there. The only thing we had to really cleanup was wood lacquer drips.
We started in the morning and removed all the lacquer drips and drops from the floor with a paint scraper. For some of the harder spots we used a drill with a wire wheel.
Then we mixed floor-prep into a pump sprayer and began the acid wash of the concrete. We finished the cleaning up by triple washing the concrete with baking soda and a thick brush broom
We then waited about 4/5 hours, it was really hot, and so the dry time was much faster for us. We even used a leaf blower to help speed the process.
We ran our hands over the concrete and checked for any kind of film. It was clear and ready for epoxy!
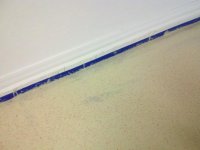
We then used blue painters tape to cover up the baseboards on all sides and divided the garage into two sections of 10x10.
We applied the epoxy to the back of the garage (first section) and followed the instructions/video guide and everything worked out just fine. We waited 10 minutes and then did the second back roll. Then we threw in the flakes.
Then we mixed the epoxy for the second section. Once again we followed the instructions and started to squeegee the epoxy and back roll.
Here is when we ran into our first problem: while we were doing the 10 min wait for the second back roll on the first section The roller hardened up on us due to the residue epoxy on the roller. We did not notice this issue until we started to roll the second section. The roller was just not effective in moving the epoxy like it did on the first section! We used the squeegee to move the epoxy over all areas of the second section as best as we could, but unfortunately we did not get it everywhere!
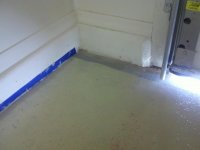
The areas of the garage closest to the garage door and sides have a very thin layer of epoxy now. We managed to roll it out to all parts by placing an old sock over the hardened roller. It helped a bit but obviously did not work as well!
The one other problem we had was where the first section met the second section. We peeled away the blue painters tape. Then we applied the second section and were trying to blend the two sections with the roller and squeegee but we ended up creating some thick double layers at some sections along the section edges. I should mention that garage floor has an incline from back to front that does help in making any fluids roll downhill.
One other thing I would call out to everyone is get the epoxy laid down before darkness. We ran into an issue real late in the game. It was dark out and the garage light was drawing in bugs, they started flying in and some ended up falling and getting stuck in the epoxy! We immediately shut off the light. Luckily we were pretty much all done and were just doing the final rolls near the garage door.
So the results are good and not so good. The back section of the garage (our first section) has turned out really nice! Really good coverage and a nice thick layer of epoxy everywhere!
The second section is nice too, but as we get closer to the door and near the edges on the side we have some spots that have an extremely thin layer of epoxy. We also some spots near where the two sections meet with double layers of epoxy.
But overall the floor does look great and product is fantastic! I have another two garage in my house that I will be doing the same process on! My buddy who was helping me loved how it came out as well. We are going to do his three garages as well soon!
Question: Can we apply another layer of epoxy coat directly over the existing one (with flakes on) so that we can cover up some of the thin spots near the garage door and sides?
I will post some photos, ASAP.
The garage we worked on had only been used to store boxes, there has never been a car driven in there. The only thing we had to really cleanup was wood lacquer drips.
We started in the morning and removed all the lacquer drips and drops from the floor with a paint scraper. For some of the harder spots we used a drill with a wire wheel.
Then we mixed floor-prep into a pump sprayer and began the acid wash of the concrete. We finished the cleaning up by triple washing the concrete with baking soda and a thick brush broom
We then waited about 4/5 hours, it was really hot, and so the dry time was much faster for us. We even used a leaf blower to help speed the process.
We ran our hands over the concrete and checked for any kind of film. It was clear and ready for epoxy!
We then used blue painters tape to cover up the baseboards on all sides and divided the garage into two sections of 10x10.
We applied the epoxy to the back of the garage (first section) and followed the instructions/video guide and everything worked out just fine. We waited 10 minutes and then did the second back roll. Then we threw in the flakes.
Then we mixed the epoxy for the second section. Once again we followed the instructions and started to squeegee the epoxy and back roll.
Here is when we ran into our first problem: while we were doing the 10 min wait for the second back roll on the first section The roller hardened up on us due to the residue epoxy on the roller. We did not notice this issue until we started to roll the second section. The roller was just not effective in moving the epoxy like it did on the first section! We used the squeegee to move the epoxy over all areas of the second section as best as we could, but unfortunately we did not get it everywhere!
The areas of the garage closest to the garage door and sides have a very thin layer of epoxy now. We managed to roll it out to all parts by placing an old sock over the hardened roller. It helped a bit but obviously did not work as well!
The one other problem we had was where the first section met the second section. We peeled away the blue painters tape. Then we applied the second section and were trying to blend the two sections with the roller and squeegee but we ended up creating some thick double layers at some sections along the section edges. I should mention that garage floor has an incline from back to front that does help in making any fluids roll downhill.
One other thing I would call out to everyone is get the epoxy laid down before darkness. We ran into an issue real late in the game. It was dark out and the garage light was drawing in bugs, they started flying in and some ended up falling and getting stuck in the epoxy! We immediately shut off the light. Luckily we were pretty much all done and were just doing the final rolls near the garage door.
So the results are good and not so good. The back section of the garage (our first section) has turned out really nice! Really good coverage and a nice thick layer of epoxy everywhere!
The second section is nice too, but as we get closer to the door and near the edges on the side we have some spots that have an extremely thin layer of epoxy. We also some spots near where the two sections meet with double layers of epoxy.
But overall the floor does look great and product is fantastic! I have another two garage in my house that I will be doing the same process on! My buddy who was helping me loved how it came out as well. We are going to do his three garages as well soon!
Question: Can we apply another layer of epoxy coat directly over the existing one (with flakes on) so that we can cover up some of the thin spots near the garage door and sides?
I will post some photos, ASAP.