ggcdad
Active member
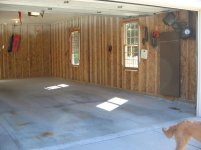
720 sq ft garage. Concrete was 8 years old.
2 full kits of beige Epoxy-coat (base and clear).
70 lbs of chips.
I did have a problem with one of the clear coat buckets opening up inside the 5 gallon bucket and causing a sticky mess when it arrived. Epoxy-coat sent a replacement and that one came the same way, so out shipped a third one. That one they taped the lids on, so it was fine. UPS must really be “drop” shipping these.
First let me say thank you to Christine and Epoxy-coat for their help with my various questions, in addition to being available for questions on the weekend, and shipping out replacement clear coats for the ones that opened in transit. Having that support, especially off hours, meant a lot!!!
And also a huge thanks to everyone on this board!! Without all the info and feedback on this board, this would have been a difficult project to do well.
Prep work:
1. Applied Epoxy-coat “patch” over the pitted areas between the garage door and the driveway.
Mixed it up and poured it on and then brushed it around. It was not trowel consistency for me as indicated. So it wanted to run down onto the driveway. And it dried slowly, so for a couple of hours, I kept brushing it back into the garage. I still had a bunch of overflow though which I ground off.
2. Ground the floor with an Edco 11” grinder with the diamond inserts (plastic wedges). This worked very well for me. Also rented the shop vac which was a must. The first vac blew a hole in the bag, so had to take that one back. A decent mask is required.
Spent about 8 hours on this.
3. Hand ground the patched area in the front of the garage with a Bosch hand held grinder and a diamond cupped wheel I picked up at Menards for $50. Hand ground the perimeter of the garage floor and entry step where the floor grinder could not reach. The handheld grinder with the diamond cupped wheel worked great.
4. Used the hand held grinder to chase (V out) the sawn expansion joints. After using the floor grinder, these saw joints had chipped and were pretty rough. This worked pretty well as long as you move in the correct direction.
5. Swept up all the concrete dust, blew the rest out, and power washed.
6. Applied Epoxy-coat floor prep solution, double rinsed and power washed.
7. Caulked the sawn expansion joints using SilkaFlex (Home Depot). Taped off the joints with blue painters taped, overfilled the cracks and used a plastic 1.5” or 2” putty knife to scrape off the excess.
After reading more posts after the fact, I think that going with a more solid product (i.e. Legacy Industrial, etc..) might be better in the longer term.
8. While waiting for the replacement clear coat to arrive, I took a closer look at the roughness of the concrete. And the front two bays where the cars park just didn’t seem that rough. So I picked up some muriatic acid at Home Depot and hit that area again. I really didn’t notice a whole of difference though, even though I used almost a 1 to 1 ratio.
Rinsed that area again twice and power washed it.
9. Waited for it to dry. Seemed to take forever. In the end I waited 9 or 10 days.
10. Torched (propane) the whole floor to get rid of the fiberglass strands that were in the concrete and surfaced after grinding and etching.
• Tried to micro fiber mop and wipe floor with denatured alcohol as some others had suggested, but that didn’t work for me. I couldn’t get the mop to slide on the floor at all. Guess it was rough enough.
• Mix both A's (4 gal) together in 5 gal bucket, and split into 4 buckets (1 gal each). Did this for both kits.
• Split both B's (2 gal) into 4 buckets (.5 gal each).
Base coat application (2.5 hours):
• Planned on starting at 2 PM, but was 3:30 PM by the time I was finally ready.
• Marked off garage into four sections (720 sq ft total)
• Followed instructions
Sect 1 – mix, pour onto floor, trim, squeegee, roll
Sect2 – mix, pour onto floor, trim, squeegee, roll
Go back and re-roll sect 1 and apply chips.
Re-roll sect 2 and apply chips.
Repeat with sections 3 and 4.
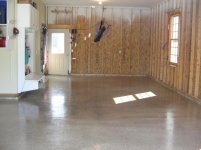
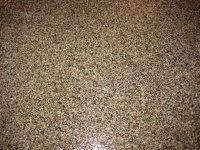
• I had 70 lbs of flakes which should have equated to a “heavy” coverage, but I had plenty of extra, so I decided to do a full coverage (to rejection).
• The next morning, I swept up all the extra flakes and blew out the remaining ones.
Then I used the backside of a topsoil rake to scrape the surface and knock down any flakes that were partially sticking up. Go back and forth on this and do two passes in perpendicular directions.
Blew out the remaining flakes.
Then vacuumed the floor to pick up more yet.
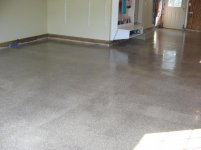
Clear coat application:
• Applied the same way as the base coat.
• I lightly sprinkled in the ant-slip grip anywhere where there could be water. I could have used less yet – use very lightly.
• I had problems with bubbles on the clear coat. I rolled 4 times on the first two sections and then used a leaf blower after that and had no bubbles in the end.
On sections 3 & 4 I only rolled twice and then used a leaf blower after that.
Bubbles just kept popping up. I think I should have re-rolled these sections once or twice more if possible. And I probably also waited too long to use the leaf blower on the last round of bubble popping.
And I think these last two sections were over mixed. I would mix on a low to med speed and not pull the mixer out of the epoxy so as to avoid pulling air down into the epoxy.
Overall it’s not too bad, but not perfect. Argggg
Be diligent on the bubbles.
• Last step was to roll down the plastic attached to the garage door.
• Sprayed another dose of Home Defense in front of the plastic to keep the bugs out. I did not have any major bugs or critters get in. Just a couple of flies and grass that I was able to dig out when applying.
Other Notes:
• I used Press n Seal to cover the buckets instead of buying lids.
• Use a timer to make sure you mix long enough. 3 min seems like a long time when mixing and I would have probably stopped sooner without the timer.
• Make sure you tape off the front of the garage where it meets the driveway (use duct tape). I forgot about this, and the epoxy flowed onto the driveway which I had to grind off.
• Using extra buckets worked well to make sure the proportions were correct – worth the extra $20.
• Buy exta rollers – 18”. I went through 5 or 6 rollers with the base coat and 4 or 5 rollers with the clear coat. They harden up fast. Temp was mid to upper 70’s.
• Have plenty of gloves. And I would suggest the thicker gloves. They all ripped, but the thicker ones lasted longer.
• I would use an electric drill. The 18 volt did not make it long before running out of juice.
• I got by with one 18” squeegee for the base and one for the clear coat. The larger rollers and squeegee’s were a huge help.
• Spiked shoes are not an option, they are a requirement. I used them for rolling, applying flakes, and working the bubbles out. As others have mentioned, tighten up the nuts, they loosen up and come off. Check them periodically. And adjust the straps ahead of time so they are tight or they will fall off.
• Buy extra chip brushes so you can use one for each section. Or in my case 2 / sect, as I had my Dad helping out.
• Have a pole for rolling and one for squeegee’ing so you don’t have to switch back and forth if you can.
• I liked the flake to rejection. I didn’t have to worry as much about getting an even spread, and I didn’t have to worry about bubbles as much. And I think it looks better as well and probably provides a tougher base. Though when doing this, a clear coat is probably a must.
Also, I had more time then I thought I would have when applying the epoxy and shouldn't have rushed as much and it would have turned out better yet.
2 full kits of beige Epoxy-coat (base and clear).
70 lbs of chips.
I did have a problem with one of the clear coat buckets opening up inside the 5 gallon bucket and causing a sticky mess when it arrived. Epoxy-coat sent a replacement and that one came the same way, so out shipped a third one. That one they taped the lids on, so it was fine. UPS must really be “drop” shipping these.
First let me say thank you to Christine and Epoxy-coat for their help with my various questions, in addition to being available for questions on the weekend, and shipping out replacement clear coats for the ones that opened in transit. Having that support, especially off hours, meant a lot!!!
And also a huge thanks to everyone on this board!! Without all the info and feedback on this board, this would have been a difficult project to do well.
Prep work:
1. Applied Epoxy-coat “patch” over the pitted areas between the garage door and the driveway.
Mixed it up and poured it on and then brushed it around. It was not trowel consistency for me as indicated. So it wanted to run down onto the driveway. And it dried slowly, so for a couple of hours, I kept brushing it back into the garage. I still had a bunch of overflow though which I ground off.
2. Ground the floor with an Edco 11” grinder with the diamond inserts (plastic wedges). This worked very well for me. Also rented the shop vac which was a must. The first vac blew a hole in the bag, so had to take that one back. A decent mask is required.
Spent about 8 hours on this.
3. Hand ground the patched area in the front of the garage with a Bosch hand held grinder and a diamond cupped wheel I picked up at Menards for $50. Hand ground the perimeter of the garage floor and entry step where the floor grinder could not reach. The handheld grinder with the diamond cupped wheel worked great.
4. Used the hand held grinder to chase (V out) the sawn expansion joints. After using the floor grinder, these saw joints had chipped and were pretty rough. This worked pretty well as long as you move in the correct direction.
5. Swept up all the concrete dust, blew the rest out, and power washed.
6. Applied Epoxy-coat floor prep solution, double rinsed and power washed.
7. Caulked the sawn expansion joints using SilkaFlex (Home Depot). Taped off the joints with blue painters taped, overfilled the cracks and used a plastic 1.5” or 2” putty knife to scrape off the excess.
After reading more posts after the fact, I think that going with a more solid product (i.e. Legacy Industrial, etc..) might be better in the longer term.
8. While waiting for the replacement clear coat to arrive, I took a closer look at the roughness of the concrete. And the front two bays where the cars park just didn’t seem that rough. So I picked up some muriatic acid at Home Depot and hit that area again. I really didn’t notice a whole of difference though, even though I used almost a 1 to 1 ratio.
Rinsed that area again twice and power washed it.
9. Waited for it to dry. Seemed to take forever. In the end I waited 9 or 10 days.
10. Torched (propane) the whole floor to get rid of the fiberglass strands that were in the concrete and surfaced after grinding and etching.
• Tried to micro fiber mop and wipe floor with denatured alcohol as some others had suggested, but that didn’t work for me. I couldn’t get the mop to slide on the floor at all. Guess it was rough enough.
• Mix both A's (4 gal) together in 5 gal bucket, and split into 4 buckets (1 gal each). Did this for both kits.
• Split both B's (2 gal) into 4 buckets (.5 gal each).
Base coat application (2.5 hours):
• Planned on starting at 2 PM, but was 3:30 PM by the time I was finally ready.
• Marked off garage into four sections (720 sq ft total)
• Followed instructions
Sect 1 – mix, pour onto floor, trim, squeegee, roll
Sect2 – mix, pour onto floor, trim, squeegee, roll
Go back and re-roll sect 1 and apply chips.
Re-roll sect 2 and apply chips.
Repeat with sections 3 and 4.
• I had 70 lbs of flakes which should have equated to a “heavy” coverage, but I had plenty of extra, so I decided to do a full coverage (to rejection).
• The next morning, I swept up all the extra flakes and blew out the remaining ones.
Then I used the backside of a topsoil rake to scrape the surface and knock down any flakes that were partially sticking up. Go back and forth on this and do two passes in perpendicular directions.
Blew out the remaining flakes.
Then vacuumed the floor to pick up more yet.
Clear coat application:
• Applied the same way as the base coat.
• I lightly sprinkled in the ant-slip grip anywhere where there could be water. I could have used less yet – use very lightly.
• I had problems with bubbles on the clear coat. I rolled 4 times on the first two sections and then used a leaf blower after that and had no bubbles in the end.
On sections 3 & 4 I only rolled twice and then used a leaf blower after that.
Bubbles just kept popping up. I think I should have re-rolled these sections once or twice more if possible. And I probably also waited too long to use the leaf blower on the last round of bubble popping.
And I think these last two sections were over mixed. I would mix on a low to med speed and not pull the mixer out of the epoxy so as to avoid pulling air down into the epoxy.
Overall it’s not too bad, but not perfect. Argggg
Be diligent on the bubbles.
• Last step was to roll down the plastic attached to the garage door.
• Sprayed another dose of Home Defense in front of the plastic to keep the bugs out. I did not have any major bugs or critters get in. Just a couple of flies and grass that I was able to dig out when applying.
Other Notes:
• I used Press n Seal to cover the buckets instead of buying lids.
• Use a timer to make sure you mix long enough. 3 min seems like a long time when mixing and I would have probably stopped sooner without the timer.
• Make sure you tape off the front of the garage where it meets the driveway (use duct tape). I forgot about this, and the epoxy flowed onto the driveway which I had to grind off.
• Using extra buckets worked well to make sure the proportions were correct – worth the extra $20.
• Buy exta rollers – 18”. I went through 5 or 6 rollers with the base coat and 4 or 5 rollers with the clear coat. They harden up fast. Temp was mid to upper 70’s.
• Have plenty of gloves. And I would suggest the thicker gloves. They all ripped, but the thicker ones lasted longer.
• I would use an electric drill. The 18 volt did not make it long before running out of juice.
• I got by with one 18” squeegee for the base and one for the clear coat. The larger rollers and squeegee’s were a huge help.
• Spiked shoes are not an option, they are a requirement. I used them for rolling, applying flakes, and working the bubbles out. As others have mentioned, tighten up the nuts, they loosen up and come off. Check them periodically. And adjust the straps ahead of time so they are tight or they will fall off.
• Buy extra chip brushes so you can use one for each section. Or in my case 2 / sect, as I had my Dad helping out.
• Have a pole for rolling and one for squeegee’ing so you don’t have to switch back and forth if you can.
• I liked the flake to rejection. I didn’t have to worry as much about getting an even spread, and I didn’t have to worry about bubbles as much. And I think it looks better as well and probably provides a tougher base. Though when doing this, a clear coat is probably a must.
Also, I had more time then I thought I would have when applying the epoxy and shouldn't have rushed as much and it would have turned out better yet.