To avoid these ads, REGISTER NOW!

Epoxy Floor Done!!! Please Help!

victor07

Active member
Joined
Jun 20, 2008
Messages
28
First I wanted to thank everyone for their thoughts, opinions and contributions. I actually learned alot about this whole epoxy process and procedure.

From what I learned here I decided to go with the Epoxy-Coat product.

Prep:

Keep in mind that my garage floor was not wet with any type of oil or grease.

1. I cleaned my garage floor with degreaser, scrubbed and rinsed. Then pressure washed.

2. Since I overdo everything, I decided to clean it again, scrubbed, rinsed and then pressure washed again.

3. Since I could not find a diamond grinder in my area, I decided to go with the Muriatic Acid washing. HD in my area sold a box with 2 - one gallon jugs of this stuff.

4. I mixed the muriatic acid at a ratio of 4 to 1 in a flower watering jug. Then poured the acid on the floor and scrubbed it. I let it sit for about 10 minutes and then rinsed. Poured baking soda to neutralize the acid, scrubbed, and then pressure washed.

5. After it dried, since I had another gallon of this stuff I decided to acid etch again just to make sure that I did not miss any areas. After I scrubbed, let it sit for 10 minutes I then rinsed it with a hose. Poured baking soda to neutralize the acid, scrubbed, and then pressure washed.

6. OK here I go again with the over doing, I cleaned the Da%$ floor again. Why! Since all I read was PREP! PREP! PREP! How could I go wrong cleaning it again? So, I cleaned it, scrubbed, rinsed it and then pressure washed it AGAIN!:shocking:

7.When my kit of Epoxy Coat came in, it contained their cleaner which was more muriatic acid. So what do I do, I decide to use this stuff. Then I rinsed and poured baking soda to neutralize the acid, scrubbed, then pressure washed one last time.

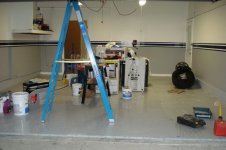
8. After letting it dry for 4 days, it was now time to lay the epoxy.

Installation:

1. First I used my compressor to blow any dust out of the garage.
2. I mixed part A & B according to the instructions.
3. Cut in the edges
4. Then proceded to pour and roll the epoxy.
5. Broadcasted some flakes.
6. Drank a beer and watched it dry.:beer:

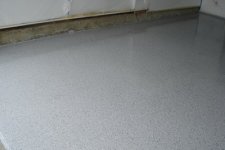
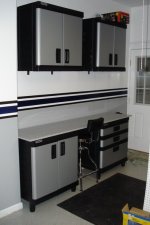
The floor is now dry and looks great. It is really, really glossy. It actually still looks wet.
I've read that people feel that all products need a top coat. So far my opinion is that Epoxy Coat does not need a top coat. The flakes actually lay flat into the epoxy. You will also not have to worry about the top coat yellowing since it does not have one.
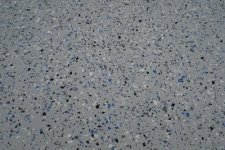
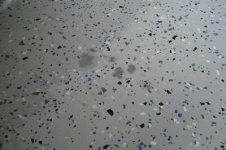
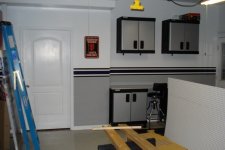
Now for the bad part! :headscratI have what we call in the auto painting business as "fish eyes". It seems that there was something on my floor that caused the epoxy to react.

I could be wrong, but I really don't know what happened. Please look at the pics and give me your feed back.

I want to make it clear, I feel that this problem was created by me somehow. The Epoxy looks great, I'm just not sure what the heck happened here. Did I prep too much? How can I fix this, if at all.

Any ideas would be highly appreciated.:lol_hitti
 

Attachments

  • Floor 00121.jpg
    Floor 00121.jpg
    30.6 KB · Views: 426
  • Floor 00131.jpg
    Floor 00131.jpg
    31.7 KB · Views: 344
  • Floor 00135.jpg
    Floor 00135.jpg
    26.3 KB · Views: 360
  • Floor 00138.jpg
    Floor 00138.jpg
    65.8 KB · Views: 567
  • Floor 00139.jpg
    Floor 00139.jpg
    33.7 KB · Views: 505
  • Floor 00140.jpg
    Floor 00140.jpg
    46.6 KB · Views: 750
  • Floor 00143.jpg
    Floor 00143.jpg
    26.7 KB · Views: 571
To avoid these ads, REGISTER NOW!

Moto

Well-known member
Joined
Dec 9, 2007
Messages
153
Maybe oil droplets from you compressor when you blew the dust out?
 

AlphaGarage

Well-known member
Joined
Apr 16, 2008
Messages
1,298
Location
Every Garage, AnyTown, USA
It does sound like oil/grease/silicon contamination.

Is t localized or all over the place?

Not that this caused the fisheyes, but it's seldom necessary too acid etch more than twice. If it bubbles and fizzes when it goes down, it's doing it's job. It's job is to open up the surface by reacting and dissolving the calcium, while leaving the other concrete components. The resulting pores gives the epoxy more surface area to chemically bond with and mechanically to adhere to.
 

thegarageguy

Well-known member
Joined
Oct 24, 2007
Messages
1,489
Location
NJ
Unfortunately you will have to wait and see if that area eventually fails. If you cant wait, then you must grind off that section, degrease it and reapply the epoxy. The chips will help hide the patched area.
 

Mlynch

Well-known member
Joined
Jun 10, 2008
Messages
181
Location
Fort Myers Florida
i have seen certain epoxies fisheye when applied too thin... it was an obscure problem we ran into a long while back that i never got a justifiable answer on. It was on a brand new overlayment so there was absolutely no contamination.
 
OP
V

victor07

Active member
Joined
Jun 20, 2008
Messages
28
Thanks for all of the feedback.

You might be right about the oil from the compressor, but I'm almost certain that it did not spit anything out.

As for waiting to see if it fails, what should I be looking for?

I actually acid etched 3 times. The first two times I used alot of acid. Since it came in one gallon jugs, I used both of the gallons mixed 4 to 1.

I'm going to find out how much it will cost to buy a repair kit from Epoxy-coat. That's if they sale it.

Once again thanks for all of the help and advise. If my floor didn't have these fish eyes, it would be perfect.

:thumbup:
 

Timm129

Active member
Joined
Apr 27, 2008
Messages
37
Very nice.... Thanks for the tips ... I'm curious .. you have cracks like my floor does how well did they cover???? Also do you think you can actually "hurt" the floor with too much acid??? Also did you grind/sand the crack filler that you used??? or did the epoxy stick to it
 
Last edited:
OP
V

victor07

Active member
Joined
Jun 20, 2008
Messages
28
I actually decided to use the 4 to 1 ratio acid mixture from reading on this post. I did try the 3 to 1 ratio but there were too many fumes.

As for the cracks, Epoxy Coat recommended using Acrylic Latex Caulking. You can barely notice them only in one area were I did not use as much product. The epoxy actually stuck really good in the area's were the caulking is. I did not sand or grind the caulking, I just applied it really evenly with a putty knife.

I still can not figure out how the "fish eyes" happened. As much as I cleaned, acid etched and pressure washed. I'm going to try and purchase a repair kit and fix it.

Other than the fish eyes, this stuff looks amazing.

Take care,
 

Fueler

Well-known member
Joined
Jun 22, 2006
Messages
1,620
Location
Urbana, IL
Another way to look at this. If this a garage where work is done, cars are moved in and out, etc. you may try ignoring it. No more than I see you won't notice them in a week or two. They will become part of the charm.
 
OP
V

victor07

Active member
Joined
Jun 20, 2008
Messages
28
Just a quick update. I contacted Epoxy Coat, and they state that the fish eyes are due to contamination.

On a good note, they are sending me additional epoxy to fill in the fish eyes. They state that the initial coat will act as a primer, all I will have to do it scuff it up and fill in the voids.

Pretty damn good customer service if you ask me. I'll let you know how it comes out.:thumbup:
 

3baysofplay

Active member
Joined
Mar 25, 2008
Messages
40
How many square feet is your garage, and how many kits did you use? Were you happy with the amount you bought and the coverage?
 
OP
V

victor07

Active member
Joined
Jun 20, 2008
Messages
28
My garage was 400 sq ft. I bought one standard kit.
Since the kit could cover 500 sq ft, I had more than enough. The only thing that I can say is to use equal amounts on all section.

I think that I might have used more in the back of the garage than in the front. I poured the product out of the bucket in two sections, but I think that I used way to much by the back door. Either way, it still looks like glass.


Good Luck and let me know how it goes.
 
OP
V

victor07

Active member
Joined
Jun 20, 2008
Messages
28
How's everyone doing? It's been 6 months since my last post and I wanted to give everyone an update.

As you may recall I had "fish eyes" in my epoxy floor. I called epoxy coat and they sent me a touch up kit. It consists of 3 quarts of product, a bucket, bruch and gloves. I really didn't expect all of this but their customer service was awesome.

I sanded the "fish eyed" areas and brushed in a little epoxy. Then I tossed on some flakes. You can not even find the repaired area's. Talking with people and epoxy coat, the fish eyes probably occured because I blow all of the dirt out of the garage with my air compressor, and as we all know, it some times has oils and moisture in the tank.

The epoxy coat is really holding up great. I would highly recommend this product. With the remaining epoxy that I had, I actually put it on my wooden bench top. It came out awesome as well.

If you guys have any question, please let me know.
 
To avoid these ads, REGISTER NOW!

Kevin54

MEMBER EMERITUS
Joined
Jan 12, 2005
Messages
29,341
Location
Urbana, Ohio
Any updated pics? And how well has it held up where you fixed the cracks. Also you don't give a location, but if you are in a snow area, how is that holding up with cleaning it?
 

Shocker

Well-known member
Joined
Nov 23, 2008
Messages
2,013
Location
Olympia, WA
Thanks for that update Vic! I am thinking of using this floor.

So, the flakes just lay right down eh? None sticking up or anything like that?

Mike
 
OP
V

victor07

Active member
Joined
Jun 20, 2008
Messages
28
I actually live in California, so the weather is usually nice.

The area's where I fixed the cracks looks as good as new. I park my truck in there and I've also used my floor jack in there consistantly. I will try and take a few new pics this weekend.

As for the flakes, they actually lay flush with the floor. I've read some posts where people are concerned that they will stick up. Believe me, they dont. The flakes basically embed into the epoxy.

When applying the flakes, make sure that you toss them up in the air away from you. They will find a spot and stick!

Keep me posted on how your garages come out. If you have any other question, let me know.

Take care
 
OP
V

victor07

Active member
Joined
Jun 20, 2008
Messages
28
Here are a few pics. Take a look at the workbench. I actually used the remaining epoxy on it.
 

Attachments

  • garage 00080.jpg
    garage 00080.jpg
    75.3 KB · Views: 228
  • DSC00867.jpg
    DSC00867.jpg
    63.5 KB · Views: 705
  • DSC00868.jpg
    DSC00868.jpg
    55.9 KB · Views: 222
  • DSC00869.jpg
    DSC00869.jpg
    51.5 KB · Views: 175
  • DSC04632.jpg
    DSC04632.jpg
    75.1 KB · Views: 263
  • DSC00872.jpg
    DSC00872.jpg
    61.1 KB · Views: 180
  • DSC00870.jpg
    DSC00870.jpg
    62.7 KB · Views: 180

Kevin54

MEMBER EMERITUS
Joined
Jan 12, 2005
Messages
29,341
Location
Urbana, Ohio
attachment.php


That actually turned out nice!!! Real nice as a matter of fact. That is the first time I've heard of someone doing that. What was the workbench top made of originally? Looking forward to seeing how it holds up. Great job all around :thumbup:
 

benjacobs

Well-known member
Joined
Sep 15, 2006
Messages
92
That actually turned out nice!!! Real nice as a matter of fact. That is the first time I've heard of someone doing that.

Same here. Very cool idea!
 

mpire

Well-known member
Joined
Nov 21, 2008
Messages
1,837
Location
Florida
I had the same problem with the fish eyes and all.

Took 10 coats to finally get right.

One coat of gel coat filler.
One coat of epoxy primer.
Two coats of epoxy.
Another coat of gel coat.
*Floor sanding to level*
Another 2 coats of epoxy.
Three coats of urethane sealer.

It was eventually blamed on the concrete being too COLD when the epoxy was applied.
 
OP
V

victor07

Active member
Joined
Jun 20, 2008
Messages
28
Sorry for repling back so late, I've been busy as He@* at work.

I actually used some redwood pieces of work that I was given. It's been about 3 months since I epoxied it and haven't had any problems, so far..:)

I've done some everyday work on it but not any banging yet. I will keep you guys posted.

As for my "fish eyes", after I sanded the spots and re-applied the expoxy, you can't even tell. It's been holding up great.

Post some pics of your guys work when complete.

Good luck
 

JohnS

Member
Joined
Jan 12, 2008
Messages
13
I work with a Southeastern General Contractor that has built a number of new auto dealers ( Ford , Dodge and Kia in 2008). A couple of general comments:

Degreasing an existing floor is more important than the acid etch. After the floor is degreased, we etch the floor one (1) time only. Clean the floor enough to get the job done, but do not overdue it with water. Remember, concrete is porous and will absorb some of the moisture necessary to etch the floor.

Allow enough drying time between cleaning and application. I would suggest 2-3 days minimum, longer if the temperature is less than 60 F. If the schedule allows, we try to get 4 days of drying.

Two coats are necessary for a durable job. We usually cut (thin) the first coat for better adhesion to the concrete. The top coat is full strength. I recommend Sherwin Williams products, but be sure to provide necessary ventilation when applying the epoxy. It is very strong and can make the installer ill in an enclosed space. Most new installations include an anti slip element. Sherwin Williams can provide aluminum oxide fines to be mixed into the top coat. These work very well and still allow the floor to be cleaned.
Some individuals use sand - I would not suggest this option - difficult to clean and can wear through the coating.

Good luck.
 

AlphaGarage

Well-known member
Joined
Apr 16, 2008
Messages
1,298
Location
Every Garage, AnyTown, USA
Please point out that application guidelines and performance features differ from product to product. As always it's best to refer to the manufacturer's or distributor's documentation for particular product application and use guidelines.

For example; Wolverine Coatings BondTite 1101 when used as a primer coat does not require a "bone dry" floor, there should be no standing water, and it shouldn't be wet to the touch, but the substrate can have the darker appearance characteristic of drying concrete and it will adhere fine.

Also we do not recommend that BT1101 be thinned in order to adhere better. It's carefully formulated and manufactured to provide maximum grip and performance at the proportions that it's supplied.

Although one shouldn't apply BT1101 in an enclosed area, it is a 100% solids epoxy with no added solvents that need to evaporate or outgas so typical open windows and doors will provide adequate ventilation.

Agreed, sand is not a good option. Besides being difficult to mop and clean it's relatively weak and will crumble under weight.
 
Last edited:

dlr944

New member
Joined
Apr 14, 2009
Messages
2
As for my "fish eyes", after I sanded the spots and re-applied the expoxy, you can't even tell. It's been holding up great.

Post some pics of your guys work when complete.

Good luck

Did you use a floor sander? What equipment did you use?

Thanks,
david
 

customcab

Well-known member
Joined
May 25, 2006
Messages
115
Location
Terra Hote, Indiana
Love the workbench top. I have been thinking about doing that myself in my garage addition. Can you share what your bench is made out of ? Sure looks great. :thumbup:
Phil


attachment.php


That actually turned out nice!!! Real nice as a matter of fact. That is the first time I've heard of someone doing that. What was the workbench top made of originally? Looking forward to seeing how it holds up. Great job all around :thumbup:
 
To avoid these ads, REGISTER NOW!
Top Bottom