To avoid these ads, REGISTER NOW!

Epoxy Floor Step by Step

RickP330

Well-known member
Joined
Apr 12, 2007
Messages
831
Location
Middle Island, NY
Hey Gang,
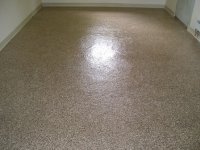
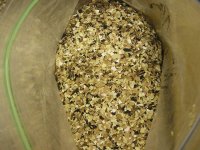
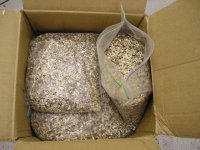
If you have been following my garage rebuild thread - you can see that I am finally up to getting the floor going. I have decided to use a clear epoxy system of 100% solids with a urethane top coat and flakes broadcast in to supply the color. I hope to have the project done in two weeks or so but lets see what happens.

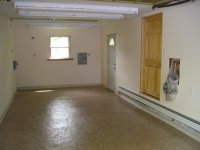
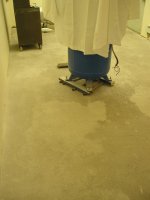
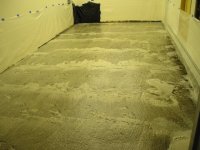
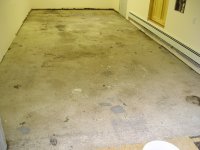
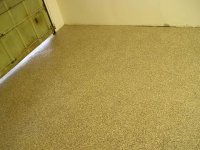
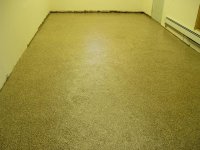
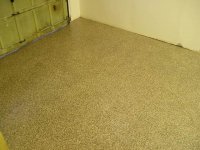
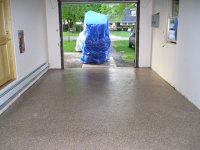
Here are some pics to start. I have just swept the floor at this point and have not done anything else. There is still allot of dust and debris that needs to be picked up. I plan on sweeping again and then getting the shop vac out before I break out the bucket and mop.

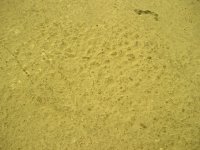
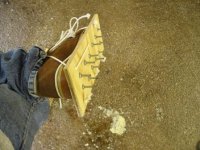
I plan on ordering materials tomorrow, degreasing and acid etching the floor as preperation. I have been torn between some mechanical preperation or not. There is a close up of my floor and you can see it is already pretty rough, like a rough trowel finish. I though of maybe renting one of those grinders, but to be honest with you I just can't take any more dust right now, and that is looking to be like a bear of a job. So the plan right now is just to float epoxy over it. However there are some high spots I need to knock down and some spilled stuff that has built up over the year. I am going to try getting the belt sander out for that and see how it does.
Rick
 

Attachments

  • RoughRED.JPG
    RoughRED.JPG
    72.5 KB · Views: 392
  • Wide2RED.JPG
    Wide2RED.JPG
    57.3 KB · Views: 286
  • Wide3RED.JPG
    Wide3RED.JPG
    61.5 KB · Views: 243
  • WideRED.JPG
    WideRED.JPG
    60.9 KB · Views: 283
To avoid these ads, REGISTER NOW!
OP
R

RickP330

Well-known member
Joined
Apr 12, 2007
Messages
831
Location
Middle Island, NY
Hello All,
Well this is more complicated then just going to the store and picking up an epoxy paint kit, that’s for sure. It turns out that I need to order my paint flakes separately as the paint manufacturer doesn’t carry paint flakes. With some help I found the manufacturer of paint flakes and they will sell direct. However, I decided that I wanted to use a “mix” of several different colors and in the qty I need for one floor it is not available. With some more help I did find an outlet that sold to me a pre mix of paint flakes in the qty I need.
So I ordered 80# of “Saddle tan” paint flake mix. Shipped to my door it was $294.00. So already it looks like this won’t be cheap. I also faxed my order to the paint manufacturer, but I didn’t get a total or call back for my payment info yet. I only just faxed it so I’m sure it will take a day or two. I’ll keep a running tally of how much I spent and do a price per square foot, although I’m sure I won’t break any records.
I’ll also need to pick up a gallon of degreaser from the Home Cheapo and Muriatic acid which I saw at Lowes. What I haven’t found yet is a cheap squeegee to help spread around the epoxy. I’m hoping I can find something at the Home depot.

Rick
 
OP
R

RickP330

Well-known member
Joined
Apr 12, 2007
Messages
831
Location
Middle Island, NY
Well I got a call back from the paint supplier. It looks like the paint package is going to run 695.89. This is really turning out to be alot more then I wanted to spend. But they say you get what you pay for so I sure hope it comes out great!
I also bought a bottle of Concrete cleaner / degreaser for $13.00. So far I'm up to 3.48 per square foot. Paint chips are due to arrive on Friday and Paint on Monday. So it looks like painting will begin weekend after next.
Rick
 

Hammerdown

Well-known member
Joined
Oct 28, 2005
Messages
596
Location
The Motor City
$13.00 for a degreaser? - what is this product? Is this a combination degreaser/etcher? I just usually use Tide or cascade for cleaning the floors of oils and soils. Keep us updated on the project. Good Luck.
 
OP
R

RickP330

Well-known member
Joined
Apr 12, 2007
Messages
831
Location
Middle Island, NY
I bought Behr "Concrete cleaner and degreaser" No. 990. I guess that is allot to spend for degreaser, but it says it makes 5 gallons. It is just a cleaner.
They had a similar product that was an "Cleaner etch and rust remover" No991 I think, but I want to use muriatic acid and mix it myself. That stuff seamed like it would be a little weak. You know, unless it has skull and crossbones on it it never works LOL.

Oh, I also did the plastic bag test. I taped down a large black garbage bag near one end of my garage for three days. It even rained one day and it came up dry as a bone. So I guess I'm good to go there.

Rick
 
OP
R

RickP330

Well-known member
Joined
Apr 12, 2007
Messages
831
Location
Middle Island, NY
Here is what 80# of paint flakes looks like. Got them last night, shipped DHL. I guess the shipping costs are really hitting me hard to, this was $42.00 to ship.
I expect the paint to be here early next week. Which should mean painting next weekend if the conditions are right. So I'll start prepping this weekend.
Regards,
Rick
 

Attachments

  • Chips2RED.JPG
    Chips2RED.JPG
    76.1 KB · Views: 187
  • ChipsRED.JPG
    ChipsRED.JPG
    65.5 KB · Views: 126
Last edited:

SteveL

Well-known member
Joined
Jan 14, 2005
Messages
760
Location
St. Louis, MO
Would you mind posting who you got the chips from?

I've talked to http://www.chipsunlimited.com/ and they seem to be reasonable and will mix and match whatever you want. They even sent me some small sample packets so I could get a better idea of how the colors worked together and the difference in sizes.
 
Last edited:
OP
R

RickP330

Well-known member
Joined
Apr 12, 2007
Messages
831
Location
Middle Island, NY
Would you mind posting who you got the chips from?

I've talked to http://www.chipsunlimited.com/ and they seem to be reasonable and will mix and match whatever you want. They even sent me some small sample packets so I could get a better idea of how the colors worked together and the difference in sizes.

Chips unlimited is the place to go unless you need smaller quantities. I believe they are the acutal manufacturer of the chips.
Rick
 
OP
R

RickP330

Well-known member
Joined
Apr 12, 2007
Messages
831
Location
Middle Island, NY
Well,
I got some work done this week. I have some pictures I’ll post later, but I made my own spiked shoes from plywood and a 2 dozen 10-24 x 1 ½” screws. I washed and swept the floor then I used degreaser to scrub it and rinse it down. I poured some right on the floor straight and scrubbed it in with a stiff bristled push broom. That worked well, but it took a lot to rinse clean. I rinsed it down and there was still enough on the floor to scrub it again. I did this three times last night.
The floor has 50 years of abuse on it so it is stained pretty well. After the second application you could see the soap rinsing off clean, so whatever is left will have to stay. I think it’s as clean as it’s going to get and there are no areas where the water is beading up so whatever is on the surface looks like it is going to stay there.
I’ll etch the concrete tonight and we will see what it looks like after that. The paint is scheduled to be delivered Friday afternoon. I want to put the primer coat down Friday night so I can work on it Saturday. I sure hope they don’t screw the delivery up.
The only thing I can’t seem to find are the mixing paddles. Apparently there are disposable drill operated paddles so I can mix the product and dispose of afterwards, but Home Depot, Lowes and Aboff’s doesn’t have them. Does anyone have any Ideas where I can get those?

Regards,
Rick
 
OP
R

RickP330

Well-known member
Joined
Apr 12, 2007
Messages
831
Location
Middle Island, NY
Hello all,
Last night I got to etch the floor. I am pretty happy with how it came out. Although it is stained pretty well from paint and stuff over the years, what is down there is sticking pretty good. I can’t scrape it up. The water I was rinsing the acid off with was coming off crystal clear when I was sweeping it dry and there are no oil slick looking areas. Plus the water was not beading up anywhere.
Even though I put plastic up over the walls I had to soak the floor down really good with the degreaser, rinsing, acid and rinsing. The bottom of the sheetrock got wet and it’s just recently finished, so I hope I didn’t ruin anything. I swept it dry and shop vacuumed it as dry as best I could. I’ll take some pics when I get home tonight.
Rick
 

duggie

Well-known member
Joined
Apr 24, 2007
Messages
100
Location
Sarnia, Ontario, Canada
Rick,

Just a quick comment - Make sure that the drywall dries out really, really, really well ... so you don't have mold growing in the future.

I too am about to embark on the garage floor finishing experience and I'm learning from you and others about how to do it properly the first time !!!

Thanks for the updates and keep them coming ....
 
OP
R

RickP330

Well-known member
Joined
Apr 12, 2007
Messages
831
Location
Middle Island, NY
Hello,
Here is a pic of the floor sudsed up with degreaser. I know not exciting, but all I have right now. I came home today and was really depressed because the floor did not dry that much at all! At this rate I will take several days to dry. I was planning on doing the painting this weekend and that is out unless i can get it dry.
I took my leaf blower and ran 3 tanks of gas through it trying to blow dry the floor. It worked some, but now my neighbors hate me LOL.
I wanted to put the primer on Tomorrow, but unless it is a real dry and HOT day I dosent' look like I will get to :sad:
RickP
 

Attachments

  • DegreaseRED.JPG
    DegreaseRED.JPG
    66.3 KB · Views: 275
OP
R

RickP330

Well-known member
Joined
Apr 12, 2007
Messages
831
Location
Middle Island, NY
Guys,
The weather doesn't look good. It's currently 65 degrees and 81% relative humidity. Gotta be over 60 degrees and 85%. It's a little too close to call. Looks like I am in a holding pattern untill the weather clears. I'm bummed - I have all my stuff scattered all over the place to make room in the garage and now it's just sitting :-(
Rick
 
To avoid these ads, REGISTER NOW!
OP
R

RickP330

Well-known member
Joined
Apr 12, 2007
Messages
831
Location
Middle Island, NY
We got started today! I have to say that this was one of the most stressfull things I have done in a long time LOL. I mixed the epoxy and when I poured it out on the floor and I ran out before I even got to the end. Even with the squeege I could not get total coverage (I don't know if you are supposed to). But once I cut it in and spread it the best I could I took out the roller and and rolled it around best I could. Looks like I got even coverage, but it took allot of work and was worried that it would set up on me and I wouldn't get it done. Turned out that I had pleanty of time once I got it out of the bucket.
In the pictures, the first one is after acid etching. And the second one is the goods I am using. The other two are shots after the primer coat was spread around. The last shots are of the "Shoes" I made so I could walk over spread areas with the roller. They seemed to have worked really well.
What do you guys think? I am really worried because the floor is so rough and so abused. There were no prior coatings, but the staining was pretty bad as you can see from the after etching pic. however, there were no large oil slicks I had to clean. Just two small spots the size of a basket ball. One was where I know I stored an old hydraulic jack that seemed to leak more oil then it held. The other from the car. But I spot cleaned them as best as I could first. The primer seemed to go over the areas really well, so we will see...
Rick
 

Attachments

  • EtchRED.JPG
    EtchRED.JPG
    65.4 KB · Views: 217
  • BaseCoat2RED.JPG
    BaseCoat2RED.JPG
    68 KB · Views: 215
  • BaseCoatRED.JPG
    BaseCoatRED.JPG
    66.2 KB · Views: 235
  • ShoeRED.JPG
    ShoeRED.JPG
    41 KB · Views: 335
Last edited:
OP
R

RickP330

Well-known member
Joined
Apr 12, 2007
Messages
831
Location
Middle Island, NY
Almost Done!!!

Okay,
I got the flakes broadcast into the first coat of epoxy. I then brushed away the excess and applied the second coat of epoxy over the flakes. I used nearly twice the epoxy over the flakes and it still was nearly not enough.

This is where the floor is now. I am waiting for it to set up and then I just have to clear over this. One coat I think is all that is required, but I have enough material to do two. I have no use for the material after I am done so I think I'll give it two coats. The clear should be much easier to apply, just roll it on like wall paint.

Rick
 

Attachments

  • Flake2RED.JPG
    Flake2RED.JPG
    66.8 KB · Views: 348
  • FlakeRED.JPG
    FlakeRED.JPG
    62.1 KB · Views: 318
OP
R

RickP330

Well-known member
Joined
Apr 12, 2007
Messages
831
Location
Middle Island, NY
Finished!!!

Hello All,

Well, first of all I owe a big round of thanks to "Floorguy" Don from our board here. I exhausted him with numerous questions and saved me from making a big mess of all of this. If you haven't checked out his thread on the truth about epoxies you should go over and check it out. There is allot of good stuff in there - and I can tell you from my experience that this guy knows what he is talking about. :thumbup: I met him here and you can tell from our locations we are on opposite sides of the country - I don't know him and I'm not putting a plug in for him. Everything he told me was spot on. He went out of his way to lend me a hand and that's what this board is all about. A big THANK YOU Don, if you ever find yourself on Long Island I owe you a nice dinner out.
:rocker:
So you can see from the pictures how it looks, this is after the last coat of clear was applied. In General I am pretty happy with it. I'm not sure that I couldn't have done a better job - I kind of short cut the preparation phase. I think with this type of floor you really need to either start with a really smooth floor or grind it smooth. I know if you start with a really smooth floor you need to rough it up though. Some of the really rough areas show through although this method did allot to hide mildly rough areas.

Also, I don't think I did a good enough job of knocking the flakes down after I applied them. I was too afraid to scrape the floor clean of chips. I shouldn't have worried though, because I learned that the epoxy is super tough, that wouldn't have been a problem. As a result the second coat of epoxy that went down was soaked up really well and I almost didn't get full coverage with the material I had. I also felt the coverage I got should have been a little better. I feel that knocking the flakes down better would have helped this. This was the same situation with the first clear coat too.

Additionally, all the hype of getting the material down before it set up only got me worked up over nothing. After I poured the material out of the bucket, the working time could have been measured in hours. For sure, a floor of this size is of no concern with regards to working time. I don’t know how bad leaving it in the bucket would have been, but I don’t imagine even a two car garage being much of a problem. Plus there was no problem with me putting down the flakes in a reasonable time after the first epoxy coat was applied. I think if it took me an hour and a half that was a lot, and I was in no worry of the epoxy coat setting on me. I also had no help – I did it all myself.

The material was top quality. Did you ever mix a good quality epoxy resin for fiberglass or something? You know that smell you get when it starts to kick over? Well – once it started to kick like 3 hours later my entire garage started to smell strong like that and I swear I saw the thermostat rise a few degrees above what I am accustom to seeing. These type of products (100% solids, non water based) are *********.

Lastly, this floor was expensive. I am pretty sure I broke the $3.50 / ft^2 mark. Now keep in mind that due to the packaging size I had to buy twice the primer I needed and twice the clear coat. Since I had it, I did use the second coat of clear, but probably didn’t need it, and even still had some waist I was sad to see go. But, I always wind up going overboard on my home improvement projects, so the price didn’t surprise me. I also like experimenting - learning about new products / procedures and that I did get a lot of.

With all this said I am reserving my impressions on the floor until I get some practical use out of it. I am still skeptical until I roll my air compressor across it and drive the car over it a few times. I mostly do light duty work, but will occasionally use my MIG welder or do some work there. We will see how well it maintains and I will report back here. Give me 3 or 4 months for a good impression of it. Please let me know how you liked my thread and don’t hesitate to ask me any questions. However I might just refer you to the source, Don, as he knows best!:lol_hitti
Regards
Rick
 

Attachments

  • Finished2RED.JPG
    Finished2RED.JPG
    63 KB · Views: 146
  • Finished3RED.JPG
    Finished3RED.JPG
    65.9 KB · Views: 160
  • Finished4RED.JPG
    Finished4RED.JPG
    58.3 KB · Views: 144
  • FinishedRED.JPG
    FinishedRED.JPG
    38.6 KB · Views: 361

Floorguy

Well-known member
Joined
Apr 14, 2007
Messages
132
Location
Austin, Texas
rick,

Thanks for the kuddo's. email me a large close-up picture of the finished floor if you would. I would like to see what it looks like. I would certainly invest in a welding blanket for your welding jobs so you don't mess up that great floor. Your compressor and car should be no problem.

Looks like you did a great job. Time will tell the whole story, but from what I can see, you did a pretty darn nice job.

Cheers:beer: :beer:

Don
[email protected]
 

spoulson

Member
Joined
Apr 4, 2007
Messages
13
It looks great! You seemed to have used a massive amount of chips. Most floors I've seen use solid color with flecks for accents. The chips you've used seem to also double as an anti-slip.
 
OP
R

RickP330

Well-known member
Joined
Apr 12, 2007
Messages
831
Location
Middle Island, NY
Yes,
The epoxy is clear coat and all the color comes from flake. It kind of has a rough texture wich should be great for a garage floor. Thanks for the complement.
Rick
 
OP
R

RickP330

Well-known member
Joined
Apr 12, 2007
Messages
831
Location
Middle Island, NY
Hello all,
I got some better pictures, seems with the florecent lights on the floor comes out looking wierd in the pics. Here it is with sunlight, more natrual color.
I got to look at it objectivly after the stress of the job was gone tonight and I'm really happy with it. If it holds up it should be killer.
Rick
:thumbup:
 

Attachments

  • Finished10RED.JPG
    Finished10RED.JPG
    66.3 KB · Views: 286
  • Finished11RED.JPG
    Finished11RED.JPG
    64.4 KB · Views: 291
OP
R

RickP330

Well-known member
Joined
Apr 12, 2007
Messages
831
Location
Middle Island, NY
Hey Guys,
Well more than a week has passed and after the stress of the job is totally gone my impression of the floor has increased substantually LOL. Here are some additional pictures and one after I moved back in some of my big stuff. Ohh, I also put up some wall base which makes it look a ton better.

I gotta say I LOVE this floor. I wish the crete were smoother, but there is really nothing I could do about that. The Epoxy is ROCK hard. I rolled my A/C in on 4 1" galvanized pipes and the floor just laughed at it. My tool box rolled like it was on ice - much better then it does on my blacktop. Plus it is super clean. We normally don't wear our shoes in the house and Now I can trot right out in the garage and work there in my socks too. Any dirt and a quick sweep and it's gone. So far stuff just won't stick to it. Grease wipes clean with a paper towel.

I'm starting to love my garage and spending time out there is getting better and better ;)

Rick
 

Attachments

  • Before2RED.JPG
    Before2RED.JPG
    72.3 KB · Views: 177
  • BeforeRED.JPG
    BeforeRED.JPG
    67 KB · Views: 164
  • CleavorRED.JPG
    CleavorRED.JPG
    63.1 KB · Views: 224

Richard Queen

New member
Joined
May 30, 2007
Messages
1
I just heard about the site from "Floorguy" Don when I called him out of the Austin yellow pages. I'm not surprised that he was so helpful and read his info with great interest.
Depending on my budget, I might hire Don. That is, if I decide on an epoxy floor, I will hire Don.
Rick, I really enjoyed reading your saga. I think your floor looks great. You should be proud of yourself. I've done a lot of diy things, but I'm going to leave this one to Don if I can afford it. I mean if my wife will agree.
The job I have is a challenge. The slab is from the 1930's, and the perimeter beam is compromised, so it leaks water from one side. I first have to fix that. It certainly has no vapor barrier, but Don has addressed that problem with the type of pre-coat he will use.
I've looked briefly into these flooring options: the V whatever floor tiles (about $4 sq. ft.), rubber flooring ($12 sq. ft.), and epoxy (about $5.75 sq. ft. acc. to Don, who hasn't yet seen the floor), and stain (which I have not yet priced). At this point, I prefer the epoxy. The pictures I've seen look great.
I wish I'd taken a photo of the shop before my son & I began emptying it.
I will take pictures tomorrow and show you the process. Perhaps you will see some of Don's work later.
 
OP
R

RickP330

Well-known member
Joined
Apr 12, 2007
Messages
831
Location
Middle Island, NY
Rich,
Please let us know how it turns out, regardless of who or what you eventually choose to use/do. Thanks for the complement. Basied on what it cost me, that price looks like a good deal.
Good luck
Rick
 

blueovalfan

New member
Joined
Jun 26, 2007
Messages
3
The floor looks great! I'm too ready to begin my gargage floor epoxy project and had a question(s) for you.

So far to date I have degressed with Home Depots degreaser, acid etched the floor and for good measure applied the good old mechianical diamond grinder to ensure a nice rough surface for the epoxy to bond to. The only reason why I did this was the floor was smooth as glass and the diamond grinder couldn't possible hit every little area on the floor.

I purchased a 100% solids epoxy from http://epoxy-coat.com/garage_paint_advantages.html I've been told from several folks including installers this is the best stuff money can buy. I hope this is true as I wouldn't know a hill of bean from this stuff.

My question is:
1) why did you appling a primer to the floor before the epoxy? Wouldn't this limit the epoxys ability to adhear to the concrete floor?

2) what type or clear urethane did you apply over epoxy? I was considering appling a coat of clear epoxy over my base color epoxy.

Let me know what you think! Thanks in adavance.
PHP:
 
Last edited:
OP
R

RickP330

Well-known member
Joined
Apr 12, 2007
Messages
831
Location
Middle Island, NY
Hello,
I used a "system" of paints. The Primer is clear (you can get it tinted / colored if you really want) and designed to adhear to prepared concrete. The epoxy top coats are also designed to adhear to the primer and provide the bulk of the protection / coverage. I suppose you could apply it directly to the concrete - but it is designed to work with the primer. The Urethane top coat provides UV resistance. So far I have been thoroghly enjoying the floor. I have been doing only light work (Alot of model airplane / helecopter work) but I have also done a few oil changes and such with regards to vehicles.
The floor is so easy to clean a quick whisk with a broom and I am often out there barefoot working on stuff - I would have never thought of doing that before. It is a total pleasure to work out there.
Hope you enjoy yours as much and just follow the manufactures requests. I would have never figured it out on my own.
You might want to find "Floorguys" post on the truth about epoxies. I got the bulk of my direction from him.
Regards,
Rick
 

V-10 Killer

Well-known member
Joined
Feb 11, 2007
Messages
1,011
Location
Midland, MI
Primers are usually a little thinner (either that or the self etching kind) if I remember, so they can penetrate a little deeper and still give an excellent bonding surface for epoxy. Epoxy is so thick, there'd probably be almost no penetration.
 
To avoid these ads, REGISTER NOW!
Top Bottom