Floor
Basic 2-car garage with 20” stem wall. (440sq ft = floor, 110sq ft wall)
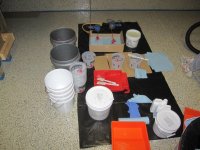
Purchased
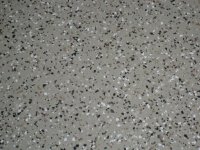
• 1.5 premium kits from Epoxy-Coat (Taupe with Beige Blend flakes)
• Additional 8 lbs of flakes in addition to the 1.75lbs included with the kit
• 1 set of spiked shoes, made a 2nd set for my wife to wear
• 20 small 2.5 quart pails (10 for color, 10 for clear)
• 8 medium pails for mixing floor paint. (4 for color, 4 for clear)
• 2 roller frames
• 4 roller covers (included with kit)
• 6 cheap spatulas
• 2 extra paint mixers for drill
• 12 plastic paint trays
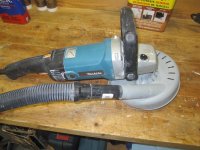
• Makita 9227CX3 7-Inch Hook and Loop Electronic Polisher-Sander
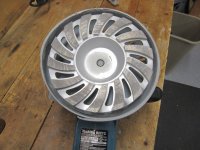
• 7" Super Twister Turbo Segmented Diamond Grinding Cup Wheel 5/8"-11 Threaded
• Dustless Technologies D1854 7-Inch Universal Dustie
• Dustless Technologies D5155 18-Inch DustBuddie Hose
• 4” diamond wheel for my angle grinder to cut a groove in the floor at the garage door.
The builder of my house put a sealer on the floor and I wasn’t comfortable with just going the acid wash route so I decided I would diamond grind it. Thinking this was a good excuse to buy myself a nice polisher-sander to use on the boat and cars I started down the hand grinding path. (Big mistake) I chose the polisher-sander instead of an angle grinder because I had read the angle grinder could get a little aggressive with gouging the floor. I was glad I did because even the polisher (3000 rpm) dug into the cement from time to time but never too much that the self-leveling epoxy didn’t cover it. I was about 5% into the grinding process when I knew this was a big mistake. If I didn’t have a sealer on the cement this probably would have not been as bad. It took me 18 hours to grind 440 sq. ft. If I was doing it again I would have put the $350 toward a walk behind rental, but hey I do have a nice polisher now as a conciliation prize.
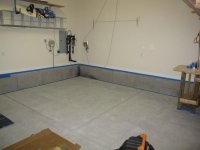
After 2 weeks of delay due to weather I was ready to start. The plan was to mix the ½ kit into 6 small batches pour into a paint tray and apply to the stem wall with a brush. I think my mixing ratio was 11oz & 22oz for a total of 33oz per batch. I first batched mixed the full and half kit part A together for color consistency. I had my wife helping me and this worked well. It took us about 20min to apply each batch of the base coat and after about 25-30min you could feel it starting to set up. Throwing the flakes at the wall wasn’t too bad but you waste a lot because only about ½ of them hit or stick to the wall. I was worried about the overall result as I have read many people talk about using fumed silica added to the epoxy for walls to prevent the epoxy from sagging but I went with Epoxy-Coat’s direction and just mixed small batches and applied with a brush. The walls have a lot of craters from air in the forms that I wasn’t about to try and fill in. I did get some runs when we loaded the craters with product and it slowly ran out but we just made sure we kept an eye on things as it was drying before the flakes were applied and we were able to clean up most of the runs. You obviously can’t get it on as thick as the floor and if you look REAL close you can see grey pin holes of the cement showing through in a few spots but between the flakes and the clear coat this was not an issue. I was surprised how much product we used. About 80% of the ½ kit was used which should cover up to 250 sq feet. My wall is only 110 sq. feet. I guess all the craters and the waste of what is left in each paint tray can account for this. After every section of wall we used a new paint tray as it was impossible to re-use the old tray with the residual product setting up in it. We were able to get through 1 or 2 sections before we had to replace our brushes. I made sure to put tape on the floor to catch any drips and make it easier to slop the paint all the way to the bottom edge without contaminating my newly grinded floor. Total time for the color coat on the wall was about 5 hours. I am glad I put the same product on the wall as it makes it nice and uniform. To make the wall perfect you probably would need to explore the fumed silica or use a product made for vertical surfaces but if you get on your knees and look at it in the light it is about 90% good otherwise it looks perfect from a few feet away more than satisfactory for me.
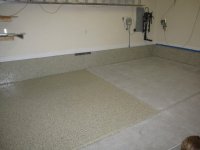
Then moved on to painting the floor. Not much to report here as it went fairly smoothly as others have already reported. Definitely must have spike shoes for at least 2 people. Attach squeegee and roller to extension polls. Vacuum up flakes that do not land in paint before moving on to next section. My garage is divided into 4 sections. I decided to not fill in the expansion joints as they are fairly large and I was worried about issues with the paint cracking under the movement over time and personally I did not feel it was necessary given it is still a garage at the end of the day.
The next day was the clear coat. I don’t know if this is normal but it was much thinner and easier to apply. Each section of wall was applied in half the time. This in part might be because we were not painting bare cement but the product was easier to work with. It poured out of the bucket easily and did not have to be scraped. Aluminum Oxide (Non-slip)…. To apply or not to apply… This was a big question for me. If I was not doing a top coat then definitely would not apply. If the wife ever fell when the floor got wet I would never hear the end of it, or if I fell I would never hear her stop telling the story laughing. So I decided to put some down on top of the clear coat. I used about 6 tablespoons over 440 sq. feet. A little heavier at the bottom of the stairs and in the walkway. This was more than enough, I probably could have used 4 or 5 tablespoons but in the end I was glad I did because after that clear coat it is like walking on glass and would have been very dangerous when wet.
Oh, a word on the spatulas. We had lines drawn on 2 of the small measuring buckets and used them for measuring our product. We then used the spatulas to scrape the product out into another bucket where it was mixed. After mixing we dumped out the product on to the floor or the paint tray but did not use the spatulas to scrape the edges as I was worried about getting some un-mixed product onto the floor. I also used a new mixing bucket for each batch as I didn’t want to take any chances after coming this far.
Other thoughts and tips
• Remove any tape while the epoxy is still wet
• Use 2 drills each with its own mixer. One for mixing part A and B together and the other for routinely mixing part A by itself
• Cover your drills in painters tape
• I laid some canvas drop cloths on the driveway to help stop any blowing debris from coming into the garage
• I used an angle grinder and cut a line 1” in from my door to serve as a stopping point for the epoxy. Then put duct tape on the outside of this groove. It made a nice clean edge and helps add strength to the leading edge of your epoxy.
• Use a timer to know how long to mix
• Use a shallow cardboard box to set mixers & brushes in this keeps the dripping epoxy contained.
• I made my wife’s spiked shoes with drywall screws and hit the tips with a grinder; man did they make an awful screeching sound on the bare cement I would suggest using a different type of screw.
The floor and walls are all dry and the cars are back in and I am very happy with the results.
Basic 2-car garage with 20” stem wall. (440sq ft = floor, 110sq ft wall)
Purchased
• 1.5 premium kits from Epoxy-Coat (Taupe with Beige Blend flakes)
• Additional 8 lbs of flakes in addition to the 1.75lbs included with the kit
• 1 set of spiked shoes, made a 2nd set for my wife to wear
• 20 small 2.5 quart pails (10 for color, 10 for clear)
• 8 medium pails for mixing floor paint. (4 for color, 4 for clear)
• 2 roller frames
• 4 roller covers (included with kit)
• 6 cheap spatulas
• 2 extra paint mixers for drill
• 12 plastic paint trays
• Makita 9227CX3 7-Inch Hook and Loop Electronic Polisher-Sander
• 7" Super Twister Turbo Segmented Diamond Grinding Cup Wheel 5/8"-11 Threaded
• Dustless Technologies D1854 7-Inch Universal Dustie
• Dustless Technologies D5155 18-Inch DustBuddie Hose
• 4” diamond wheel for my angle grinder to cut a groove in the floor at the garage door.
The builder of my house put a sealer on the floor and I wasn’t comfortable with just going the acid wash route so I decided I would diamond grind it. Thinking this was a good excuse to buy myself a nice polisher-sander to use on the boat and cars I started down the hand grinding path. (Big mistake) I chose the polisher-sander instead of an angle grinder because I had read the angle grinder could get a little aggressive with gouging the floor. I was glad I did because even the polisher (3000 rpm) dug into the cement from time to time but never too much that the self-leveling epoxy didn’t cover it. I was about 5% into the grinding process when I knew this was a big mistake. If I didn’t have a sealer on the cement this probably would have not been as bad. It took me 18 hours to grind 440 sq. ft. If I was doing it again I would have put the $350 toward a walk behind rental, but hey I do have a nice polisher now as a conciliation prize.
After 2 weeks of delay due to weather I was ready to start. The plan was to mix the ½ kit into 6 small batches pour into a paint tray and apply to the stem wall with a brush. I think my mixing ratio was 11oz & 22oz for a total of 33oz per batch. I first batched mixed the full and half kit part A together for color consistency. I had my wife helping me and this worked well. It took us about 20min to apply each batch of the base coat and after about 25-30min you could feel it starting to set up. Throwing the flakes at the wall wasn’t too bad but you waste a lot because only about ½ of them hit or stick to the wall. I was worried about the overall result as I have read many people talk about using fumed silica added to the epoxy for walls to prevent the epoxy from sagging but I went with Epoxy-Coat’s direction and just mixed small batches and applied with a brush. The walls have a lot of craters from air in the forms that I wasn’t about to try and fill in. I did get some runs when we loaded the craters with product and it slowly ran out but we just made sure we kept an eye on things as it was drying before the flakes were applied and we were able to clean up most of the runs. You obviously can’t get it on as thick as the floor and if you look REAL close you can see grey pin holes of the cement showing through in a few spots but between the flakes and the clear coat this was not an issue. I was surprised how much product we used. About 80% of the ½ kit was used which should cover up to 250 sq feet. My wall is only 110 sq. feet. I guess all the craters and the waste of what is left in each paint tray can account for this. After every section of wall we used a new paint tray as it was impossible to re-use the old tray with the residual product setting up in it. We were able to get through 1 or 2 sections before we had to replace our brushes. I made sure to put tape on the floor to catch any drips and make it easier to slop the paint all the way to the bottom edge without contaminating my newly grinded floor. Total time for the color coat on the wall was about 5 hours. I am glad I put the same product on the wall as it makes it nice and uniform. To make the wall perfect you probably would need to explore the fumed silica or use a product made for vertical surfaces but if you get on your knees and look at it in the light it is about 90% good otherwise it looks perfect from a few feet away more than satisfactory for me.
Then moved on to painting the floor. Not much to report here as it went fairly smoothly as others have already reported. Definitely must have spike shoes for at least 2 people. Attach squeegee and roller to extension polls. Vacuum up flakes that do not land in paint before moving on to next section. My garage is divided into 4 sections. I decided to not fill in the expansion joints as they are fairly large and I was worried about issues with the paint cracking under the movement over time and personally I did not feel it was necessary given it is still a garage at the end of the day.
The next day was the clear coat. I don’t know if this is normal but it was much thinner and easier to apply. Each section of wall was applied in half the time. This in part might be because we were not painting bare cement but the product was easier to work with. It poured out of the bucket easily and did not have to be scraped. Aluminum Oxide (Non-slip)…. To apply or not to apply… This was a big question for me. If I was not doing a top coat then definitely would not apply. If the wife ever fell when the floor got wet I would never hear the end of it, or if I fell I would never hear her stop telling the story laughing. So I decided to put some down on top of the clear coat. I used about 6 tablespoons over 440 sq. feet. A little heavier at the bottom of the stairs and in the walkway. This was more than enough, I probably could have used 4 or 5 tablespoons but in the end I was glad I did because after that clear coat it is like walking on glass and would have been very dangerous when wet.
Oh, a word on the spatulas. We had lines drawn on 2 of the small measuring buckets and used them for measuring our product. We then used the spatulas to scrape the product out into another bucket where it was mixed. After mixing we dumped out the product on to the floor or the paint tray but did not use the spatulas to scrape the edges as I was worried about getting some un-mixed product onto the floor. I also used a new mixing bucket for each batch as I didn’t want to take any chances after coming this far.
Other thoughts and tips
• Remove any tape while the epoxy is still wet
• Use 2 drills each with its own mixer. One for mixing part A and B together and the other for routinely mixing part A by itself
• Cover your drills in painters tape
• I laid some canvas drop cloths on the driveway to help stop any blowing debris from coming into the garage
• I used an angle grinder and cut a line 1” in from my door to serve as a stopping point for the epoxy. Then put duct tape on the outside of this groove. It made a nice clean edge and helps add strength to the leading edge of your epoxy.
• Use a timer to know how long to mix
• Use a shallow cardboard box to set mixers & brushes in this keeps the dripping epoxy contained.
• I made my wife’s spiked shoes with drywall screws and hit the tips with a grinder; man did they make an awful screeching sound on the bare cement I would suggest using a different type of screw.
The floor and walls are all dry and the cars are back in and I am very happy with the results.