To avoid these ads, REGISTER NOW!

Epoxy prep: concrete grinding job look good enough?

djgarrett21

Member
Joined
Jun 4, 2020
Messages
8
Location
Utah
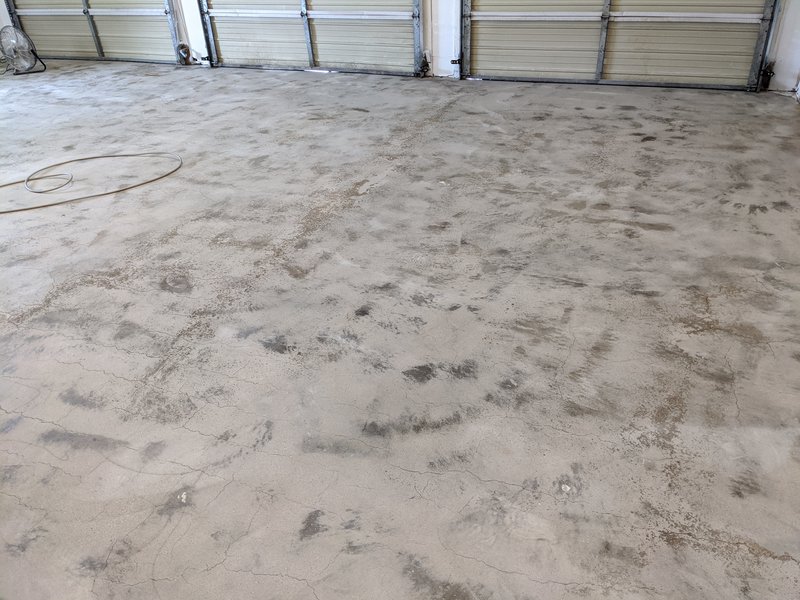
I rented a 10" grinder from HD and ground my garage last saturday. It is about 800 sq-ft and took forever - I spent 11 hours to get to this point. I know I hit every square inch of that floor multiple times but there are still spots that are darker where the grinder just didn't hit. The concrete is 30 years old and fairly uniform. I don't think the wheel on the grinder was aggressive enough given the amount of time I had to spend.

Thoughts on if this will be sufficient for an epoxy coating or should I plan on grinding all those spots that haven't been ground as well as the rest of the floor?

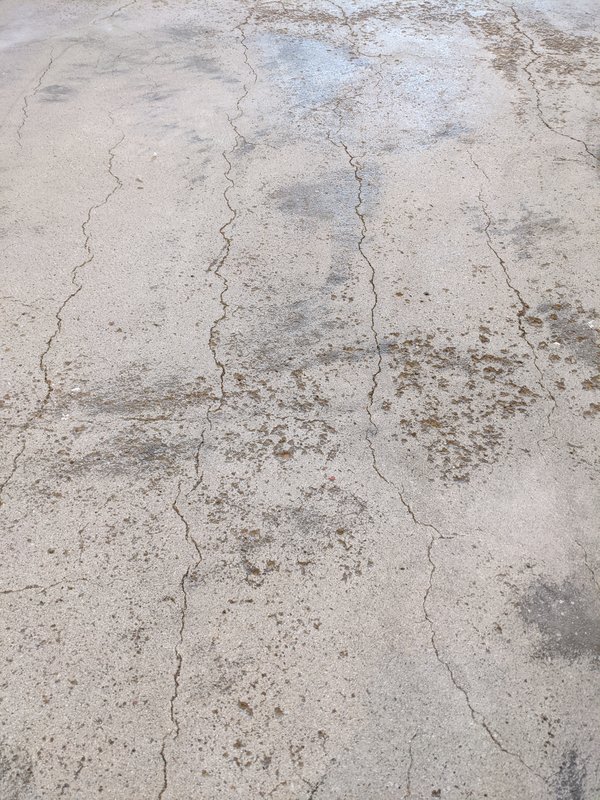
2nd question: I've got a lot of rather fine cracks which are probably less than 1/8" deep. Lots of them (see picture). Should I plan on filling all of them or are they shallow enough that the coating will fill them in?

My original plan was to do a 3-coat polyaspartic kit from Garage Flooring LLC. After looking at how much work it will take to make the concrete surface pristine I wonder if I'd be better off with a high-build epoxy?

Almost forgot to mention, I plan to fix the pitting/spalling with Aradex-CP. I've got a fair amount of that going on.

IMG-20200608-085347.jpg


IMG-20200608-085400.jpg
 
Last edited:
To avoid these ads, REGISTER NOW!

ConCretin

Well-known member
Joined
Jan 20, 2011
Messages
3,379
Location
Central Maine
I'll let those more knowledgable than I am comment on the sufficiency of your grinding job but I thought I'd offer some insight into the cracks in your slab before the inevitable deluge of declarations that your slab is ****.

You have a classic example of plastic shrinkage cracks. They occur early in the finishing process when the surface drys too quickly. They tend to be shallow and run parallel to each other.While primarily aesthetic and not a concern by themselves their presence suggests challenging finishing conditions that could suggest other issues.

De-lamination is the first thing to come to mind. Hopefully your grinding will have exposed any that exists but before you apply an expensive epoxy coating, it might be prudent to do some additional evaluation. If you drag a chain across the surface, there will be a pronounced change in tone as the chain crosses problem areas.

I hate to be a downer but it's better to eliminate the possibility of problems or cut your losses by changing course now.
 
OP
D

djgarrett21

Member
Joined
Jun 4, 2020
Messages
8
Location
Utah
Thanks for the insight, very helpful. As you said, the cracks are very superficial,probably 1/16" deep for the most part.

Regarding the condition of the slab, it may be worth noting that there is living area underneath the entire garage area so perhaps that could be the cause of some of the issues as well? See below for a pic of the underside.

The orientation and pitch of all the cracks is very consistent - they all run the length of the garage and are at a 6" pitch. Wonder if this could be the spacing of steel reinforcement in the slab.

Only thing worse than changing course now is spending additional time/$ only to find out there is a problem after the job is done.

IMG-20200608-170404.jpg
 

ConCretin

Well-known member
Joined
Jan 20, 2011
Messages
3,379
Location
Central Maine
Whoa! I think we need to see a little more of this structure. Precast double tee's. What was the genesis of this design? There is obviously a topping slab. I assume it's fully bonded, which as you suggest probably contributed to the cracks. Very cool!
 

SolarColumbia

Well-known member
Joined
May 7, 2019
Messages
211
Location
Wisconsin
Use 2two part epoxy or two part polyurea to fill the cracks. Ardex CP is cementitious and it's best not to use that under your coating.
I just ground my 821 sq. ft , and yeah, it took me about that many hours. I can't tell how rough it is in pictures but if you have time you might want to do an acid etch to get it rougher.
I have similar damage on mine and decided to epoxy prime, then medium/high build epoxy, then one color and one clear poly.
 
Last edited:
To avoid these ads, REGISTER NOW!
OP
D

djgarrett21

Member
Joined
Jun 4, 2020
Messages
8
Location
Utah
Whoa! I think we need to see a little more of this structure. Precast double tee's. What was the genesis of this design? There is obviously a topping slab. I assume it's fully bonded, which as you suggest probably contributed to the cracks. Very cool!

This is making more sense now that you've shown some light on fabrication of the structure. The garage sits above a sport court. Due to the grade of the lot, there is ~25' drop from the front of the house to the rear. Above and to the right is the garage, above and to the left is the master bedroom.

PANO-20200609-161248-vr.jpg
 
OP
D

djgarrett21

Member
Joined
Jun 4, 2020
Messages
8
Location
Utah
Use 2two part epoxy or two part polyurea to fill the cracks. Ardex CP is cementitious and it's best not to use that under your coating.
I just ground my 821 sq. ft , and yeah, it took me about that many hours. I can't tell how rough it is in pictures but if you have time you might want to do an acid etch to get it rougher.
I have similar damage on mine and decided to epoxy prime, then medium/high build epoxy, then one color and one clear poly.

Glad to hear I'm not the only one who took that long on the grinding job. Maybe I had unrealistic expectations but I thought it would take 4-5 hours max. Good idea on the acid etch I think I'll do that.

Your choice is very similar to my latest thinking on coating the floor. Can I ask where you sourced your material from? Was your high build epoxy coat pigmented? Were the final two coats poly or was just the clear poly? (Polyurithane or polyaspartic/polyurea?)
 

SolarColumbia

Well-known member
Joined
May 7, 2019
Messages
211
Location
Wisconsin
I purchased from Garage Flooring LLC. The primer is oil block (only comes in black) because the floor had some oil spills and although I cleaned I wasn't taking chances. Second coat will be their industrial orange peel texture epoxy in medium gray to help cover the black and make irregularities in the surface less noticeable. Third coat will be All Weather poly in grey. Fourth coat clear poly. I'm not using flakes as I only like heavy broadcast and from what I've seen I'd need perhaps 150# of them and a second coat of clear.
Pick up a diamond cup for an angle grinder. Mine off Amazon was about $12 and it's great for grinding small areas after spot repairs. I'm still doing that and hope to do coating in a couple weeks.
 
Last edited:
OP
D

djgarrett21

Member
Joined
Jun 4, 2020
Messages
8
Location
Utah
After grinding the floor three times, putting down numerous patch/repair products (Ardex CD, Five Ton Epoxy Patch, Rust-Oleum Concrete Patch, Turbokrete, Sikadur Crack Fix, Quickrete), pressure spraying the concrete three times, two vacuums (don't set your robot vacuum loose in the garage with silica dust around, disaster will ensue) and lastly a solvent wipe...I finally got my epoxy down this morning.

Learned a lot, more of the what-not-to-do than the to-do variety. But, I'm so relieved to finally have the coating on the floor. Still have the poly to do but hopefully that is just the icing on the cake.

This stuff better stay stuck to the floor because if it doesn't...:Twitch:
 

Attachments

  • IMG_20200702_142637.jpg
    IMG_20200702_142637.jpg
    136.3 KB · Views: 80
Last edited:

SolarColumbia

Well-known member
Joined
May 7, 2019
Messages
211
Location
Wisconsin
I agree with your learning what not to do. Had I spent a couple less minutes mixing my 100% solids I might have had a few more minutes to roll it out. Thank heaven 2/3 of the garage is done. And yeah, I hope it sticks!
 
To avoid these ads, REGISTER NOW!
Top Bottom