To avoid these ads, REGISTER NOW!

Epoxy Project Update for Legacy Industrial (Need Input!)

Jimrod

Member
Joined
Jul 27, 2012
Messages
19
There was a prior post that I started about this project, but thought I'd start a fresh one as the old post title would be a bit misleading now.

To cut a long story short, I was today installing a second coat of Legacy Industrial HD Epoxy (Medium Gray). The first coat went down okay (did that a few weeks ago), but I wanted to fix a few things and liked the idea of putting down a second coat to build up the floor a bit.

Today's first batch of HD Epoxy started to get warm and cure more quickly than I expected. Bear in mind that I'm doing this job by myself, so was cutting in along the edge first prior to rolling. When it came time to roll, I was immediately having a tough time moving the epoxy around, and in a couple of spots I wasn't able to fully roll even the material after it had poured from the bucket.

The second batch was fine (I probably did work a bit quicker), but now that i'm done the colours don't match - I'm guessing because I was working the epoxy past the point at which I should have?

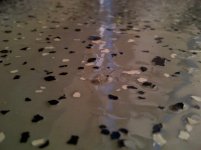
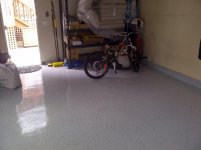
I've attached a picture. There are a couple of darker patches where I was trying to fix areas with the second batch. As you can see, the first batch is much lighter.

So, wondering what to do now? Today's second batch went down really nicely and I'm very happy with that (top) half of the room. I don't want to leave it as-is, even though I've put two coats down now.

Question for Legacy - can I buy another HD Epoxy kit and apply it to just the lower half of the room where the Epoxy is lighter? The garage is on a grade so I don't mind doing this as it will build up the floor a bit towards the bottom of the room (better than the top!). My concern is going to be getting a good colour match between the existing batch (top half of the room) and the new batch of HD Epoxy that you send me. I think I'll be okay blending the two together, won't I?

I've got the Urethane top coat to put down, but will obviously wait to do that until I've resolved this issue.

Would really appreciate some help and yet more advice...

James
 

Attachments

  • IMG-20130811-00026.jpg
    IMG-20130811-00026.jpg
    145.7 KB · Views: 145
To avoid these ads, REGISTER NOW!
OP
J

Jimrod

Member
Joined
Jul 27, 2012
Messages
19
Scotty,

What do you mean by "box your color"?

I just checked the finished floor (after almost 24 hours) and the edging that I painted first is not curing. It's a darker shade than the rest of the first batch from yesterday and I can easily impress my thumbprint into it. I'm scratching my head over this as I mixed it really well. Should I have poured onto the floor first, then cut in at the edge? It just doesn't make sense to me. I don't feel like I did anything any differently to the other 3 batches.

The rest of the first batch seems okay. Not too soft, but a lighter shade of gray. It's just around the egde that I have the problem with the soft patches. Okay, it's only been 24 hours, but I'm guessing everything should cure at the same speed.

Help?

Assuming nothing changes from here, how do I lift up the uncured epoxy so I can have another go at it? The area isn't huge - it's maybe 25 fit long, 4 inches wide around the edge of the room. And again, I want to ensure a colour match to the second batch from yesterday that looks just fine.

James
 
OP
J

Jimrod

Member
Joined
Jul 27, 2012
Messages
19
Scotty - the coding on one of the tins of Part A is: B3RG-272 80/0130.

If i place the order for one last kit online, are you able to get me a tin from the same batch?

I'm sure this problem is all down to a mixing problem. Nothing else explains it. Half the room looks fantastic!

Thanks, James.
 
OP
J

Jimrod

Member
Joined
Jul 27, 2012
Messages
19
So, to save myself more problems, I've ordered enough HD Epoxy to fully recoat the garage. I guess there's no problem with having 3 coats of epoxy, is there?

I'll monitor the floor over the next few days to see how the lower half hardens. Right now, it seems fine - just the edge that hasn't cured properly.

I plan to use my orbital sander to remove the uncured epoxy from the edge. It'll gum up lots of paper along the way, but there's not enough material to easily scrape, and I want to end up with a nice flush finish to the properly hardened epoxy.

After sanding down those spots with 100 grit, I'll degloss the entire floor, wipe with xylene, and go one last time. I think I've learned enough now to get this done right. Any tips to prep the surface after yesterday's curing issues would be greatly appreciated!

James
 

LegacyIndustrial

ALLIANCE MEMBER
Joined
Jun 7, 2010
Messages
7,994
Location
deerfield, IL
Jim:

Looks like you answered your own questions. Yes, sounds like a mix issue.
We received your order and it will be on it's way. As long as you properly prepare the surface: Sand/scuff, wipe the floor with denatured alcohol and recoat you will have a successful application. The xylene may knock you over, try denatured alcohol. Learned this from an old installer in Indianapolis. :)
 

The Bramptonian

Well-known member
Joined
May 23, 2013
Messages
64
Never used denatured alcohol so don't know. I had a similar problem of uncured epoxy and used Xylene. If you can put on a mask and keep the area ventilated, go for Xylene. I found it to be very strong and effective. Scotty is correct. Xylene is very strong and quite capable of knocking you over.

Jim:

Looks like you answered your own questions. Yes, sounds like a mix issue.
We received your order and it will be on it's way. As long as you properly prepare the surface: Sand/scuff, wipe the floor with denatured alcohol and recoat you will have a successful application. The xylene may knock you over, try denatured alcohol. Learned this from an old installer in Indianapolis. :)
 
OP
J

Jimrod

Member
Joined
Jul 27, 2012
Messages
19
Thanks, guys. I'll be glad when this job is done and will certainly report back to share the final result.

Scotty - would appreciate prompt shipping on that last batch of HD Epoxy!
 
To avoid these ads, REGISTER NOW!

Edger

Well-known member
Joined
May 18, 2011
Messages
623
Location
Melbourne Australia
Just a BTW, I used to have trouble with a Sika epoxy where the shade of color changed as the epoxy cured while rolling it out. At the end of the job it looked awful, but once it all cured it was perfect.
 
OP
J

Jimrod

Member
Joined
Jul 27, 2012
Messages
19
So, I finally finished the job! I spent plenty of time making sure I got all the uncured epoxy removed from around the edge before applying the final coat (i de-glossed using 100 grit sandpaper on an orbital sander). With this last coat, I felt far more confident working with the HD Epoxy. I spread it evenly over the floor in two seperate batches, applying chips after each half was rolled out. I'm not total happy with the distribution of the 1/4" flakes as I found it hard to blend the join together in the middle of the room. I'm still not sure how or if I could have done it better. The flakes appear heavier in that area, but it's only barely noticable, and probably only to my trained eye!

I left to dry overnight before applying the Urethane finish. Pictures are attached.

The only remaining issue is one small blemish in the finish where a small piece of old epoxy came off my shoes or spikes (not sure), and sat on top of the finished floor. I'm not sure if it happened when rolling the epoxy or urethane, but I think the latter as it was quite loose on the surface and the uretane pooled around it a bit. The pictures make it look bigger than it really is (its probably 3x4mm). The pictures show what I've left behind after picking away the rogue piece of epoxy.

Question (perhaps best answered by Legacy Industrial): what can I do to fill-in this little crater in the Urethane finish? I obviously don't want to buy another whole batch of urethane, and really only need a thimbal full of it to fix this blemish. If I can't buy the same product in a small quantity (HD-356VOC Urethane Clear Coat), what would be the next best thing I could use? I'd obviously sand flat and then dab in enough product to make it look as seamless as possible. Suggestions?

Thanks everyone,

James
 

Attachments

  • IMG-20130902-00050.jpg
    IMG-20130902-00050.jpg
    67.9 KB · Views: 66
  • IMG-20130902-00038.jpg
    IMG-20130902-00038.jpg
    62 KB · Views: 65
  • IMG-20130829-00031.jpg
    IMG-20130829-00031.jpg
    125 KB · Views: 67
  • IMG-20130829-00033.jpg
    IMG-20130829-00033.jpg
    98.5 KB · Views: 61
  • IMG-20130829-00036.jpg
    IMG-20130829-00036.jpg
    80.5 KB · Views: 62
  • IMG-20130902-00037.jpg
    IMG-20130902-00037.jpg
    89.1 KB · Views: 64

LegacyIndustrial

ALLIANCE MEMBER
Joined
Jun 7, 2010
Messages
7,994
Location
deerfield, IL
I can't see the pics too well on my iPhone.
Will check it in the AM and get back to you.

I can probably get you out a small touch-up amount tomorrow.

From what I can see it looks good!!
 
OP
J

Jimrod

Member
Joined
Jul 27, 2012
Messages
19
That would be awesome. Thanks, Scotty! Let me know if you need my mailing info again.
 

bigbadktm

Well-known member
Joined
Sep 6, 2013
Messages
85
Location
SoCal
the trick to even distribution of color chips is to roll the whole floor and go out on spikes. But...it is super slick and care must be taken not to drag your feet or slide. Sprinkle like fairy dust.

Epoxy will kick faster in a large quantity i.e. in the bucket than it would poured in beads on the floor. If you are working alone and have a lot of cut in to do, make a small batch only and once you are done cutting in, then make your whole mix.

Boxing - to mix all colors together from separate kits/batch #s to get 1 uniform color
 
To avoid these ads, REGISTER NOW!
Top Bottom