Aww' man. Great answers, guys .. got busy this week .. but today .. something happened ! Ha.
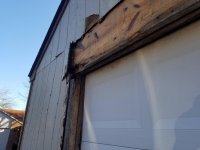
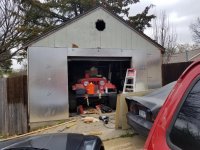
Don't want to get ahead of myself .. and no thread can be without pictures .. but I'm tired. Pictures tomorrow. Got started late, and tore out the rotted pressed board exterior paneling .. at 2pm .. to discover half rotten sill plate & top sill. Oh brother. Now a short daylight emergency !
The header rot was from the lack of Z flashing at the top of the old exterior masonite panels. It had allowed the water to flood the left garage door wall. So small chunk of rotten header, ran into half the 4' top sill & finally half the lower 4' sill plate.
Picked up my stud lumber, a sheet of OSB tech shield & then bought 21° framing nails instead of 30° .. of course, I didnt know that yet. I would have to run back to the Depot to exchange them .. to keep my framing nailer happy.
The garage shed corners were double stack studs, with another set of double stack studs in the center of the rotten left garage door wall. Strangely the garage door frame itself, only had one stud upright, with the back side .. edge nailed to the garage door track frame 2" by 8" support board. WTH ? A really chintzy deal. Was baffling at the least.
I started by cutting out 20" of the top sill and 20" of the lower sill plate .. along with the one stud that amazingly held up the garage door track support board for 30 plus years.

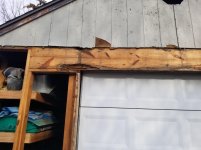
I fixed that, of course. Scabbed in the top sill 20" with new .. and double stacked that portion of the top sill plate. Lower sill plate got the same double stack treatment. I still have to drill new leg anchors into the concrete pad .. but I'll do that next week.
The garage door frame got a triple stud like the right side did .. and I went ahead nailed the garage door track support 2" by 8" board well into it. The garage door track is going nowhere, now.

Quick note :
When you hang cement Hardie panel or similar. You can't edge nail it. You have to nail it 2" from the cement panel edge. So if you guys ever choose to use cement board .. remember to double stack your lumber. So you have enough room to coil nail your panel. Otherwise it will chip out the edge and ruin the whole panel. Breaks very easily.

Cement board 4' by 8' panel will be hung once I get these repairs done .. but that's later.. I don't look forward to it. Sh*t is heavy .. and again, I'm working solo. It is what it is.
I tackled the rotted header last. I've been researching beam saves, header repairs, epoxy beam salvage .. whatever I could type into the search bar. I lucked out really .. and found a post Bob Villa era This Old House episode .. with a repair known as a "dutch repair". I remembered the phrase used in Barn Builders .. the log frame salvage guys on Discovery .. so I got on track to what I was going to do.
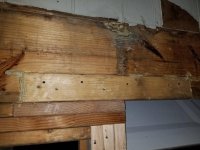
The rot could be covered by a 2" by 4" piece of stud lumber. So I cut a piece longer than the rotted area & traced the repair .. about 18" of the 16' span .. to be cut and then wood chiseled. I chose a 1/2" paddle bit and drilled 4 holes at each corner. Then set the depth on my circular saw and made 2 of the 3 cuts needed to extract my soon to be patched area.
I couldn't cut the line going into my freshly framed left garage door wall .. so this is where my combination rasp/chisels came into play. Made sure they were sharp & let the mini 5 lb sledge hammer do most of the work. On a ladder its hella' fun !!
Once the perimeter was separated .. I cleaned everything out with air .. and wiped it with acetone. My adhesive of choice was not epoxy .. it was Liquid Nails Heavy Duty .. and it was applied liberally. I wanted it to seep out the perimeter. I clamped it in .. and got the ring shank nailer to nail it in permanently.
Pretty impressed with it .. to be honest. The patch had to be friction fit with the same mini sledge. It fit perfectly snug. I mean perfect. Very tight fit. The perimeter seeped as wanted .. and after nailing .. I wiped it flush & clean.
Have to add .. that the rot in the double thickness 2" by 12" 16 foot long header was the outer exterior board only .. as well as seated on the edge of the top sill left side garage wall. If your rot is center of header .. above a long span garage door .. while I wouldn't say no to a dutch repair there .. for sure evaluate your span & area of rot to be cut out.
I'll be honest .. if my rot was center of header .. and still working alone .. I wouldn't hesitate to cut out the lower 2 by 4 patch .. but go the 8 foot distance of the garage door to install a 10 foot plus 2" by 4" dutch repair. Of course I would completely support the inner intact 2" by 12" header with some dead man studs. You'd have to bridge the span onto your sill plate transitions.
I know everyone wants to say "the only way to do it, is to do it right". Sure !! Whether you choose to rip out the outer layer of header & fully replace it is up to you. I fixed my rot "right". With the time available & the fun to be had with a ring shank nailed 2 by 12 .. trying to pry & separate without damage/splitting my interior 2 by 12 header .. I chose to pass on that sh*show.

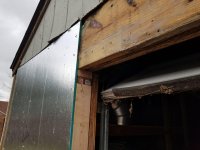
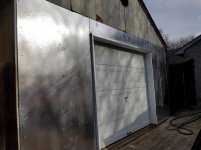
This area I live in is nice .. but we have had a recent string of late night thievery .. so as the sun went down on me .. I literally just got done nailing on the OSB tech shield to secure my garage wall. The mad dash of "oh sh*t what have I done" had to be completed the same day it was ripped open. I should've started earlier .. but didn't .. so oh well.
I took some pictures of the basics but as I got into it .. had definitely missed the framing details. I'll post the progress tomorrow. Being how the thread title alludes to an epoxy repair .. I'm thinking the "dutch repair" is the focus, anyway.
At present, I'm going to shower off rat turds and saw dust so not to inhale it at dinner. Have a good night !


")