To avoid these ads, REGISTER NOW!

Erosion Control Part 2

PALYDIN11

Well-known member
Joined
Feb 6, 2016
Messages
87
Location
Salisbury Maryland
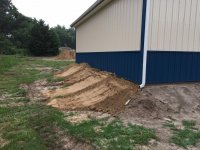
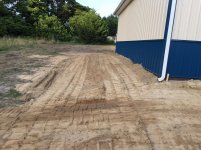
UPDATE. I got a good deal on a couple of loads of fill and topsoil as seen in the photo. I don't have a lot of experience filling and grading with the skid steer. I was thinking of dumping the dirt against what is already in place and let it naturally roll down hill, and then try to grade it. Any help on any other methods of dumping and grading using the skid steer would be appreciated. Thanks.:D
 

Attachments

  • Skid Steer Ready.jpg
    Skid Steer Ready.jpg
    147.9 KB · Views: 139
To avoid these ads, REGISTER NOW!

mechanic217

ALLIANCE MEMBER
Joined
Jul 30, 2010
Messages
184
Well you could try that, but you might also try approaching the pile, tilting the bucket till it is 90 degrees to the ground, lower the bucket into the pile and drag it backwards spreading the fill as you go, as the load is spread and needs less moving flatten the bucket and let it float on the fill as you backup. I find it easier to control the grade pulling backwards so I can see the effect, hope this helps easier to do than explain.
 
OP
P

PALYDIN11

Well-known member
Joined
Feb 6, 2016
Messages
87
Location
Salisbury Maryland
Well you could try that, but you might also try approaching the pile, tilting the bucket till it is 90 degrees to the ground, lower the bucket into the pile and drag it backwards spreading the fill as you go, as the load is spread and needs less moving flatten the bucket and let it float on the fill as you backup. I find it easier to control the grade pulling backwards so I can see the effect, hope this helps easier to do than explain.

Yes! this does help. I can do that. Thank you!
 

The Wart

Member
Joined
May 18, 2015
Messages
13
Location
Maryland
You don't want to end up to steep, it will be a pain to mow. Shoot for "rough grade" to start and then go back and "finish". So, for rough, just get most, but not all, of the dirt all the way around the building. This will let you determine if you have enough and how far out you can pull your grade. At that point go back and get it good and flat and how you want it to look when finished. The very last of the dirt is for filing low spots and misses. Also, watch you don't pile too high right next to the building, doing so will add hand work
 
OP
P

PALYDIN11

Well-known member
Joined
Feb 6, 2016
Messages
87
Location
Salisbury Maryland
You don't want to end up to steep, it will be a pain to mow. Shoot for "rough grade" to start and then go back and "finish". So, for rough, just get most, but not all, of the dirt all the way around the building. This will let you determine if you have enough and how far out you can pull your grade. At that point go back and get it good and flat and how you want it to look when finished. The very last of the dirt is for filing low spots and misses. Also, watch you don't pile too high right next to the building, doing so will add hand work

Thanks. I have to tell you guys, I am grateful for all of the support. This is saving me a lot of money as well.
 

heynicebits

Active member
Joined
Apr 27, 2011
Messages
26
Location
New York
Dump low piles in a general shape that you want , rough grade and run all over it to help compact, dont even bother trying to get it to look good/perfect at this point. After you get a rough shape, fill in low spots, knock down the high spots and float everything to the finish grade you want.
 
OP
P

PALYDIN11

Well-known member
Joined
Feb 6, 2016
Messages
87
Location
Salisbury Maryland
Dump low piles in a general shape that you want , rough grade and run all over it to help compact, dont even bother trying to get it to look good/perfect at this point. After you get a rough shape, fill in low spots, knock down the high spots and float everything to the finish grade you want.

Thank you.
 
To avoid these ads, REGISTER NOW!

larry_g

Well-known member
Joined
Apr 28, 2007
Messages
16,874
Location
oregon
Dump low piles in a general shape that you want , rough grade and run all over it to help compact, dont even bother trying to get it to look good/perfect at this point. After you get a rough shape, fill in low spots, knock down the high spots and float everything to the finish grade you want.

I agree with the above except for "Dump low piles" I find it much easier to dump on the move, spreading as you go. This also gives you a thin layer that will pack as you travel across it. I would also dump traveling parallel to the wall your working against instead of driving up to the wall and dumping as your picture above shows.

lg
no neat sig line
 

larry_g

Well-known member
Joined
Apr 28, 2007
Messages
16,874
Location
oregon
By float, do you mean use the scoop like a blade and just skim the surface? Thanks.

Have you ever troweled cement to get it flat and smooth? Floating is about the same except your using the bottom of the bucket as the trowel or float. When floating your not moving a bunch of dirt, just running the bottom of the bucket at a small angle to do the work of smoothing. Kinda like using a knife almost flat to frost a cake.


The vid above shows the floating process. If the bucket is at a much steeper angle and your dragging a lot of material back then your backblading.

lg
no neat sig line
 
Last edited:

heynicebits

Active member
Joined
Apr 27, 2011
Messages
26
Location
New York
Your machine should have a way to float , its a function of the machine that lets the the bucket ride free (no hydraulics forcing it to be straight) against the rough grade. If you have foot controls for the boom and bucket, its usually pushing the boom (left) toe pedal all the way to the floor - this locks the pedal down and slowly drops the boom to enable the attachment to "float" on grade.

Essentially, you can tip the bucket forward to backdrag material to the rough shape then float to get a finish grade. You can setup a string line as a guide if you really want to. Good quality mason line can get ran over and bounce back.....up to a certain point lol.
 
Last edited:
OP
P

PALYDIN11

Well-known member
Joined
Feb 6, 2016
Messages
87
Location
Salisbury Maryland
Have you ever troweled cement to get it flat and smooth? Floating is about the same except your using the bottom of the bucket as the trowel or float. When floating your not moving a bunch of dirt, just running the bottom of the bucket at a small angle to do the work of smoothing. Kinda like using a knife almost flat to frost a cake.


The vid above shows the floating process. If the bucket is at a much steeper angle and your dragging a lot of material back then your backblading.

lg
no neat sig line

Yes I have did concrete work before. I get the technique now. Nice video BTW. Thanks.
 
OP
P

PALYDIN11

Well-known member
Joined
Feb 6, 2016
Messages
87
Location
Salisbury Maryland
Your machine should have a way to float , its a function of the machine that lets the the bucket ride free (no hydraulics forcing it to be straight) against the rough grade. If you have foot controls for the boom and bucket, its usually pushing the boom (left) toe pedal all the way to the floor - this locks the pedal down and slowly drops the boom to enable the attachment to "float" on grade.

Essentially, you can tip the bucket forward to backdrag material to the rough shape then float to get a finish grade. You can setup a string line as a guide if you really want to. Good quality mason line can get ran over and bounce back.....up to a certain point lol.

I have joystick controls, left stick for driving and the right stick for the bucket. I will check tomorrow for the float function. I have some masons line to use as a guild as well. Thanks.
 

moserjj

Well-known member
Joined
Oct 17, 2010
Messages
155
Location
WI, USA
With my joystick controls float is the right stick all the way forward. I would also travel parallel to the building while you work. Don't worry about getting it smooth in a few passes, it can take a bunch to work it

Sent from my A0001 using Tapatalk
 

csp

Well-known member
Joined
Mar 23, 2010
Messages
5,719
Location
Franktown, CO
I would also dump traveling parallel to the wall your working against instead of driving up to the wall and dumping as your picture above shows.

x2, this will keep the grade flat instead of curved as in the pictures.

When floating, the flatter the bottom of the bucket is, the less material you'll move when backdragging. If you want to drag material while floating, rotate the bucket so that the cutting edge is pointing downward. Do it a little bit at a time to get a feel for how much angle will move how much material.
 
OP
P

PALYDIN11

Well-known member
Joined
Feb 6, 2016
Messages
87
Location
Salisbury Maryland
I have joystick controls, left stick for driving and the right stick for the bucket. I will check tomorrow for the float function. I have some masons line to use as a guild as well. Thanks.

Ok here is what I have so far. I used the string method for the grades. The fill seems to be compacting well. I ran over it a few times as suggested. I found the float function.

With that said should I do a final grade by float, fill in the low spots, and get ready for the top soil?
 

Attachments

  • IMG_2010.jpg
    IMG_2010.jpg
    147.2 KB · Views: 43
OP
P

PALYDIN11

Well-known member
Joined
Feb 6, 2016
Messages
87
Location
Salisbury Maryland
Dump low piles in a general shape that you want , rough grade and run all over it to help compact, dont even bother trying to get it to look good/perfect at this point. After you get a rough shape, fill in low spots, knock down the high spots and float everything to the finish grade you want.

I have started compacting the fill. Hopefully early next week I will be done and get ready to float the final grade. Thanks for the advice.
 

Attachments

  • IMG_2010.jpg
    IMG_2010.jpg
    147.2 KB · Views: 34
To avoid these ads, REGISTER NOW!
Top Bottom