To avoid these ads, REGISTER NOW!

Expansion Cuts

jerethemiah

Member
Joined
Aug 9, 2011
Messages
6
1st time post :bounce:

I have a question about how I should proceed with my garage floor epoxy coat when I have expansion cuts.

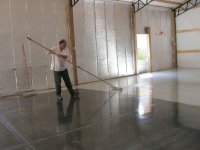
Background: My wife and I recently bought a new construction house and closed on it last July. It has a 2 car garage with 2 expansion cuts in the concrete floor dividing it into 4 sections. No car has been parked on the floor, it was just filled with moving boxes. So the floor is like new and clean. This past weekend I decided to coat the floor with epoxy-coat with the help of a friend. We followed the directions - scrape, sweep clean, acid etch, scrub, wash, let dry. I'm stuck at this next step.

How have you guys been handling the expansion cuts? I know the purpose for them but I'd really like to have 1 big uniform flat epoxy level garage floor.

1) Should I leave the cuts alone and just roll down the epoxy and live with the cuts?
- I feel this will be hard to clean as oil/dirt/grime would get into the cuts.

2) Do I fill the cuts with SikaFlex and roll epoxy over that?
- With it being a brand new construction I'm afraid it may crack the epoxy as the house settles. Any experiences?

3) Do I roll the epoxy and fill the cuts later with SikaFlex?
- Will the SikaFlex not adhere in the cuts with the epoxy somewhat down in the cuts during application?

Please give any advice, I'm looking to finish this project this weekend.

Thanks!
Jere
 
To avoid these ads, REGISTER NOW!

Apdl

Active member
Joined
Jul 9, 2010
Messages
40
Location
Lakeville, MN
I say leave the cuts, I am not sure the expoy coating is as flexible as the SikaFlex (whatever that is). Therefor if there is some thermal expansion or settling your epoxy will crack

I vote option 3, I am not sure how well the SikaFlex will adhere to the epoxy. You might want to coat a piece of scrap cardboard and test it before you go through with option 3. You could probably contact the manufacture of SikaFlex. My guess is they have been asked this before.
 
Last edited:

Edger

Well-known member
Joined
May 18, 2011
Messages
623
Location
Melbourne Australia
The best way is not the easiest, it is to coat the floor and then seal the joints after. Sikaflex is very good, but all polyurethane sealants are difficult to apply with straight edges, experts learn to do a good job without masking tape, I could not, and if you use tape you end up with a thin line the thickness of the tape that can attract dirt.

There are other sealants that can be cut off later with a blade which may be easier.
 
OP
J

jerethemiah

Member
Joined
Aug 9, 2011
Messages
6
Thanks for the replies. After some more google'n I'm going to do option 3, roll the epoxy and fill the cracks with sikaflex later. Like this guy but I'll use less, everyone says it expands and I don't want a convex fill. I'll attach some of my finished pics later.
 

AlphaGarage

Well-known member
Joined
Apr 16, 2008
Messages
1,298
Location
Every Garage, AnyTown, USA
I would fill them first. Use a quality 100% solids filler that's formulated for the task. That would mean a filler that when fully cured still has a bit of flexibility to deal with expansion or contraction of the joints.

If they're cut the process is pretty straight forward, fill just a tad over grade, wait a few minutes, then take a putty knife and just run it over the joint removing the excess.

If you expect a lot of movement you might want to consider "V" grooving the joints, although that takes a bit of time and effort.

Also you may want to use "backer rod" to save some $$$. Here's a tip sheet on joint filling
 

Edger

Well-known member
Joined
May 18, 2011
Messages
623
Location
Melbourne Australia
Alpha garage's tip sheet prompts me to say that during summer days there will be a small bulge along the joints and in winter there will be a small depression. How much of each depends on the variation of temperature the slab is subjected to and also the temperature at which you applied the joint filler.

Say you applied it during the coldest period it would always bulge in summer and vice versa. If you do it after coating at least the epoxy will not be flexing which can crack.
 

LegacyIndustrial

ALLIANCE MEMBER
Joined
Jun 7, 2010
Messages
7,993
Location
deerfield, IL
Alpha garage's tip sheet prompts me to say that during summer days there will be a small bulge along the joints and in winter there will be a small depression. How much of each depends on the variation of temperature the slab is subjected to and also the temperature at which you applied the joint filler.

Say you applied it during the coldest period it would always bulge in summer and vice versa. If you do it after coating at least the epoxy will not be flexing which can crack.

We have a gel crack filler specific for this.
It goes down prior to coating. The pic below is from a GJ member.

http://legacyindustrial.net/cart/crack-sealant-gel-style-p-206.html
hd821-JOBPHOTO.jpg
 

ggcdad

Active member
Joined
Feb 28, 2009
Messages
25
Location
Cedarburg WI
I just did my floor.
I used a hand held angle grinder with diamond cup wheel I got at Menards for $50 and just ran it along both sides of the expansion joint at an angle to V it out, and it worked pretty well, and it did not take long.
Then I put the foam backer rod in and taped off both sides of the joint, over caulked with SilkaFlex, let it sit a few minutes and then used a putty knife and scraped off the excess. This worked well.
You cannot see the tape edge in the epoxy, but I flaked to rejection, though I don't think it would be that noticeable with a standard application.
I do a slight depression right now. We'll see how it holds up when we hit winter.
 

LegacyIndustrial

ALLIANCE MEMBER
Joined
Jun 7, 2010
Messages
7,993
Location
deerfield, IL
I just did my floor.
I used a hand held angle grinder with diamond cup wheel I got at Menards for $50 and just ran it along both sides of the expansion joint at an angle to V it out, and it worked pretty well, and it did not take long.
Then I put the foam backer rod in and taped off both sides of the joint, over caulked with SilkaFlex, let it sit a few minutes and then used a putty knife and scraped off the excess. This worked well.
You cannot see the tape edge in the epoxy, but I flaked to rejection, though I don't think it would be that noticeable with a standard application.
I do a slight depression right now. We'll see how it holds up when we hit winter.


That's why we recommend the gel for "under the coating" applications.
It doesn't shrink and won't depress when something rides over it.

Sikaflex or other urethane materials contract and have no strength.

This will cause your coating to crack over and naturally reveal the cut.
 

Edger

Well-known member
Joined
May 18, 2011
Messages
623
Location
Melbourne Australia
Scotty, what happens to the gel when the slabs expand and the joint closes a bit, and what happens when it opens up as the slabs contract when they cool?
 
Joined
Jun 30, 2011
Messages
1,080
Location
AZ
Does the gel work for the wide expansion joints? Not the single saw type but the rounded edge wide joints?
 
Joined
Jun 30, 2011
Messages
1,080
Location
AZ
Allow for approx. 1/2" in depth. 1" would be my max. but could go deeper if you had to.
This material is a gel, similar to vaseline consistency.

Thanks! I'll be ordering some the end of November. :thumbup:

Do I need to V notch the joints as well?

How much time needed to cure before the epoxy goes over it?
 
To avoid these ads, REGISTER NOW!

tcianci

Well-known member
Joined
Feb 7, 2009
Messages
4,242
Location
Walpole, Ma
I would just like to correct a common misnomer, those cuts in the garage floor are not expansion joints, they're control joints designed to give the concrete a place to crack in a controlled non visible manner, especially when it's in the process of curing. Most of us will probably never see a situation where concrete is expanding but you will see the results of it shrinking nearly everywhere you look. Check out the edge where your floor meets the stem wall... got a gap? that's shrinkage. Got a crack where the surface of the floor is flush on both sides of the crack? That's shrinkage. I am by no means the last word on all things construction but, I do maintain that evaluating an existing condition and determining a course of action dictate having a reasonable understanding of what you're dealing with, the physics behind it and the proper terminology in order to correctly articulate your project to others.
 

mfive

Active member
Joined
Sep 25, 2011
Messages
35
I would just like to correct a common misnomer, those cuts in the garage floor are not expansion joints, they're control joints designed to give the concrete a place to crack in a controlled non visible manner, especially when it's in the process of curing.

Correct, and thanks for the clarification.

So, as a first-time homeowner ready to epoxy his floor, is it a bad practice to fill these control joints?

And also, how long do these need to cure before applying the epoxy over top?
 

LegacyIndustrial

ALLIANCE MEMBER
Joined
Jun 7, 2010
Messages
7,993
Location
deerfield, IL

ggcdad

Active member
Joined
Feb 28, 2009
Messages
25
Location
Cedarburg WI
Filling the joints with a more solid product seems like a better idea then caulk to me now.
Darn - too late for me, wish this thread would have arose 2 months ago.

So now I'm curious how long the SilkaFlex will last before cracking.
Anyone out there have longer term reports on how the epoxy is holding up over it?
 

mfive

Active member
Joined
Sep 25, 2011
Messages
35
Scotty,

I've got an 18x22 foot garage with two perpendicular joints (splitting the garage into 4 squares). How much of the HD-821 would I need to order to fill the gaps? They aren't the the single-saw blade style joints, but rather the larger, rounded (almost v-shaped) joints.
 

mfive

Active member
Joined
Sep 25, 2011
Messages
35
The video on the HD-821 product page says that once it hardens it's "ready for coating" with no mention of grinding. What type of grinder needs to be used on this? Starting to sound like more work than it's worth... :-(
 
Joined
Jun 30, 2011
Messages
1,080
Location
AZ
I plan on filling the control joints with the Legacy HD-821 and let it cure out a few days before the flooring guys show up, Then they can grind the floor and coat all in the same day. No need for them to stop and come back a day or two later.
 

LegacyIndustrial

ALLIANCE MEMBER
Joined
Jun 7, 2010
Messages
7,993
Location
deerfield, IL
Your right.
We will revise the audio, it should be ground flat in order to get maximum hide.

Any grinding or sanding wheel will do the trick. On your drill or grinder.
 

mfive

Active member
Joined
Sep 25, 2011
Messages
35
Scotty, there wouldn't be any issues with re-degreasing/prepping the floor after applying the HD-821 into the cracks, right?
 

LegacyIndustrial

ALLIANCE MEMBER
Joined
Jun 7, 2010
Messages
7,993
Location
deerfield, IL
We recommend that our product is the last step when using an etch process. However, as long as you make sure water is not trapped or driven under the product (through an open joint) you should be ok.
 

repomannwp

Active member
Joined
Oct 15, 2011
Messages
26
FWIW, I used SikaFlex SL in my control joints, and if I had to do it over again, I would definitely go with the gel product from legacy.

In my case I had about 60ft of control joint to fill, and it took A LOT of product to do it. Use the foam backer rod for sure, it will save you a ton of money. The Sika is flexible after curing, but with my epoxy-coat w/ top coat on it, its pretty solid and its 100x better than leaving the control joints as is.
 

LegacyIndustrial

ALLIANCE MEMBER
Joined
Jun 7, 2010
Messages
7,993
Location
deerfield, IL
If you are only using a sealer I would tape both sides of the joint with duct tape, apply the product and then pull the tape (when tacky). Some of our customers will cut it with a razor-scraper before it fully cures but that takes a few jobs to master.

When using a pigmented epoxy it's better to grind it flush.

Either way you want a nice crisp edge.

Lastly, we offer a product that is "extremely" close in design to the sika-flex. This is also an option for sealing, fill the joints post sealing, available in (4) colors too.
 

Attachments

  • Hd100-Black.jpg
    Hd100-Black.jpg
    1.7 KB · Views: 390
  • HD100-Tan.jpg
    HD100-Tan.jpg
    1.6 KB · Views: 388
  • Hd-100 White.jpg
    Hd-100 White.jpg
    1.4 KB · Views: 384
  • HD-100Limestone.jpg
    HD-100Limestone.jpg
    1.6 KB · Views: 386
Last edited:

repomannwp

Active member
Joined
Oct 15, 2011
Messages
26
Some of our customers will cut it with a razor-scraper before it fully cures but that takes a few jobs to master.

I went with the razor scraper and got somewhat inconsistent results as a first timer. This was on Sikaflex, it helps alot to 1) have a brand new sharp blade at all times, 2) hold the scraper at an angle to the right, or left, so as you push through the filler, its slicing it off angle (instead of perfectly in-line with your control joint)., and 3) do a continuous cut, don't stop and restart.

I found the scraper pulls the flexible seal material as it cuts so you end up taking more out than desired in some spots. Anything that gives you a perfectly level cut is what you are looking for and I would agree, it takes some practice to get good at that.
 

mfive

Active member
Joined
Sep 25, 2011
Messages
35
We recommend that our product is the last step when using an etch process. However, as long as you make sure water is not trapped or driven under the product (through an open joint) you should be ok.

Right, but I'm guessing the dust from grinding/sanding would need to be washed away, no? Would just sweeping it up be sufficient to lay a basecoat of epoxy over?
 

mfive

Active member
Joined
Sep 25, 2011
Messages
35
Scotty, what's the minimum temperature you would apply the HD-821 in?
 
To avoid these ads, REGISTER NOW!
Top Bottom