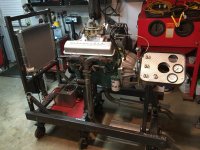
Hey everyone, I want to share the engine run stand project I am working to completion. I have been working for a while, so this initial post show progress to date and I will share how I started in follow on posts. My goal is to have a stand that rolls, adapts to any engine, and can be collapsed or folded when not in use.

You are using an out of date browser. It may not display this or other websites correctly.
You should upgrade or use an alternative browser.
You should upgrade or use an alternative browser.
F-66 Engine Run Stand Build
- Thread starter F-66
- Start date


larry4406
Well-known member
Very cool!


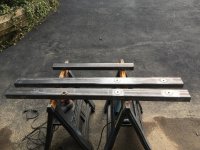
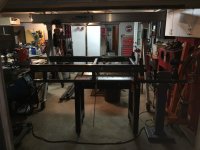
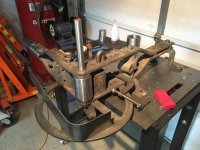
The frame for the stand is made in two parts that will allow for the stand to be folded and rolled for storage when not in use. This is the front of the end frame and has 4 legs for casters.
Attachments


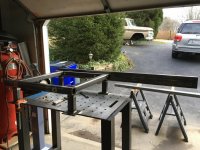
To allow the stand to fold, I laid out and drilled 1/2" holes in the end frame and the side rails. To space the rails, I added and tack welded washers. Here are the separate pieces in fab and then ready to assemble.
Attachments


These pictures show the fitment of the side rails of the engine run stand, with the legs and feet for casters.
Attachments


Kaizen
Well-known member
Sent from my iPhone using Tapatalk
Last edited:
Jagmandave
Well-known member
Nice job! Mine is only set up for the tiny 4 cyl engines I build, but it still takes up a lot of room when not in use. I would have done it differently if I knew then what I know now, but mine works ok for what I do.
I had to buy bigger casters when I realized the legs of the engine hoist wouldn't fit under it to load the engine in, for example.....
I had to buy bigger casters when I realized the legs of the engine hoist wouldn't fit under it to load the engine in, for example.....
Attachments
Your stand looks great too! I am learning as I go along as well. I am glad mine can be folded, but after I assembled I realized the frame was much too heavy to lift and drop safely. I added a lift/winch to overcome that obstacle.
Here is a youtube video.
Here is a youtube video.
Jagmandave
Well-known member

larry4406
Well-known member
F-66 I like your gantry crane in the background as well!
Second picture in Post#6 looks like an old pickup truck in the background. Might it be the one to receive the bowtie engine?
Second picture in Post#6 looks like an old pickup truck in the background. Might it be the one to receive the bowtie engine?
Boosted1
Well-known member
Very nice.
Larry, The gantry crane has been a great addition to the shop. I use it frequently. Yes the engine on the run stand is for the pick up. When I get it back together, it will be my shop truck and daily driver. I have been in the process of rebuilding and refinishing the running gear over the past 3 years. Here are some pics. I am going to assemble starting this summer.
Attachments


zmotorsports
ALLIANCE MEMBER
VERY nice job on the engine run stand. That turned out great.
Thanks Mike!
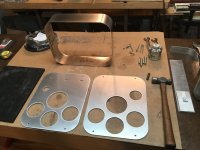
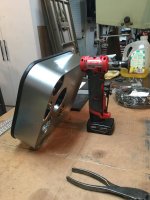
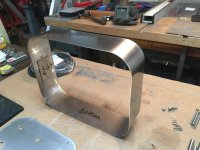
The next pictures are of fabricating the gauge pod. I made the case out of stainless steel sheet and the inner and outer dash out of aluminum plate. I cut the inner and outer dash pieces and drilled holes for the gauges, ignition switch, and the on off switches. I then made dies for my Hossfeld bender to shape the stainless steel for the outer case.
The next pictures are of fabricating the gauge pod. I made the case out of stainless steel sheet and the inner and outer dash out of aluminum plate. I cut the inner and outer dash pieces and drilled holes for the gauges, ignition switch, and the on off switches. I then made dies for my Hossfeld bender to shape the stainless steel for the outer case.
Attachments


macgee
Well-known member
The frame for the stand is made in two parts that will allow for the stand to be folded and rolled for storage when not in use. This is the front of the end frame and has 4 legs for casters.
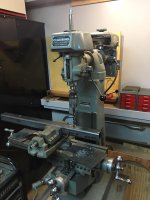
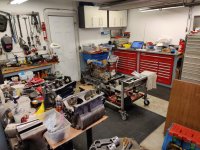
Very nice Clausing 8520 mill...................and engine stand!
Wow "A series" mini engine,god these are heavy[emoji15] all cast steel, ive run these in wheel barrows [emoji23][emoji1787][emoji23] before paying for them in scrap yards, tbh the biggest thing ive fired up in a scrappys on the floor was an old gardener bus engine, that was at the buttom of an old scrap engine pile a few years ago.
Sorry i digressed down memory lane, or my own dead end road.
That looks like a cool set up [emoji106][emoji106]
Sent from my IN2023 using The Garage Journal mobile app
Sorry i digressed down memory lane, or my own dead end road.
That looks like a cool set up [emoji106][emoji106]
Pic with an engine in it to be run in.....
Sent from my IN2023 using The Garage Journal mobile app
67CarGuy
Well-known member
What material did you use for the surround of the dashboard? The whole thing looks slick!
Sent from my iPad using The Garage Journal mobile app
Sent from my iPad using The Garage Journal mobile app
Jagmandave
Well-known member
Wow "A series" mini engine,god these are heavy[emoji15] all cast steel, ive run these in wheel barrows [emoji23][emoji1787][emoji23] before paying for them in scrap yards,
Yep, that's all I do - Mini and Sprite A series engines and transmissions. I have more work than I know what to do with and more calling on me every day. My wife says I'm a complete failure at retirement!
F-66, is that enough switches? I have a main (just in case I need to shut off all the electrical in a hurry), fuel pump, ignition, aux electric cooling fan, start button and I found I had to add an idiot light for the alternator to power up.
I also have a quick disconnect on the battery - again, JIC.
I keep a fire extinguisher right beside the unit when it's running too....probably would be a good idea to attach it to the unit?
Also, does your gauge pod swivel? I thought that would be a good idea so you can see the tach while making adjustments and so on.
Jagman, Good questions on the switches. I have extra. I have three plus ignition now. I will add a kill switch and the extinguisher. I will be wiring up soon, and will let you know how all of that works out. The gage pod is fixed now. I will look into adjust ability, I think it can be done. Thanks for the great tips the feedback is exactly what I needed.
What material did you use for the surround of the dashboard? The whole thing looks slick!
Sent from my iPad using The Garage Journal mobile app
Thanks!. For the surround, I used stainless sheet that I bent/shaped around the radius'. the first pic has the materials, second is the bend, third shows the assembled surround.
Attachments

Ohmthis
Well-known member
That’s a sweet run stand. I appreciate the extras like engine turning the gauge face plate. I made a run stand out of 2 x ** in the past. It worked for what I needed and was cheap and easy to disassemble.