To avoid these ads, REGISTER NOW!

Fab table upgrades

royce

Well-known member
Joined
Jun 22, 2014
Messages
3,111
Location
fairbanks ak
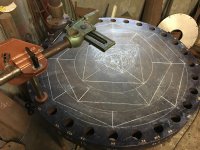
I use this table for laying out and every time it is used, I mark a baseline, then either divide for triangle, square, hex or oct.
Rather than having to use a trammel to divide it every time, I decided to put permanent marks around the perimeter.
It will be marked for 7-1/2, 15, 30, 60, 90 and 11-1/4, 22-1/2, 45 degrees.
I cut a saw kerf to mark, then stamped for degree.
I whacked the stamps deep, so they could hold some paint.
This is going to be super handy and a time saver.

Royce
 

Attachments

  • image.jpg
    image.jpg
    151.3 KB · Views: 731
To avoid these ads, REGISTER NOW!

lis2323

Well-known member
Joined
Dec 25, 2016
Messages
3,234
Nice!!!! How the heck do you keep the stamped numbers STRAIGHT and indented so consistently????


Sent from my iPad using Tapatalk
 
OP
R

royce

Well-known member
Joined
Jun 22, 2014
Messages
3,111
Location
fairbanks ak
The other upgrade is a mount for a versa vise.
It is adjustable in all directions and is good for a third hand, holding fabrication while tacking off.
 

Attachments

  • image.jpg
    image.jpg
    150.3 KB · Views: 348
OP
R

royce

Well-known member
Joined
Jun 22, 2014
Messages
3,111
Location
fairbanks ak
Nice!!!! How the heck do you keep the stamped numbers STRAIGHT and indented so consistently????


Sent from my iPad using Tapatalk

Thanks Lis,
They are only relatively straight, not perfect by any stretch.
I just go by eye, to line them up.
To get get the depth consistency, each one gets whacked three times with a three pound hammer, concentrating on the light side, with each strike.

Royce
 

sberry

Banned
Joined
Jun 18, 2005
Messages
35,747
Location
Brethren, Michigan
Steel was cheap an should have bought a little a while ago. One of these days just to say I did it I might treat myself to a new bench top, I could start right over too but as far as what makes it work is the top. I might simply cut around the old one and put a new top on. I know where I would put a coup[le holes slots and overhangs, one end hyper square with some score lines for angles similar to
Royce but on a rectangular plate. Might engrave a ruler along end and side. I am going to put a couple bolt holes along overhang on the end to bolt a couple fences, kind of a version of a fixture table cept only 2 holes
 
Last edited:
OP
R

royce

Well-known member
Joined
Jun 22, 2014
Messages
3,111
Location
fairbanks ak
I thought about how to degree this, 0-360, 0-180-0 or what I went with 0-90-0-90-0.
Decided against the 7-1/2 and 11-1/4 degree increments, as they would not get used much and the stampings would be crowded.

Lastly filled the the degree stampings with gold paint, it contrasts pretty well.

Next up, I'll cut a 0-15 degree protractor to the outer radius of the table, with 1 degree increments.
That way, I can mark to the degree anywhere on the perimeter of the table, when needed.

Here a pic showing some of the common shapes that can be laid out with this set up.

Royce
 

Attachments

  • image.jpg
    image.jpg
    152.8 KB · Views: 346

sberry

Banned
Joined
Jun 18, 2005
Messages
35,747
Location
Brethren, Michigan
I thougbt your idea was decent. My comment wasn't about the validity, I think it's got merit and might even be better applied to a square table.
 

sberry

Banned
Joined
Jun 18, 2005
Messages
35,747
Location
Brethren, Michigan
I would be more than happy to see this in action. It is beautiful just as art work. I was trying to think where I might apply it , what I might build where it would be an asset. I can certainly see it would be useful for cutting or laying out to a degree,, would be wasted on me. Hell i can go a lot of days witout putting much wear on a tape measure or scuff up a square.
Even though I had it in the apprenticeship in 1980 just don't use it and most of it is over my head. I am still mastering 90 degrees. Other guys could probably come up with all kinds of stuff.
 
Last edited:
To avoid these ads, REGISTER NOW!
OP
R

royce

Well-known member
Joined
Jun 22, 2014
Messages
3,111
Location
fairbanks ak
Getting back on topic,
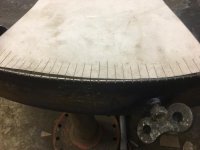
Started out this morning making a template, cut to a 21-1/2" radius with 1 degree increments.
As luck would have it, turns out that 1 degree at a 21-1/2" radius is .3752"
That makes it easy to layout.
I did this, with the thought that I would cut one out of aluminum, to be used when needed.
After further study, I decided to bite the bullet and mark out all 360 of them on the table,
Then followed that, by cutting notches with a 3 corner file.
I was a slow tedious chore, but when it was done, I was happy to have done it
Royce
 

Attachments

  • image.jpg
    image.jpg
    106.9 KB · Views: 202
OP
R

royce

Well-known member
Joined
Jun 22, 2014
Messages
3,111
Location
fairbanks ak
That’s a great layout table idea. Royce- you accomplish some great pretty cool things!

Thanks Outwest,
I've thought about degreeing this table for years, finally got around to it and it feels right.
With a few table squares, it should be an efficient fit up table, on top of being a good layout table.

Royce
 

Oregon rock crusher

Well-known member
Joined
Jun 28, 2016
Messages
1,913
Location
West of Salem
I really like that blind flange table Royce and the degree enhancements are a very useful feature to add to it. That should really speed up the layout on a lot of your projects. Nice. Ed.
 

2oolhound

Well-known member
Joined
Dec 18, 2010
Messages
5,918
Location
BC Canada
Wus just thinking, instead of gold paint could you melt brazing rod (inlay) in the file and saw cuts and file them flush afterward?

:evil:

:)
 

lis2323

Well-known member
Joined
Dec 25, 2016
Messages
3,234
The stand is way better than the truck wheel that's always in the way and catches dirt.


I’m with you on that topic as I can get undeservedly and embarrassing rude in my opinions of truck wheel stands.

I need to think before I type. [emoji3525]


Sent from my iPad using Tapatalk
 
OP
R

royce

Well-known member
Joined
Jun 22, 2014
Messages
3,111
Location
fairbanks ak
I really like that blind flange table Royce and the degree enhancements are a very useful feature to add to it. That should really speed up the layout on a lot of your projects. Nice. Ed.

Thanks Ed,
I never would have thought that a round table would be as handy as this is.
Access to the sides or back of a layout or weldment is easier without corners to deal with.
This one, also goes against the thought that a work bench needs to be 36" tall.
At only 30" tall, it is easier to get over the top of the layout and reaching across, for sighting lines and for fitting up.

Royce
 
OP
R

royce

Well-known member
Joined
Jun 22, 2014
Messages
3,111
Location
fairbanks ak
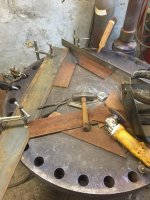
Made good use of the degree marks on the table, fitting up some squares, today.

Royce
 

Attachments

  • image.jpg
    image.jpg
    114.2 KB · Views: 172
OP
R

royce

Well-known member
Joined
Jun 22, 2014
Messages
3,111
Location
fairbanks ak
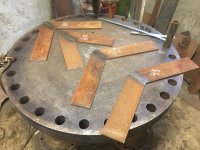
Got all of the squares made, still working on the way they will be fastened and indexed to the table.
Needs to be simple and quick in attachment/detachment.


Royce
 

Attachments

  • image.jpg
    image.jpg
    151 KB · Views: 141
OP
R

royce

Well-known member
Joined
Jun 22, 2014
Messages
3,111
Location
fairbanks ak
Got lucky and found a chunk of 1-7/8" round bar in the bone pile, it fits the holes with just the right amount of slack.
Cut some 1" pieces and plug welded them on the back side of the squares, making sure that they were indexed with the table.
Now, any of the squares can be placed on any of the quarter points of the table
They could be clamped to the table, but don't really need to be.
I'll drill a hole in them, so they can be hung on the wall, when not in use.

Royce
 

Attachments

  • image.jpg
    image.jpg
    150.2 KB · Views: 139
OP
R

royce

Well-known member
Joined
Jun 22, 2014
Messages
3,111
Location
fairbanks ak
Finished the day, starting on some hold downs.
I usually make them out of 5/8"bar, but did not have any, so used some 3/4".
Scaled them up a little, because of the larger diameter.

Royce
 

Attachments

  • image.jpg
    image.jpg
    151.1 KB · Views: 112

2oolhound

Well-known member
Joined
Dec 18, 2010
Messages
5,918
Location
BC Canada
Cut some 1" pieces and plug welded them on the back side of the squares, making sure that they were indexed with the table.

Royce

:thumbup: Projects that make working on projects easier and faster are doubly rewarding! Awesome!
 
OP
R

royce

Well-known member
Joined
Jun 22, 2014
Messages
3,111
Location
fairbanks ak
:thumbup: Projects that make working on projects easier and faster are doubly rewarding! Awesome!

Right you are 2ool,
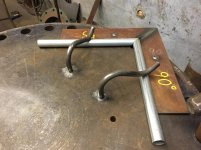
Got a few hold downs bent up, drilled a couple couple holes in the table and gave it a test drive, today.
The round tubing is only for illustration, this set up is more for sq tube, angle and flat bar.
Thanks

Royce
 

Attachments

  • image.jpg
    image.jpg
    150.8 KB · Views: 154
To avoid these ads, REGISTER NOW!
Top Bottom