To avoid these ads, REGISTER NOW!

Fabbed up some socket holders

NUTTSGT

Super Moderator
Staff member
Joined
Sep 14, 2009
Messages
50,968
Location
Northern Central Ohio
I had done this once before and never got around to making a thread on it. I might have posted a pic of the 1/2" drive stuff but I honestly don't remember.
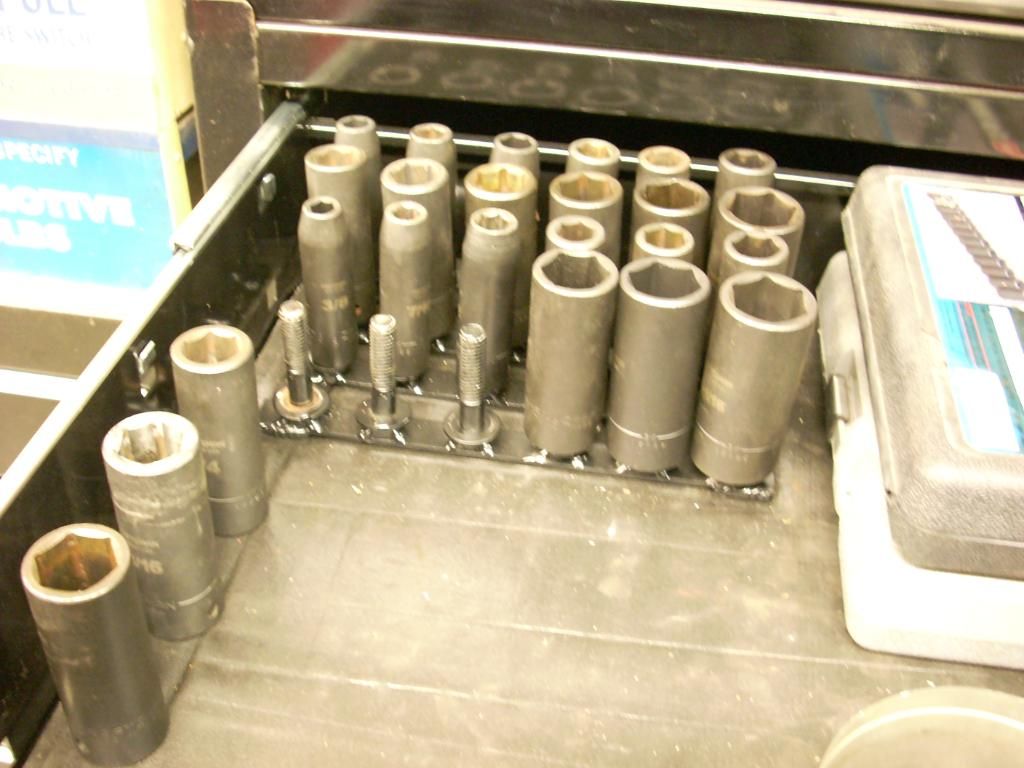
I keep all my air tools in a single 40" wide drawer and the socket holders are for my impact sockets.
Here are the ones I made for the 1/2" stuff, that I never took pics as I was making.

12142011011.jpg


Since I bought a 3/8" drive air impact and sockets this summer, I needed some storage for them. Here's what I started with, some 3/4" flat stock, some 1/4"x 2" bolts and washers.
12142011003.jpg


I cut off the threaded end, as I wanted a bare shaft for the sockets to sit on.
12142011007.jpg


Then I rounded the ends off with a grinder, bolt cutters are somewhat brutal. The two bolts for smaller shallow sockets had to be thinned down a little for the socket to fit over.
12142011009.jpg
 
To avoid these ads, REGISTER NOW!
OP
N

NUTTSGT

Super Moderator
Staff member
Joined
Sep 14, 2009
Messages
50,968
Location
Northern Central Ohio
Next step was figuring out how wide to make them. Actually I matched it to the one I already made, 9" wide. So I cut up some flat stock.

12142011008.jpg


and started to tack it together. Once things looked ok, I welded them together. Then I welded the bolts on, head down.

12142011012.jpg


I tossed it in the blast cabinet to clean all the **** off of it. Another trip to the welding table for the washers. The washers do nothing more than give the socket a wider base to sit on. Once they were added, a quick blast cleaned them up too.
12152011001.jpg


Then a mock up to make sure they look ok. They are currently hanging up with the paint drying. Nobody likes to watch paint dry, so I didn't take a picture of that.
12152011004.jpg


12152011005.jpg
 
OP
N

NUTTSGT

Super Moderator
Staff member
Joined
Sep 14, 2009
Messages
50,968
Location
Northern Central Ohio
Now you'll notice an empty spot in front of the sockets. I'm going to build a small tray for the impact extensions. Something like this.
06232011014.jpg


First, I have to fix my homemade brake, which I ruined bending the threshold for my door.
 
OP
N

NUTTSGT

Super Moderator
Staff member
Joined
Sep 14, 2009
Messages
50,968
Location
Northern Central Ohio
Thanks guys. I know the second one didn't turn out as nice as the first one. Everything was closer on the second and it had 30% more positions making it tight.
 

NASTYZEN

Well-known member
Joined
Jun 11, 2010
Messages
2,823
Location
St-Colomban,Que. Canada
Looks good.
You know, if you put a bit of Muriatic acid in a plastic container. You could dip the galvanized part of your bolt into it and dissolve the plating. So it's easier to weld and you don't have to breath the vaporized yellow cloud.
Save yourself some burns from the excessive spattering and make prettier welds.
 
OP
N

NUTTSGT

Super Moderator
Staff member
Joined
Sep 14, 2009
Messages
50,968
Location
Northern Central Ohio
Looks good.
You know, if you put a bit of Muriatic acid in a plastic container. You could dip the galvanized part of your bolt into it and dissolve the plating. So it's easier to weld and you don't have to breath the vaporized yellow cloud.
Save yourself some burns from the excessive spattering and make prettier welds.

Didn't know that but I do now. Thanks. :beer:

Honestly though, the welds for the bolts were bascially nothing more than 3 little tack welds. A little black paint, sockets on them and in a drawer, nobody will really see them now. :bounce:
 

t100

Well-known member
Joined
Sep 3, 2009
Messages
6,101
yep, the muriatic acid will take off the zinc plating on these bolts in the matter of seconds. $2 a gallon at pool supply stores. for future reference, cad, zinc or any plating will weaken your welds, if you are making load bearing parts.

btw, I use the leftover acid to kill weeds behind the shop.
 

NASTYZEN

Well-known member
Joined
Jun 11, 2010
Messages
2,823
Location
St-Colomban,Que. Canada
Oh yeah....Don't breath the Muriatic acid fumes...! The fumes also make everything in the shop rust a little faster.

I keep the bottle outside the shop and do the stripping outside also. I dump the used acid in an other bottle, not into the environment.:)
A final water dip and dry and your ready to go.
Beware, your stripped parts are going to corrode faster now. Don't weld them
in a week or your going to have clean of some rust.
 

USMCdodge

Well-known member
Joined
Oct 12, 2011
Messages
453
Location
MCBH
very cool! I made a few wrench holders with just a piece of u channel and a grinder to put slots in it.
 
OP
N

NUTTSGT

Super Moderator
Staff member
Joined
Sep 14, 2009
Messages
50,968
Location
Northern Central Ohio
very cool! I made a few wrench holders with just a piece of u channel and a grinder to put slots in it.

I've thought about about wrench holders along the same lines as these socket holders. That would be for the larger wrenches, as I have already made some for "regular" sized wrenches. I wonder if I ever posted pics of those ? Damn getting old *****. :lol_hitti
 
To avoid these ads, REGISTER NOW!

OccupantRJ

Well-known member
Joined
May 15, 2009
Messages
11,096
Location
Eastern North Carolina
I've thought about about wrench holders along the same lines as these socket holders. That would be for the larger wrenches, as I have already made some for "regular" sized wrenches. I wonder if I ever posted pics of those ? Damn getting old *****. :lol_hitti

Eric, just click on your screen name, then the statistics tab, and you will be able to see anything you have ever posted or replied to.
 
OP
N

NUTTSGT

Super Moderator
Staff member
Joined
Sep 14, 2009
Messages
50,968
Location
Northern Central Ohio
Eric, just click on your screen name, then the statistics tab, and you will be able to see anything you have ever posted or replied to.

Trust me, I've done that a few times. I know I took pictures at one time but I don't know if I had posted somewhere in response to somebody else asking about wrench holders.

I'm glad you quoted me on that, I had forgot about those pics too. :lol:
 
OP
N

NUTTSGT

Super Moderator
Staff member
Joined
Sep 14, 2009
Messages
50,968
Location
Northern Central Ohio
Well, I just looked through pictures on the computer and I have none of the wrench holders, I will have to take some tonight.
 
OP
N

NUTTSGT

Super Moderator
Staff member
Joined
Sep 14, 2009
Messages
50,968
Location
Northern Central Ohio
As promised, I took a couple of pictures today.

Here are the wrench holders I fabbed up many months ago. They're nothing more than some flat stock and nuts welded on to them as spacers.
12182011fabbedtools001.jpg

12182011fabbedtools003.jpg


While I was out there, I grabbed a cut off wheel out of the drawer. Another idea popped into my head and a few minutes later, organized cut off wheels. Nothing more than a 3" piece of 10 guage and a 3/8" bolt welded on.

12182011fabbedtools007.jpg


12182011fabbedtools005.jpg
 

Provincial

Well-known member
Joined
Sep 21, 2011
Messages
6,869
Location
Near Salem, OR
Just a thought, but plow bolts have a flat head and a square shank. 5/16" plow bolts have a .325 square and 7/16" bolts have a .450 square. The flat head would weld down nicely and provide an automatic spacing (.605 on the 5/16" bolts and .826 for the 7/16" bolts) between the sockets. Plow bolts are usually unplated, which would make welding easier.
 

JC23

Well-known member
Joined
Dec 31, 2009
Messages
11,718
Location
Northcoast
Ha ha. I like to watch paint dry.

But I like it more when I put it on...

Nice work!
 

BUGTHUG

Well-known member
Joined
Nov 12, 2010
Messages
2,960
Location
Kansas
I think you could use a small piece of rebar, lot cheaper than all those bolts. Plus you don't have to cut the threads off. Basic a good idea, and is works for what it was designed for. Good job.
 

bimmer1980

Well-known member
Joined
Feb 5, 2009
Messages
2,104
Location
York, PA
They also have plain rod in a variety of sizes at both the big box stores, tractor supply and of course, the steel supplier....

That would be a bit easier than cutting the threads off bolts and then having to dip them to remove the galvanizing.....

I understand these are done, but just for future reference for guys that want to use this idea.....
 

drivesitfar

Well-known member
Joined
Oct 23, 2013
Messages
36,028
Location
Pacific Northwest
Nutts: WELL DONE. just curious how you LIKE them? i'm hearing other options and wondering if you would make more exactly the same or what would you do different?

thanks for sharing
 
OP
N

NUTTSGT

Super Moderator
Staff member
Joined
Sep 14, 2009
Messages
50,968
Location
Northern Central Ohio
Nutts: WELL DONE. just curious how you LIKE them? i'm hearing other options and wondering if you would make more exactly the same or what would you do different?

thanks for sharing

They're working fine for me. Would I make more the same way, not sure but probably as it wasn't extra work using the bolts. I think it saved me a bit.

Using the bolts allowed for a nice wide area to weld to and if I used rod and put to large a welding berry, it wouild have to be ground down to make sure the socket sat straight. The large head made it easier to make sure the bolt/rod was straight up and down, not leaning to the side.
 

drivesitfar

Well-known member
Joined
Oct 23, 2013
Messages
36,028
Location
Pacific Northwest
Nutts: I bet you had the bolts and the scraps and thought I think I should make some. congrats on making stuff you have laying around into a storage solution.

cheers
 

BUGTHUG

Well-known member
Joined
Nov 12, 2010
Messages
2,960
Location
Kansas
They make a little magnet that looks like a speed square. It works very well of keeping everything straight. I think HF has them for a few bucks. Plus it like a 3rd hand, helping to hold the part and not burning the hand.
 
To avoid these ads, REGISTER NOW!
Top Bottom