To avoid these ads, REGISTER NOW!

Fabricating My LAST Work Bench

Modifieddriver

Well-known member
Joined
May 29, 2009
Messages
820
Location
Moonville, South Carolina
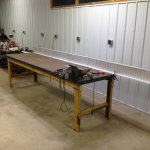
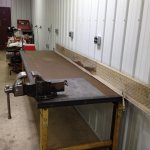
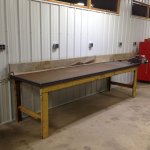
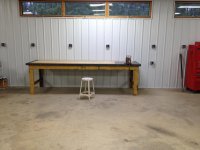
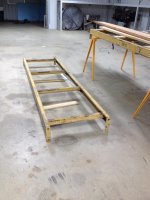
Used a pallet rack shelf as a base. This rack is rated for a 5,000 lb load!! I carriage bolted 2"x12" planks to the frame. Cut the boards off 10' long. This gives about 2" of top over hang to the steel frme.

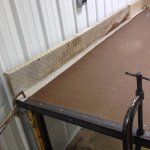
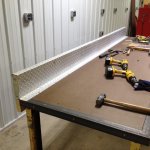
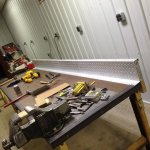
Using 1/4"x2"x2" angle iron on the bench top edges. Fastened the angle to the planks with decking screws. Had to drill and countersink each hole.

Under the vise is a 1/4"x24"x24" steel plate to use as a small welding area. The plate was already sheared to this size, otherwise I would've made it wider.

Now,l come the hard part. I'm going to use 1/4" thick tempered hardboard for a bench top. BUT, guess what? Nobody stocks 1/4" thick hard board in 4'x8' sheets. 3/16" is common and readily available. In hind sight, I should've done this with 3/16" thick angle and plate.

A local building supply usually has it but are out of stock right now. Might have some next week. I haven't decided if I'll glue or screw the bench top on.

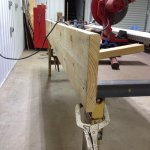
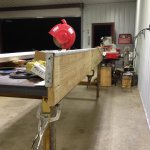
I used part of another pallet rack for the legs incorporating the welded in support. I put the bench top at 34" off the floor. I'll also construct a shelf or two under the bench top, but recessed back from the legs to not be in the way while I'm working there (probably on a stool!!).

I'll also install a couple of diagonal braces on the rear legs. I bolted each leg to the top with two 1/2" bolts, but some more lateral support is needed.

I also need to fabricate a back splash. I might use aluminum diamond plate (tread plate). Probably at least 12" high. When I get my Miller MIG welder moved in I'll weld the mitered corners and grind then flush.

I have to be a "nut case" to do this much work on a f'ng bench. That's the reason for the Keystone. This drove me to drinkin' !!!

I was asked why 34" high. I already have a work bench at 34" that pretty comfortable to work at, and because of my advanced age I plan on being on a stool if I'm doing time consuming detail work, like a carburetor.

Then, the other factor is the vise. Proper vise height placement for doing work is important. Here's how you figure that out. Stand at the bench, arms down but forearm bent up at the elbow. Where your elbow is off the floor is the proper height for the jaws of the vise. It's an ergonomics thing that I learned from a European several years ago. Makes sense because that's the body pivot point for doing filing cutting, etc.

The vise is a Columbian with 5" wide jaws. It doesn't have a swivel base, so I might center it on the steel welding top plate. What do ya' think?
 

Attachments

  • Work Bench 027.jpg
    Work Bench 027.jpg
    139.1 KB · Views: 357
  • 007.jpg
    007.jpg
    140 KB · Views: 436
  • Work Bench 011.jpg
    Work Bench 011.jpg
    138.8 KB · Views: 377
  • Work Bench 032.jpg
    Work Bench 032.jpg
    138 KB · Views: 516
  • Work Bench 043.jpg
    Work Bench 043.jpg
    141.4 KB · Views: 499
  • Work Bench 024.jpg
    Work Bench 024.jpg
    137.2 KB · Views: 371
Last edited:
To avoid these ads, REGISTER NOW!

RivennHewn

Well-known member
Joined
Jun 4, 2011
Messages
10,368
Location
PNW
Makes a nice looking and sturdy bench, but you expect us to believe it will be your last?

Nahhh…...
 

Ign

Well-known member
Joined
Jul 7, 2006
Messages
12,769
Location
Butte Peak ND
You're one of the few people I've seen who put in just the right amount of 110V receptacles (not joking, people always install too few).
 

lilcraigford

Well-known member
Joined
Oct 19, 2014
Messages
348
Location
Portland, ME
That'll be a nice bench when its all done! I like the integrated welding plate and angle edging. Also, interesting tip on determining vise height. That'll come in handy in the future!
 
OP
M

Modifieddriver

Well-known member
Joined
May 29, 2009
Messages
820
Location
Moonville, South Carolina
You're one of the few people I've seen who put in just the right amount of 110V receptacles (not joking, people always install too few).


It was an over kill, but that wall will have all my stationary shop equipment lined up against it. I'm in the process of moving in.

I have a super dislike for unplugging something to plug another in.
 

classicJackets

Well-known member
Joined
Sep 26, 2014
Messages
448
Location
SE Michigan
I like it! Very good looking IMO and obviously should be very sturdy! Good to hear that "vise-elbow" advice again, I'm setting up to build a bench pretty soon and I thought I had heard it as the tabletop at elbow height.

Edit: Just noticed you are exactly where I lived this past fall (off Sandy Springs Road) and probably where I'll be again this summer, haha. Small World.
 
Last edited:
OP
M

Modifieddriver

Well-known member
Joined
May 29, 2009
Messages
820
Location
Moonville, South Carolina
I like it! Very good looking IMO and obviously should be very sturdy! Good to hear that "vise-elbow" advice again, I'm setting up to build a bench pretty soon and I thought I had heard it as the tabletop at elbow height.

Edit: Just noticed you are exactly where I lived this past fall (off Sandy Springs Road) and probably where I'll be again this summer, haha. Small World.


Whatcha' doin' up here?

I'm just around the corner from that old white frame building Sandy Springs Baptist Church on Snow Rd. Stop on by for a shop tour.

The vise jaws are supposed to be at elbow height. Trust me, it works.
 

classicJackets

Well-known member
Joined
Sep 26, 2014
Messages
448
Location
SE Michigan
Whatcha' doin' up here?

I'm just around the corner from that old white frame building Sandy Springs Baptist Church on Snow Rd. Stop on by for a shop tour.

The vise jaws are supposed to be at elbow height. Trust me, it works.

I'm in college for Engineering and I am Co-oping with Michelin at the Marc campus. So I get to be up there every other semester. I drove that road once or twice when I was out exploring, and I'll definitely shoot you a message once I get back up there. Awesome, thanks!
 
To avoid these ads, REGISTER NOW!
OP
M

Modifieddriver

Well-known member
Joined
May 29, 2009
Messages
820
Location
Moonville, South Carolina
I'm in college for Engineering and I am Co-oping with Michelin at the Marc campus. So I get to be up there every other semester. I drove that road once or twice when I was out exploring, and I'll definitely shoot you a message once I get back up there. Awesome, thanks!

Incredible coincidence. I spent about 22 out of my 27 years of Michelin employ at MARC. Started there in Feb '77, left there Jan '04. I spent about five years over at the Hqtrs on Pelham road.

Ask some of the old timers at MARC. They'll probably remember me. I spent 10 years as a test driver in the 80's, and my last eight in the racing department. Most remember me for the variety of old cars I drove to work.
 

Kevin54

MEMBER EMERITUS
Joined
Jan 12, 2005
Messages
29,341
Location
Urbana, Ohio
I think I built my last workbench about 4 benches or so ago:lol_hitti But then I'll rearrange something, and decide I need another one, or a different style, something.

Yours looks like it is going to be a sturdy one. If you are going to use hardboard, or the brown Masonite like stuff, I would not glue it down. That way when it gets scratched and beat up, you can swap it out. On the last bench I built I used laminated flooring on it. The bench was 4x8, and I just pion nailed it in a few places around the perimeter as I had a 1x2 band around the edge. The laminate flooring was on sale dirt cheap, and only took a couple of boxes. It made for a nice, easy to clean bench top.
 
OP
M

Modifieddriver

Well-known member
Joined
May 29, 2009
Messages
820
Location
Moonville, South Carolina
I think I built my last workbench about 4 benches or so ago:lol_hitti But then I'll rearrange something, and decide I need another one, or a different style, something.

Yours looks like it is going to be a sturdy one. If you are going to use hardboard, or the brown Masonite like stuff, I would not glue it down. That way when it gets scratched and beat up, you can swap it out. On the last bench I built I used laminated flooring on it. The bench was 4x8, and I just pion nailed it in a few places around the perimeter as I had a 1x2 band around the edge. The laminate flooring was on sale dirt cheap, and only took a couple of boxes. It made for a nice, easy to clean bench top.

Thanks for the tip. I did a bench similar to this about 40 years ago. I moved south and it stayed up north. On that one I screwed the hard board down with small counter sunk wood head screws. Of course, back then we had contact cement as the primary adhesive. With this one I thought about construction adhesive, but ruled it out, just for the very reasons you mentioned. You just reinforced my decision. I'll screw this one too, literally. THANKS !!
 
OP
M

Modifieddriver

Well-known member
Joined
May 29, 2009
Messages
820
Location
Moonville, South Carolina
Work bench update:

Cut and attached the 1/4" tempered hard board to the bench top planks. I used 1" flat-head philips wood screws.

Cleaned up the 5" jaw Columbian vise. Mounted it through the steel plate with 3/4" grade 8 bolts. The front two bolts go through the steel frame. The read bolt goes through the planks and another 5/4" spacer board.

Then I decided I needed a back splash to control "stuff" rolling off the back of the bench top.

The result is aluminum diamond plate that I'll back up with another 2"x12"x10" wood plank for support.

Can you guess what the aluminum was originally? I bought the pair at an auction several years ago, slightly bent and real dirty, for $5. They are running boards for a crew cab pickup truck.

Cleaned them with some hi-octane chemical and straightened them out on the new work bench edge!!!

I'll cut them so I can use the already existing end mounting flanges on the 2"x12". The two left over pieces will be long enough to do the same on a 5' long commercial maple top bench I already have.

Get done with the back splash and I'll put a shelf or two underneath. Then a coat of gray paint on the bottom frame work.
 

Attachments

  • DSCN7731.jpg
    DSCN7731.jpg
    79.7 KB · Views: 57
  • DSCN7728.jpg
    DSCN7728.jpg
    78.4 KB · Views: 68
  • 104.jpg
    104.jpg
    131.9 KB · Views: 58
  • 103.jpg
    103.jpg
    134.3 KB · Views: 53
  • 084.jpg
    084.jpg
    134 KB · Views: 56
  • 083.jpg
    083.jpg
    134.7 KB · Views: 60
  • 101.jpg
    101.jpg
    133.3 KB · Views: 62
OP
M

Modifieddriver

Well-known member
Joined
May 29, 2009
Messages
820
Location
Moonville, South Carolina
UPDATE:

Installed my back splash last night. I really like the way it turned out.

Used a 2"x12"x10' as a backer. Used deck screws to attach to bench top planks.

The running board fit over this perfect.

I have a chop saw with an aluminum cutting blade (bought the saw and blade at a swap meet a few years ago for $50. It's a Milwaukee. Blade is probably worth $50 alone) and used this to cut to length. It worked like a charm. One pass and went through the entire running board, nice square cut. Best $50 investment I've made.

Cut them to equal length and butted them in the middle of the bench. I was able to use the end flanges of the running board and attach them to the backer board. I used oval head Philips screws to attach everything to the bench top.

I was too tired to clear the bench top off before taking pictures.
 

Attachments

  • Latest work bench 112.jpg
    Latest work bench 112.jpg
    134.7 KB · Views: 26
  • Latest work bench 111.jpg
    Latest work bench 111.jpg
    136.3 KB · Views: 21
  • Latest work bench 110.jpg
    Latest work bench 110.jpg
    134.9 KB · Views: 23
  • Latest work bench 109.jpg
    Latest work bench 109.jpg
    131.3 KB · Views: 24
  • Latest work bench 108.jpg
    Latest work bench 108.jpg
    125.2 KB · Views: 21
  • Latest work bench 105.jpg
    Latest work bench 105.jpg
    132 KB · Views: 27
  • Latest work bench 113.jpg
    Latest work bench 113.jpg
    133.7 KB · Views: 24

WeldTightFab

Member
Joined
Mar 2, 2015
Messages
22
Out of all the tables I have built I have never done a backstop, yet I drop things behind it constantly... I love that feature of your table.
 
To avoid these ads, REGISTER NOW!
Top Bottom