To avoid these ads, REGISTER NOW!

Fabrication Question

TravisT

Well-known member
Joined
Oct 22, 2011
Messages
156
Location
NoVA
I'm trying to figure out the best way to accomplish something, and know that this is the best place to ask. I know several of you guys have background in machining/milling things.

I have 30 rails for computer hard drives that have a countersunk hole in them. I need to move this hole back about 1/16 - 1/8" (end up with a slotted hole). Countersink new section of hole, then drill a new hole in the aluminum to line up to another mounting hole in the hard drive. This will prevent the hard drive from moving in the slotted hole. All of this has to be pretty precise.

I did the first one with a half round file - it was very tedious, but it worked. I thought getting a drill press would work, but the bit flexes to much to slot the hole.

I read up on slotting holes, and it looks like an end mill in the correct size may work in the drill press, along with an x-y vise. Does this sound like the ticket? Appreciate any advice or suggestions.

Travis
 
To avoid these ads, REGISTER NOW!

Outlawmws

Well-known member
Joined
Aug 9, 2011
Messages
39,310
Location
The Badlands
Probably not as the DP was not made for side loads, and if the DP chuck is the common taper/taper adapter into the spindle, it can pop loose and at a minimum, go falling off and damage the end mill and probably whatever it lands on (high likely hood your foot, or some part that is irreplaceable...)

Make a fenced fixture with a stop so you can setup one, and drill the through hole first. After you have all 30 drilled, change to the counter sink and do that operation with the same fixture setup. You might even use a different hole to "pin" the part in location on the fixture so it doesn't shift once in place.

It doesn't sound like the slot is operationally significant so skip trying to slot them, even if they are that close...
 

JeremyManning

Well-known member
Joined
Oct 12, 2010
Messages
1,457
Location
Ontario, Canada
Yes it sounds like your headed down the right path, use a center punch to mark the point where you want to drill, that will steady the bit from wobbling in the wrong place you can also use a smaller bit to start and then step up to the size you want.
 

metaleltr

Well-known member
Joined
Sep 4, 2009
Messages
2,680
Location
Western Ohio
Drill presses are not designed for axial loads, because of the Morse taper holding the chuck.

Since this is a light duty application it might work, have you thought about using a center drill?
 
OP
T

TravisT

Well-known member
Joined
Oct 22, 2011
Messages
156
Location
NoVA
Problem is that the center of the "new" hole is located right in the middle of the countersink of the original hole, so I'm starting at a disadvantage.

It isn't a highly precise piece that I'm working on, but precise enough that the hole that is a little off is not working correctly. The material is thin aluminum, so we're not talking about trying to mill a 1/4" piece of hardened steel or anything. Still, you guys know much more than me about this, but I can say because of what I'm working with I don't think drilling the original hole into a slot will work.
 
OP
T

TravisT

Well-known member
Joined
Oct 22, 2011
Messages
156
Location
NoVA
To elaborate a little, this is for a removable hard drive bay. The hard drives are mounted to aluminum trays that insert into a backplane. I found through a lot of frustration that the hard drives are not inserting into the backplane connector enough. There is no way to adjust the amount the trays insert into the fixture without re-inventing the tray itself.

The only easy option is to mount the hard drive further back (by about 1/16" or so) so that it seats fully on the connector on the backplane.
 

wess23

Member
Joined
Jun 20, 2007
Messages
12
Location
Central NJ
Use an end cutting endmill and plunge it in just like a drill. Obviously the piece needs to be clamped first.
 

Transman304

Well-known member
Joined
Feb 1, 2011
Messages
173
Location
Morgantown WV
Can you center punch the new hole on the other side as not to end up in the existing countersink and then use a dremel tool to slot and then new countersink?
 
OP
T

TravisT

Well-known member
Joined
Oct 22, 2011
Messages
156
Location
NoVA
Use an end cutting endmill and plunge it in just like a drill. Obviously the piece needs to be clamped first.

This sounds like it could work. I'm thinking the end mills are much less flexible than a drill bit. Plus, from what I've seen, it looks like they are relatively flat on the end. That may help it cut into the countersink as opposed to just flexing on me.

Can you center punch the new hole on the other side as not to end up in the existing countersink and then use a dremel tool to slot and then new countersink?

This could work in a pinch, but it would be a long process.
 

2oolhound

Well-known member
Joined
Dec 18, 2010
Messages
5,918
Location
BC Canada
I wonder if a good hole punch would cut through. Either that of a carbide burr in the drill press with a fence or guide clamped in place.
 

Outlawmws

Well-known member
Joined
Aug 9, 2011
Messages
39,310
Location
The Badlands
A Whitney Jr. no.5 sheet metal punch would probably do fine, depending on the shape/config of the rail. these often have lips that might make it not so good a choice.

The end mill plunging straight in will work, and the back side start is also an option in conjunction. Then go in from the other side with the counter sink if still needed
 

garfunkle24

Well-known member
Joined
Mar 18, 2008
Messages
3,429
Location
Saskatoon, Canada
It's possible that however sharp or small of a drill bit you use, the light duty material is actually flexing as soon as anything hits the countersink bevel. You might just need to support the material better, the light gauge being your obstacle.

For similar projects (dash work, computer case mods) I have found that brushing on some glue or even a dab of expanding foam on the backside of the work piece can work wonders.
 

srmofo

Well-known member
Joined
Oct 15, 2009
Messages
6,161
Location
SW ohio
Another option is to move them further back , say 1/4 to 3/8 of an inch further back and drill all new holes. if you have the room on the rails, this should get you far enough away from the previous countersink and allow you to drill perfectly aligned holes. Make a jig to hold the pieces and do 1 hole at a time on all 30 pieces, then repeat.

Im familiar with the flimsy aluminum that holds the HDD. It might be 20 gauge on a good case and even less on cheaper cases. I dont see any issues with using a drill press for side loads for just a few pieces. IMHO
 
To avoid these ads, REGISTER NOW!
OP
T

TravisT

Well-known member
Joined
Oct 22, 2011
Messages
156
Location
NoVA
It's not your typical HDD mount that is made of sheet metal. This is for a server that has aluminum rails that allow hot-swapping of the drive. Overall, it is close to 1/4" thick, but it is machined to fit the slots in the bay and slide in and out - so it's not just a hunk of 1/4" aluminum.

As for moving the holes back behind the countersunk hole, that isn't an option either. I have to move them between 1/16" and 1/8" - no more or less. The drives insert into a backplane that will be destroyed if I move the holes back past 1/8". Really crappy QC from the company I bought them from, but I have 3 of these and trying to RMA these will be more work than just modifying them.

The carbide burr would work perfectly for removing the metal, but doing it in a dremel in my hand probably wouldn't produce accurate enough results. That's why I though the end mill may work.
 

racingtadpole

Well-known member
Joined
Dec 3, 2011
Messages
2,029
Location
The far side of crazy.. but sometimes Australia
I had to do something very similar for some RF gear. I made a piloted fixture out of some scrap that located the drill. The drill still tried to wander even with a pilot. I used a router bit in the drill press running flat out. Worked very well. So well that after I got it figured, it took less time to make the remaining holes than it did to get the setup working right.
 
Last edited:
OP
T

TravisT

Well-known member
Joined
Oct 22, 2011
Messages
156
Location
NoVA
That is good news to hear. I'll order an end mill and see what I can figure out. Thanks for all the suggestions.
 

kbs2244

Well-known member
Joined
Nov 11, 2006
Messages
14,065
Can you not just shim the back plane connector a 1/16 inch?
What does it attach to?
You are talking the thickness of a breakfast food box.
 
OP
T

TravisT

Well-known member
Joined
Oct 22, 2011
Messages
156
Location
NoVA
The backplane is mounted behind the mounting tabs, so any shimming would make my problem worse. I thought of moving the backplane to the other side of the mounting tabs (they are about 1/16"), but it won't physically go in that way.

Wish it would work - this would make my life much easier.
 

er3456df

Well-known member
Joined
Dec 1, 2009
Messages
230
Wish it would work - this would make my life much easier.

Wish you would post pics - would make this conversation much easier :p

What do the trays rest on at the sides? I'm picturing regular sheetmetal bays, but maybe not. Are there "stops" on the enclosure that could be modified instead?
 
OP
T

TravisT

Well-known member
Joined
Oct 22, 2011
Messages
156
Location
NoVA
Wish you would post pics - would make this conversation much easier :p

What do the trays rest on at the sides? I'm picturing regular sheetmetal bays, but maybe not. Are there "stops" on the enclosure that could be modified instead?

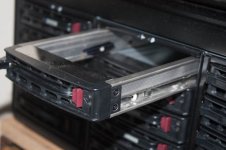
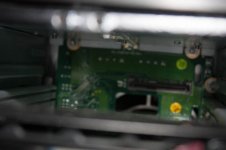
Point taken! Almost posted pictures the first time, but talked myself out of it.

The first picture is of the front of the installed drive bays. The second is of the drive tray sticking out of the bay. The third is of the inside of one drive bay rail, which was already modified by drilling the middle hole and elongating the rear hole. The last picture is a bad one, but it shows the backplane of the drive bay. Although it is out of focus, you can see that the mounting tabs of the backplane are in front of the backplane, but there is also many other tabs that would interfere with moving it to the front of the mounting tabs.

Hope this clears things up a little.

As for stops, there are stops that the rails hit in the back, so in theory shaving some off of the back of each rail would allow it to travel further into the bay. The problem is, there is a lever on the front with a cam that fits perfectly into a slot on the front side of the bay. There is very little slack in the fit of this. Plus, that ensures the drives is fully seated as well as removes the drive from the backplane connector. It would be more to modify all of those things than it would to move the drive back.

I'm open to suggestions, but I think the route I'm going is going to be the best. Keep them coming though in case I overlooked something.

My 9/64" end mill should be here tomorrow.
 

Attachments

  • IMG_6908.jpg
    IMG_6908.jpg
    53.5 KB · Views: 25
  • IMG_6909.jpg
    IMG_6909.jpg
    49.1 KB · Views: 31
  • IMG_6910.jpg
    IMG_6910.jpg
    27.9 KB · Views: 29
  • IMG_6911.jpg
    IMG_6911.jpg
    36.5 KB · Views: 28
Last edited:

EOC_Jason

Well-known member
Joined
Jun 25, 2012
Messages
11,388
Location
Bentonville, AR
Use an endmill and have the rail secured good. Endmills don't really care what angle the material is when you cut into them, as long as you have rigidity... I would make a fixture for the rails so that you can hammer through them real quick. Then swap bits for a center drill or regular drill bit to make the counter-sink.

That being said, make sure you don't have your bit sticking way far out either. To get the most ridigity you only want it out as far as you need it, especially with small bits that can flex and break real easy.
 
OP
T

TravisT

Well-known member
Joined
Oct 22, 2011
Messages
156
Location
NoVA
I need to figure out the best way to make a fixture or jig for this. I'm sure I'll figure something out. I haven't ever used an end mill before, but it seemed like it would cut at any angle.

I can imagine that it would try to flex still, but being that they are shorter than a normal drill bit, and the tip is designed differently, I think it will work ok.
 

K13

Well-known member
Joined
Oct 24, 2007
Messages
2,233
Location
St. Albert, AB Canada
A simple drilling jig would be to get a piece of 3/4" plywood and then attach another strip of plywood along one edge to use like a fence and then put another piece as a stop at one end. Place the jig on the drill press with your rail on it pushed against both stops and lines up to where you want to drill clamp the jig to the table and the rail to the jig. Now all you have to do it put each new rail in the jig and clamp and it will drill in the same spot every time.

I did this one to drill holes in bed rails for a pick up truck and had multiple stops for mulitple holes but same basic idea.

IMAG0008.jpg
 

kbs2244

Well-known member
Joined
Nov 11, 2006
Messages
14,065
What are the female connectors attached to?
Can you not shim them further forward?

I cannot belive you are the first, or only guy, to have this problem.
There has to be an easier way than all this machining.
 
OP
T

TravisT

Well-known member
Joined
Oct 22, 2011
Messages
156
Location
NoVA
The female connectors are attached to the backplane circuit board. There is no way to shim that without shim-ing the entire circuit board. I have heard of a couple people that have had similar problems in the past, but they never got this far to find the problem. They were still in the RMA window to exchange for something else. I've had one of these in use for over a year and just never realized the performance problems were caused by this.

I wonder how many others are having similar problems and don't know it.:dunno:
 
To avoid these ads, REGISTER NOW!
Top Bottom