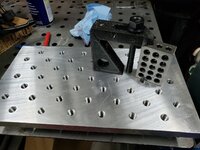
Built my new welding table ad was able to acquire this 4x3ish top. The holes are 1/4-20 and fairly tightly spaced. It was used at a precision optical lab and is super precise. My question is I want to make some of these holes 5/8 so that is can use other clamping methods. How would you suggest I enlarge these holes accurately? I have a mag drill as well

You are using an out of date browser. It may not display this or other websites correctly.
You should upgrade or use an alternative browser.
You should upgrade or use an alternative browser.
Fabrication table opinion
- Thread starter countryss
- Start date

steel 35
Well-known member
Make accurate legs, pieces & or top, to bolt on what you have.
Whatever pattern you do it won't be right for the job, if you do it now!
buy some 1",2",3" blocks instead.
Whatever pattern you do it won't be right for the job, if you do it now!
buy some 1",2",3" blocks instead.
BLUE72CAMARO
Well-known member
Use a gauge pin should be just over .200 in your mag drill to center up on the holes and then switch over to your 17/32 tap drill to punch them out. I have also used a mag drill to start the tap squarely as well. It wont have the cojones to push the tap thru but gives a good start to hand tap the rest of the way.
Monza Harry
Well-known member
Milwaukee (3/4") will drive a 3/8 NPT I stopped short as this was depth critical. I have bottom tapped 1" NC with the 2 speed Milwaukee Drill version (1/2" further than the started hole) in the recent past (multiple times), that required me to grind three flsts to stop tap slippage. Harry
WoodsTruck
Well-known member
- Joined
- Jan 12, 2013
- Messages
- 1,037
I'm curious on power tapping. When I tap by hand, I turn maybe 1/8 of a rotation, then reverse slightly until I hear the curl "pop" loose, then continue the next 1/8 rotation and back off to pop the curl again. If I don't do this it seems I cram the tap in tight and break it. I usually just use WD-40 as a lube which flows down the tap reliefs but a cutting fluid might be a better choice. How does an operator keep a tap from breaking when power tapping while allowing the curls to accumulate in the tap relief?
zmotorsports
ALLIANCE MEMBER
I'm curious on power tapping. When I tap by hand, I turn maybe 1/8 of a rotation, then reverse slightly until I hear the curl "pop" loose, then continue the next 1/8 rotation and back off to pop the curl again. If I don't do this it seems I cram the tap in tight and break it. I usually just use WD-40 as a lube which flows down the tap reliefs but a cutting fluid might be a better choice. How does an operator keep a tap from breaking when power tapping while allowing the curls to accumulate in the tap relief?
Power tapping requires a spiral tap which pushes the chips down and out rather than a standard 4-flute tap that you have to cut and then break the chips free by backing slightly.
If you have never power tapped, I suggest purchasing a few spiral taps and give it a try. It's a game changer for sure.
zmotorsports
ALLIANCE MEMBER
Built my new welding table ad was able to acquire this 4x3ish top. The holes are 1/4-20 and fairly tightly spaced. It was used at a precision optical lab and is super precise. My question is I want to make some of these holes 5/8 so that is can use other clamping methods. How would you suggest I enlarge these holes accurately? I have a mag drill as well
Nice looking table. If I were doing this and wanted the holes to be accurately spaced and sizing to say 5/8" holes, I would first decide on where to enlarge the 1/4" holes to 5/8" and once a pattern is decided on such as every third hole or every other in one direction then the other, I would then make up a small jig that bolted to a couple of the 1/4"-20 holes with a pin to use for aligning the mag drill to center it over that particular hole. Then it would be easy to align the mag drill over that hole, remove the jig or fixture and drill the 5/8" hole. Then move on to the next.
With that many holes it may be easy to get off the pattern decided on so I would go through and mark each one you want to drill with something like a piece of masking tape or even a bolt so you don't mis-drill one of the holes and throw your pattern off.
I was not one for having fixturing holes in my fabrication table, until recently. I have drilled a few 5/8" holes for clamping on my fabrication table and now I'm thinking about adding a few more. I kind of like them now.
Walkers
Well-known member
I think you are way overestimating the need for accuracy on the table. The holes are only for clamping, you can pretty much clamp anything wherever you want. Most clamping is going to be on the edge because that is where it is fast and easy.
Bigblue&Goldie
Well-known member
I'd probably just leave it all 1/4-20 and make/modify tooling to work with it. 1/4-20 is so common it would be easy to buy off the shelf sruff from McMaster and other places to work with. Otherwise, I'd do what Mike suggested and only do some of the holes (in a pattern of course). A mag drill will do what you want. I'd also setup with a dowel pin, change to the drill bit, followed by the tap. The stickiest, most nasty smelling tapping **** will be your best friend.
Truth be told, I would prefer to have 1/2-13 threads to match my Teco clamps. I ended up making a pallet for this very reason.
Truth be told, I would prefer to have 1/2-13 threads to match my Teco clamps. I ended up making a pallet for this very reason.
mike93lx
ALLIANCE MEMBER
Why would the holes only need to be for clamping? Being able to thread in pins for, say, aligning two parts at 90 degrees, then clamping them down could be very usefulI think you are way overestimating the need for accuracy on the table. The holes are only for clamping, you can pretty much clamp anything wherever you want. Most clamping is going to be on the edge because that is where it is fast and easy.
Walkers
Well-known member
Not saying only for clamping, but a few thou difference isn’t going to make much difference for a huge majority of fabbed items. Warpage from welding will take out any accuracy you think you have. Granted I use my tables for much heavier work, but I use them every day.Why would the holes only need to be for clamping? Being able to thread in pins for, say, aligning two parts at 90 degrees, then clamping them down could be very useful
I would use for alignment more than for clamping. I wish I had a mag drill so I could do my welding table.Why would the holes only need to be for clamping? Being able to thread in pins for, say, aligning two parts at 90 degrees, then clamping them down could be very useful
sanddan, how thick is your table top? If it's half inch or less, you could get one of these
I have that kit to extend the range downward from the smallest (7/16") my annular cutters can do - if you're accurate with your center punch and fairly steady of hand, those will NOT completely replace a mag drill but they WILL probably let you SAVE for one a bit less painfully
Truth in advertising - LOOK AT THE PICTURE - the 9/16" and LARGER sizes will cut to 1/2" deep, the smaller ones just a bit over 1/4" depth.
Even so, they cut so much faster than twist drills they're worth it. It's been probably a couple YEARS since I've used a regular twist drill for anything the linked set can handle. For more $$, they also make larger sets... Steve
I have that kit to extend the range downward from the smallest (7/16") my annular cutters can do - if you're accurate with your center punch and fairly steady of hand, those will NOT completely replace a mag drill but they WILL probably let you SAVE for one a bit less painfully
Truth in advertising - LOOK AT THE PICTURE - the 9/16" and LARGER sizes will cut to 1/2" deep, the smaller ones just a bit over 1/4" depth.
Even so, they cut so much faster than twist drills they're worth it. It's been probably a couple YEARS since I've used a regular twist drill for anything the linked set can handle. For more $$, they also make larger sets... Steve
My table top is 1/2”. I would rather use a mag drill so the holes would be straight and I have a 5/8” annular cutter. I would rent one but I think it would take me a couple of days to do the holes. I have a similar set as yours except it’s more for sheet metal. Might do 1/4” but really for thinner.sanddan, how thick is your table top? If it's half inch or less, you could get one of these
I have that kit to extend the range downward from the smallest (7/16") my annular cutters can do - if you're accurate with your center punch and fairly steady of hand, those will NOT completely replace a mag drill but they WILL probably let you SAVE for one a bit less painfully
Truth in advertising - LOOK AT THE PICTURE - the 9/16" and LARGER sizes will cut to 1/2" deep, the smaller ones just a bit over 1/4" depth.
Even so, they cut so much faster than twist drills they're worth it. It's been probably a couple YEARS since I've used a regular twist drill for anything the linked set can handle. For more $$, they also make larger sets... Steve
A lot of welding fab stuff is 2” on center, so you probably don’t need to do all of them to use the standard stuff.
I would go to a big drill index like this:


 www.harborfreight.com
Then find the drill bit that fits the tightest in the hole, and use that to center the mag drill. A pin gage set will be more accurate, but I doubt you will need that accuracy.
An annular cutter or rotabroach as Bukitcase posted would be the tooling I’d prefer to use.
I would go to a big drill index like this:
Titanium M2 High Speed Steel Drill Bit Set, 115 Piece
Amazing deals on this Titanium M2 Hss Drill Bits, 115Pc at Harbor Freight. Quality tools & low prices.
www.harborfreight.com
Then find the drill bit that fits the tightest in the hole, and use that to center the mag drill. A pin gage set will be more accurate, but I doubt you will need that accuracy.
An annular cutter or rotabroach as Bukitcase posted would be the tooling I’d prefer to use.
Last edited:
PugetDude
ALLIANCE MEMBER
Thread a 3" long 1/4-20 Grade 8 bolt with the head cut off in the hole you want to enlarge, scoot the mag drill around until it's centered enough you can tighten the unthreaded bolt shank up in the chuck. Lock the drill down tight, you're now centered over the 1/4-20 hole. Reverse the bolt out of the hole and replace with a 17/32 drill bit- drill the hole, then use a spiral or taper point tap - start with the mag drill to start the first couple of threads square, then finish by hand if you're not comfortable tapping with the mag drill.
As BB&G mentioned you want the stickiest tapping fluid you can find for those 5/8" holes.
I've used chain saw bar oil before.
As BB&G mentioned you want the stickiest tapping fluid you can find for those 5/8" holes.
I've used chain saw bar oil before.
Last edited:
BigNuge
Well-known member
I built a fab table, used a 4’x3’ certiflat top kit. It has 5/8 holes perfectly spaced, but is not tapped. The strong hand tools and DIY clamps/devices don’t use tapped holes.
As far as spacing, you’re going to end up having to pick a pattern and deal with a non-standard spacing situation.
I will measure my tables spacing/patter and post the dimensions…at least you’ll know what the standard pattern is for 5/8 holes (non-tapped).
As far as spacing, you’re going to end up having to pick a pattern and deal with a non-standard spacing situation.
I will measure my tables spacing/patter and post the dimensions…at least you’ll know what the standard pattern is for 5/8 holes (non-tapped).
Attachments


Sanddan, I'm about 15 miles east of Albany; if you're not too far from me, PM me and we might be able to work something out on the mag drill - also, if you did decide to do 5/8" TAPPED holes, Evolution is one mfg that offers several tap drill sizes in annular - here's the 1" depth 5/8-11 size
those are also available in 2" DOC - just add an L to the part#... Steve
those are also available in 2" DOC - just add an L to the part#... Steve