To avoid these ads, REGISTER NOW!

Fahrenheit 126 Garage

TXNinAZ

Well-known member
Joined
Oct 9, 2011
Messages
507
Location
Phoenix, AZ
Hi everybody,
I've read about every day since I joined, but don't usually post unless I feel I really have something to offer- now I'd like to share my space.

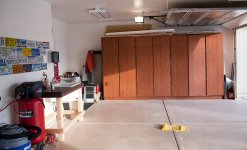
Last summer (2010) my wife and I became first-time homeowners and have steadily gotten the foreclosure repairs straightened out. Now it's time to get the garage up to our high standards. I have an attached 3 car garage that is in need of some help- I'll be having the floor epoxied soon, which will repair all of the chips out of the flooring from the original owner's former bonus room built in the garage. That, and replacing the other T12 light fixture with another high-output 6 bulb T8 unit (Lithonia Industrial high bay fixture) and wire in a third near the center of the garage.

I'd love some suggestions for a workbench I'm planning in order to make the space more useable for projects. I added the bench with the sink in it when we moved in, since the plumbing was already there, but it's not good for anything other than collecting junk that needs to be put away.

The idea I have in my head is to build a new bench that will take up almost the entire length of the wall from the water heater to the sink (scrapping the existing bench). Rather than have posts on the floor, I'd prefer to attach a ledger plate along the wall for the bench to rest on, and then 45* (more or less) struts every 24-30", screwed to another 2x4 plate that would sit on the stem wall and screwed to the wall studs. The top will either be 2x12"s or two layers of 3/4" plywood. I will be mounting a smallish vise and bench grinder, possibly a drill press later on.

Making such a long bench would require moving the air compressor and hose reel, which is fine, but I'm not sure if it would be smart to put the air compressor next to the water heater or not. I'd like suggestions for where to mount the hose reel, as well.

Any other input would be great!
 

Attachments

  • 01.jpg
    01.jpg
    116.2 KB · Views: 521
  • 02.jpg
    02.jpg
    143.7 KB · Views: 492
  • 03.jpg
    03.jpg
    146.8 KB · Views: 459
  • 04.jpg
    04.jpg
    144.4 KB · Views: 453
  • 05.jpg
    05.jpg
    139.3 KB · Views: 443
  • 06.jpg
    06.jpg
    140 KB · Views: 394
To avoid these ads, REGISTER NOW!

Nighttrain

Well-known member
Joined
Aug 6, 2009
Messages
2,682
Location
Dripping Springs, Tx
Nice clean slate. I would think the air compressor behing the door next to the water heater would be fine, it would be out of the way and hidden when that door is open. Not much ele to go there. Maybe plumb the hose reel up abpove the door.
 
OP
T

TXNinAZ

Well-known member
Joined
Oct 9, 2011
Messages
507
Location
Phoenix, AZ
Well, finally bit the bullet on the flooring. Tomorrow morning a few helpful guys from Sledge Concrete Coatings will be here to diamond-grind the **** paint off the floor and do a three-layer granite coat epoxy with clear coat. I tried everything under the sun to try and remove the paint on the floor, but it wouldn't budge.

With our lovely summers here in Phoenix, with air temps in the upper 120's Fahrenheit, so DIY store-bought epoxy peels right up on your tires. I elected to use this company after a few references and seeing a previous job in person.

Now that I've got all of my stuff out of the garage, here is what they have to fix.

Construction adhesive left behind when the foreclosing bank removed the previous owner's living quarters. There is plenty of carpet glue across the floor where the bedroom was built.
GJ7.jpg


The carpet tack strips were placed along the control joints and when they came out, they pulled up the edge of the concrete all over the floor.
GJ6.jpg


The warning stamp for the post-tension cables is somewhat damaged from the build, but the epoxy guys said it would still be readable.
GJ5.jpg


GJ4.jpg


Where two control joints meet is where the most damage was done.
GJ3.jpg


GJ2.jpg


GJ1.jpg
 

Jack Olsen

Super Moderator
Staff member
Joined
Mar 22, 2009
Messages
6,678
Location
Los Angeles
Nice garage. I like those cabinets.

Why not integrate the hose reel into the bench itself? I have a different kind of reel than yours, but I just cut out a space for the end piece and never have to look at the reel itself.

dsc0433m.jpg
 
OP
T

TXNinAZ

Well-known member
Joined
Oct 9, 2011
Messages
507
Location
Phoenix, AZ
Nice garage. I like those cabinets.

Why not integrate the hose reel into the bench itself? I have a different kind of reel than yours, but I just cut out a space for the end piece and never have to look at the reel itself.

That's a great idea. I would have to get a self-retracting hose reel, which I should have done in the first place. My new bench is coming together in my head- let me see how I can incorporate this on the underside.
 
Last edited:
OP
T

TXNinAZ

Well-known member
Joined
Oct 9, 2011
Messages
507
Location
Phoenix, AZ
What rack system is that holding all of that stuff up? pretty neat...Good Job!

Thanks! It's actually a Rubbermaid garage hanging system from Home Depot. They recently discontinued just about the whole line of products for new ones, so the double-hook tool hangers were $.98 instead of like $11, and baskets I have inside the cabinets were $1.98, instead of their usual $34.99!

They are nice and clean looking, and super sturdy, so I can't complain much.
 
OP
T

TXNinAZ

Well-known member
Joined
Oct 9, 2011
Messages
507
Location
Phoenix, AZ
cool space..I really like the plate wall! :)

Thanks! I've loved license plates since I was a little kid- my parents bought me an "I spy" sort of sticker book for road trips, so that I could move a sticker to the map page if I saw a car with that state's license plate. They were either really in tune to what I liked, or they just wanted the youngest of the 7 kids to keep it down while they were driving :)

I've got another stack waiting to be hung, but we'll be painting before too long, and they'd have to come down to do so. The plan is to have them up to the ceiling as soon as I can track that many down.
 
OP
T

TXNinAZ

Well-known member
Joined
Oct 9, 2011
Messages
507
Location
Phoenix, AZ
Ricky and Brandon were here before 8 this morning to get started on the removal process.

About two-thirds of the way there with the grinder, then chemical treatment to remove the rest, then acid etch, then patches, then primer.
TwothirdsDone.jpg


The dust is killing their shop vac, as it is so fine, it just cakes the vacuum's filter.
DustPilingup.jpg


Slow and steady wins the race, as they say.
Oneswipeatatime.jpg
 

Jeff Ivers

Well-known member
Joined
Apr 9, 2010
Messages
2,555
Location
Oklahoma
In your original post you said you were thinking about building a new workbench supported entirely by the wall with no legs to the floor, if I understood you correctly. From a cosmetic perspective, I like that idea. However, I was always concerned about transferring more vibaratory noise to the house from banging on things clamped in a vice or running a grinder or other tool mounted on the bench. I have no proof of this - perhaps others on here have positive/negative input on this. A lot probably depends on the type/frequency of work you anticipate and what is on the other side of the wall.
 

jeffmoss26

Well-known member
Joined
May 25, 2011
Messages
12,854
Location
Cleveland, Ohio
I really like the license plates. I've been collecting for a while too. I don't have the space to display them as neatly as you do, though!
 
OP
T

TXNinAZ

Well-known member
Joined
Oct 9, 2011
Messages
507
Location
Phoenix, AZ
Thanks for the encouragement, everyone! The guys are done for the day, and we're making progress. They'll be back early to put down the base coat, chips and polyurethane.

After cleaning up the dust and getting tools moved out of the way, time for muriatic acid cleaning and etching.
Aciddown.jpg


They used a big floor buffer to brush the acid around and remove any loose contaminates.
Acidrubbing.jpg


They patched the defects in the concrete with a quick patch. They'll get them cleaned up tomorrow before the base coat.
Patches.jpg


Cut in the primer first around the control joints and edges.
CuttingInprimer.jpg


They used an 18" double-sided roller to cover the large areas, in one direction, then the other.
Rollingprimer.jpg


Primer is finished.
FinishedPrimer.jpg
 
OP
T

TXNinAZ

Well-known member
Joined
Oct 9, 2011
Messages
507
Location
Phoenix, AZ
In your original post you said you were thinking about building a new workbench supported entirely by the wall with no legs to the floor, if I understood you correctly. From a cosmetic perspective, I like that idea. However, I was always concerned about transferring more vibaratory noise to the house from banging on things clamped in a vice or running a grinder or other tool mounted on the bench. I have no proof of this - perhaps others on here have positive/negative input on this. A lot probably depends on the type/frequency of work you anticipate and what is on the other side of the wall.

I didn't even think about that possibility. Fortunately, the wall is up against the laundry room, guest bathroom and guest bedroom. It will mostly be used on projects that shouldn't be too intensive. Thanks for the thought!
 
OP
T

TXNinAZ

Well-known member
Joined
Oct 9, 2011
Messages
507
Location
Phoenix, AZ
126 refer to the summer temps in Phoenix?

My son lives there too, and when it's summertime he's pretty much not in the garage anymore!

Yeah, it can get pretty brutal in the summer. 126* is the hottest I've recorded in the garage, although it could certainly have gotten above that.

I'm working on getting it more sealed up, and I was given a large window a/c unit that can hopefully keep it below 90*- that's all you can really ask for when the temperature at 1 a.m. is still around 105*! The highest outdoor air temperature I've recorded is 122*, which matches the city of Phoenix all-time high. 68-72* from November to April is nice, though!
 
OP
T

TXNinAZ

Well-known member
Joined
Oct 9, 2011
Messages
507
Location
Phoenix, AZ
Nice starting point. What is that hose/tube sticking out of the wall by the push broom? First post.

Yeah, that's a remnant of the former homeowner's handiwork. They had an a/c unit installed through the wall, and for some reason, when the bank removed the extra room to ready it for sale, they patched the wall but left the electrical conduit in place. I just haven't done anything with it yet. I don't really see a need, since I have quite a few 20 amp (I think) GFCI outlets, along with 220v power where the clothes dryer was.

Thanks for the compliment!
 
To avoid these ads, REGISTER NOW!
OP
T

TXNinAZ

Well-known member
Joined
Oct 9, 2011
Messages
507
Location
Phoenix, AZ
Got started this morning about 7:15. Frost for the second night in a row- brrrr, when you consider the normal low is around 45.

Starting in the corner, cutting in a small area at a time.
Day2-1.jpg


Fling the chips at the stem walls, and fill in any gaps with more urethane and more chips.
Day2-2.jpg


One section of the floor at a time, again using the 18" double-sided roller.
Day2-3.jpg


Even with the cold temps, they still only did a few square feet at a time. When the air temp is above 100*, they pretty much throw chips right behind the roller, since it starts to set almost instantly.
Day2-4.jpg


Four different colors in the chips we chose- mix is called Carefree Tan.
Day2-5.jpg


With a "granite chip" cover, they're pretty liberal with the chips, then sweep them up before the acrylic sealer.
Day2-6.jpg


Looks nice and glossy now, but after the final layer tomorrow, it will really shine. :)
 

Dickey

Well-known member
Joined
Oct 28, 2011
Messages
930
Location
Chapin, SC
That's pretty.

I wouldn't be able to help myself from trying to create subtle watermark like designs if I were doing that in my shop.
 
OP
T

TXNinAZ

Well-known member
Joined
Oct 9, 2011
Messages
507
Location
Phoenix, AZ
That's pretty.

I wouldn't be able to help myself from trying to create subtle watermark like designs if I were doing that in my shop.

Ha, we actually talked about doing that, but I probably won't live here for the rest of my life, so I'd decided to make it interest-neutral for the next owner :)
 

gofastoldguy

New member
Joined
Nov 1, 2011
Messages
3
Location
Avondale, Az
Floor is looking good...Did anyone mention that it would have been a good idea to fill in the joints with an elastomeric compound in order to sweep easier and for the creeper to glide over? Probably too late now, but food for thought next time. Regards, Bill in Avondale, AZ
 
OP
T

TXNinAZ

Well-known member
Joined
Oct 9, 2011
Messages
507
Location
Phoenix, AZ
Floor is looking good...Did anyone mention that it would have been a good idea to fill in the joints with an elastomeric compound in order to sweep easier and for the creeper to glide over? Probably too late now, but food for thought next time. Regards, Bill in Avondale, AZ

Yeah, I wanted to do that, but my installer was pretty insistent that we not do it. We went back and forth, but he's been in the business for ten years doing this, so I chose to take his expert opinion.

At this point, I'm so happy not to have big chunks out of the concrete that I don't think I'll even notice the bumps when I cart things over the joints!
 

fastbroshi

Well-known member
Joined
Jul 23, 2010
Messages
111
Location
Dallas, TX
I have to wonder, what's the logic behind thinking that literally covering every square inch of floor with chips is necessary? Every business I've seen that does this seems to prefer this style. Good luck finding any small nuts and bolts that fall on the floor. Heck you might misplace your baby on that floor too if it were wearing a tan shirt!
 

crazy1

Member
Joined
Mar 31, 2008
Messages
22
What the heck are post tension cables, mentioned in a way earlier post....just curious?
 
OP
T

TXNinAZ

Well-known member
Joined
Oct 9, 2011
Messages
507
Location
Phoenix, AZ
I have to wonder, what's the logic behind thinking that literally covering every square inch of floor with chips is necessary? Every business I've seen that does this seems to prefer this style. Good luck finding any small nuts and bolts that fall on the floor. Heck you might misplace your baby on that floor too if it were wearing a tan shirt!

Ha- I think that's the point. If you don't clean it for a while, it won't look so dirty. My understanding is that it is also adding thickness to the coating, so that it will stand up better to abuse.
 
OP
T

TXNinAZ

Well-known member
Joined
Oct 9, 2011
Messages
507
Location
Phoenix, AZ
What the heck are post tension cables, mentioned in a way earlier post....just curious?

Newer homes in my area are poured on post-tension concrete slabs. We have somewhat shifty soil here (lots of sand), so if there is a small sinkhole under my house, the tensioned cables in the concrete will keep it rigid and the hole under the house will be mostly harmless.

These cables are set in the concrete when it's poured, then after it is partially cured, they bring in a huge hydraulic ram that puts the cables under immense tension, making a strong backbone. If you drill into the concrete and pierce one of these cables, it will rip up through the concrete, and in extreme cases, cut walls and people in half, like a huge steel whip.
 

crazy1

Member
Joined
Mar 31, 2008
Messages
22
Thanks for the information on the construction of the concrete slabs....learns something new every day....
 
OP
T

TXNinAZ

Well-known member
Joined
Oct 9, 2011
Messages
507
Location
Phoenix, AZ
Any finished pictures?

As requested:
Day3-1.jpg


It's hard to see how glossy it is in this photo, but in person it looks stunning. I won't walk on it until tomorrow evening, but it will be great to start enjoying it.

Here is the most damaged area- not 100% perfect, but it looks pretty darn good.
Day3-2.jpg
 
OP
T

TXNinAZ

Well-known member
Joined
Oct 9, 2011
Messages
507
Location
Phoenix, AZ
Did you mention cost to do this project?

I don't think I did. It was $2200 with a cash discount. If it were clean concrete, that would have saved me $400. For a solid color without chips, it would have run right at about $1000, not including concrete grinding/repair.
 
OP
T

TXNinAZ

Well-known member
Joined
Oct 9, 2011
Messages
507
Location
Phoenix, AZ
Been a while since I've updated. Added insulation above the attic and some of the house- now R34. Also installed in-ceiling speakers with volume control and a stereo receiver in the laundry room. Worked on the bench on Saturday and just need a few more jobs to complete it. Jack, I took your suggestion to integrate the hose into the bench, and it turned out ok- not as clean as your install, but I may close it up once the plumbing is done. Right hose if for water and left for air.

I'm stuck on how to finish it, however. My old bench was painted brown with exterior paint to protect it from splashed water from the sink, so I need to seal it, but not sold on how. The original idea was to paint the legs and underside dark brown to match the chips in the floor, and then seal the top with a urethane or clear epoxy, but I don't know if that will look any good. Any suggestions??

Bench.jpg
 

Bronson

Well-known member
Joined
Aug 2, 2011
Messages
12,676
Location
Texas panhandle
I just stained My benches brown (walnut) with plain old stain. Several coats, I didnt seal them. Motor oil and other liquids just wipe off. They are going on 6 years now with no problems.
 
OP
T

TXNinAZ

Well-known member
Joined
Oct 9, 2011
Messages
507
Location
Phoenix, AZ
Need some suggestions on how to remount my license plates now that the wall is painted. Since that part is finished, I'll finish covering the wall with plates- I was waiting on painting before I hung any more.

I'm not a pegboard fan, and I didn't like how they were hung before (drywall nails). I was thinking about screwing 1/4" plywood to the studs and then roofing nails to mount the plates, but that is overkill even for me. The other idea was to mount a furring strip across the top, and then use S hooks to connect them down the wall like a wind chime, then mount another strip at the bottom to anchor them in. I would rather not have the gap that creates, but it would be simple. Any better ideas??

Before:
GJ1.jpg


After:
Paintedwall.jpg
 
To avoid these ads, REGISTER NOW!
Top Bottom