buening
Well-known member
I'm guessing you will do this one block at a time and the wall sill will bridge the opening?


Sometimes you want to kill these bastards, especially when someone refers them thinking they are good. Just the referrer is an idiot himself and thinks any type of **** is good because he doesn't know any better.
I hope this works out for you. Good luck.

JOES169 - You are right about the less than stellar masonary work. It was too late by the time I found out, but the pack of idiots who laid this thing did a horrible job..luckily they laid it straight and square. It is still a mystery to myself as well as anyone who has seen this issue as to how these guys were supposed to be good masons, yet failed to notice things such as:
(A)The bags of Type-S mortar on the job, which have a cartoon of the mixing procedure on the back, as well as the words pre-mixed. A Fu**ing 5 year old could have followed these directions.
Absolutely, they should have known. When you work with simple mortar for a living, you are extremely partial & picky with it's consistency. A mix that's too wet/too stiff/too sandy/too rich/etc.... brings production down real quick. No reason they wouldn't have known right away and taken a few moments to have it corrected, or just dump it. Besides, I can't think of one advantage to using pre-mix anyways on a project that size, especially when they had sand there already.
(B)The 2 masons(3 total - 1 laborer mixing and 2 masons laying block) who were laying the block should have noticed the difference in the consistency/tackyness of the mud...they do blockwork all the time and I know that for a fact.
(C)Crappy scratch coat(or lack of) on foundation which I now have to ultimately take a angle grinder to to skim second time.
Please elaborate on your laundry list - I am very interested if you point out something I have not discovered yet. I'd imagine it may include something I mentioned above.
The "masons" were recommended to me, next time around i'll find my own guys...seems like unless you watch everyone like a hawk, things never get done right. So much for trying to pay someone to do something to save time...would have been better off learning how to lay block myself, probably would have come out better than this hack job.
You should be able to see it in these pics, i'm sure you'll notice how light in color those joints are:
-Mike
Proposed plan:
If picture is too small - right click -> open in new window -> click picture to zoom
I would think a little more about compacting the garage floor, or more or less getting it to settle out before even thinking of pouring the floor. (Maybe it's too late for that though...)
I am lucky I had an **** retentive building inspector that came out unannounced several times during my build and red flagged my job.
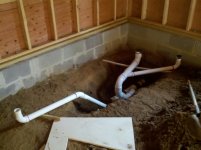
So flatwork inside of garage is not poured so at least you have that going for you. Last pictures show you in process of plum and alining walls?
the ground on each side of the block is doing most of the work as far as side load, couldnt you just drill through the sill plate ? that way you dont have to remove any blocks at all .
thats what i was thinking , you can then put new anchors in the newly poured concrete ..I have an idea to slightly vary my above pictured plan - to skip drilling holes in block, just 2" holesaw through sillplate, rebar and fill from those holes, then block out the sill plate for added strength since holes were cut.
-Mike
Good idea.I have an idea to slightly vary my above pictured plan - to skip drilling holes in block, just 2" holesaw through sillplate, rebar and fill from those holes, then block out the sill plate for added strength since holes were cut.
Yeah, I was thinking that too and forgot to mention it.thats what i was thinking , you can then put new anchors in the newly poured concrete ..
Not looking to point blame, but what the heck did I pay for a permit for then.
so its taken care of and everythings ok? i was thinking maybe tuckpointing the mortar section by section but that would most likely take way to long.