To avoid these ads, REGISTER NOW!

Filling Expansion Joints without caulk?

noles

Member
Joined
Mar 13, 2021
Messages
16
Location
Two car attached in Charlotte, NC
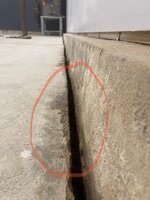
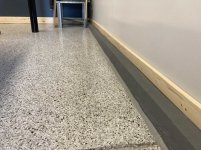
I'm planning on epoxy-coating my garage floor and I'm somewhat confused with how I should treat the gaps around the perimeter of my garage between the driveway concrete and the foundation. There is a huge amount of variation in their condition (width of gap up to 1.25", presence of fiberboard in some but not in others, depth of joint up to 4"). See photos below.

From what I've read on here, I've learned that these are called expansion joints and that most stuff with backer rod and fill with Sika SL caulk. People seem to recommend finishing these after the epoxy coating since they are prone to cracking/discoloration if coated.

I'd prefer a solution in which these joints are filled with a harder material so that the epoxy can go right up to the foundation walls. Also, I've used the Sika product before and I don't really like how dirty it gets over time.

Are there other solutions to this problem that will fill the joint soundly and still allow movement in the driveway slab? I've seen someone recommend a trowel-grade epoxy in another thread. It looks like Simpson makes some and so does Legacy (Five-ton) but I have no experience with this stuff.

Can I epoxy over it after it dries? How deep does it need to be? Do I need to use backer rod for it (i.e. some of the joints are 4" deep)? Do I need to do a lot of sanding after?

Any thoughts you all have would be greatly appreciated! Thanks in advance.
 

Attachments

  • FB in gap_0.75in.jpg
    FB in gap_0.75in.jpg
    148.4 KB · Views: 151
  • Largest gap_1.25in.jpg
    Largest gap_1.25in.jpg
    148.2 KB · Views: 139
  • Thin gap.jpg
    Thin gap.jpg
    147 KB · Views: 127
To avoid these ads, REGISTER NOW!
OP
N

noles

Member
Joined
Mar 13, 2021
Messages
16
Location
Two car attached in Charlotte, NC
I think it be easier to put some baseboard along walls say up to your drywall.


I like that idea and I think it would work for the area where the expansion joint falls directly below the drywall, but what would you do for the areas where the joint is in front of the stem wall? The baseboard would come straight down on top of that ledge, still leaving the issue of the joint below and in front of it. Probably 1/2 of the perimeter has that damn ledge that juts out.
 

karoc

Well-known member
Joined
Dec 19, 2017
Messages
1,990
Location
Hemphill Tx
Maybe run your base up to the ledge or lip, then put a trim cap on top of the lip and set on top of the baseboard. Maybe round over the trim cap make it look like it was planned. Paint to complement your new flooring.
 

Attachments

  • Baseboard.jpg
    Baseboard.jpg
    28.4 KB · Views: 109
Last edited:

Bill50

Active member
Joined
Apr 15, 2016
Messages
29
Location
Northeast Il
Caulk the joint with a matching color as your epoxy. I used a self leveling Sakrete product on my garage floor. Self leveling can not be used on sloping floors. Caulk keeps ants out. Gungrade caulk works best if one can not seal the joint from leaking out the pourable sealant.
 
OP
N

noles

Member
Joined
Mar 13, 2021
Messages
16
Location
Two car attached in Charlotte, NC
Maybe run your base up to the ledge or lip, then put a trim cap on top of the lip...


Thanks for the diagram. This makes sense. Would you use tapcon screws to secure the baseboard to the concrete ledge? With scribing and cutting the boards I’m worried it could end up being just as time-consuming as caulk.
 

karoc

Well-known member
Joined
Dec 19, 2017
Messages
1,990
Location
Hemphill Tx
I agree it is more work, but only worth it is up to you. But what I visualize your flooring would look like I think that with baseboard would be a one time deal and don't have to worry about trying to match your flooring or if it cracks. As far as top cap goes could do away with it and just paint that part of the concrete ledge which I guess is small. But if no interest in little woodworking then caulking would be better. I always wanted epoxy flooring they look so neat, that was my first time to kinda draw something:)
 

Shea

Well-known member
Joined
Sep 19, 2012
Messages
2,864
Location
California
Epoxy is extremely hard and does not flex. The joints you want to epoxy over will expand and contract. If you fill those joints and epoxy over them, then you stand a high chance of the coating cracking over these joints. This is why it is not done.
 
OP
N

noles

Member
Joined
Mar 13, 2021
Messages
16
Location
Two car attached in Charlotte, NC
But what I visualize your flooring would look like I think that with baseboard would be a one time deal...


This is a good point since I had planned to try to install a baseboard somewhere anyway to hide the ragged bottom of the drywall. I don’t know why I was thinking I had to do it all one way.

I think I will probably use the baseboard to cover the expansion joints where there is no concrete ledge. I’ll save the joint cleanup/caulking for just the sections where the joint is in front of the ledge. When the wall stops, the joint will just turn and disappear under the baseboard. I’ll have to step-up the baseboard to run along the top of the ledge, but I’m pretty sure this is a standard practice I can look up how to do.

Thanks for your help!
 
OP
N

noles

Member
Joined
Mar 13, 2021
Messages
16
Location
Two car attached in Charlotte, NC
If you fill those joints and epoxy over them, then you stand a high chance of the coating cracking over these joints. This is why it is not done.


I get it now. Nothing I do below the epoxy is going to stop those joints from moving, which means the epoxy coating above it can crack. Caulk it is then. Thanks for your input.
 

bigdave_185

Well-known member
Joined
Feb 14, 2021
Messages
423
Location
Utah
Sikaflex is a fantastic product for applications after you epoxy the floor. It’s usually a grey color and resistant to chemicals.


Sent from my iPhone using Tapatalk
 
OP
N

noles

Member
Joined
Mar 13, 2021
Messages
16
Location
Two car attached in Charlotte, NC
Sikaflex is a fantastic product for applications after you epoxy the floor.


Have you ever used the non-self leveling variety? Any reason to use it other than a large slope or being unable to keep sealant from running out?

Also, I saw a guy on YT use silica sand on top of caulk to “finish” the joint. Basically to prevent bugs and debris from getting in while curing and to provide a sort of coating. Ever done this?
 

bigdave_185

Well-known member
Joined
Feb 14, 2021
Messages
423
Location
Utah
Have you ever used the non-self leveling variety? Any reason to use it other than a large slope or being unable to keep sealant from running out?

Also, I saw a guy on YT use silica sand on top of caulk to “finish” the joint. Basically to prevent bugs and debris from getting in while curing and to provide a sort of coating. Ever done this?


I have used many of their products with good results.
Tooling it can be hard to do unless your a patient person. Acetone if I remember correctly is a good help to keep it from sticking to tools, we used it in a spray bottle.

No idea why you would want sand or silica in it. Not sure on that one

Where your trying to do the edge of the pad and the footing joint I would try and clean as much out of the joint and pour in a fine sand to keep the sika from running away down the joint on you. The stuff isn’t cheap and you don’t need it three inches thick into the crack


Sent from my iPhone using Tapatalk
 
OP
N

noles

Member
Joined
Mar 13, 2021
Messages
16
Location
Two car attached in Charlotte, NC
Also, because of the colored flakes, it is really difficult to find small objects that have fallen to the floor, the best is a solid color!


Thanks. I’m on the fence about epoxy coating. Maybe I’ll just fix the cracks, clean it up a bit, and paint/seal it a solid color. I love the look of the epoxy but I’m not sure if it’s worth the time or money for what I use the garage for. My main goals are to stop the constant concrete dust and make it look neater, so I can enjoy lifting weights and do easy clean-ups.
 
Last edited:

bigdave_185

Well-known member
Joined
Feb 14, 2021
Messages
423
Location
Utah
If you have the means the best coating you can do is polished concrete, look at your local box store HD, Lowe’s, Costco, Walmart’s. All polished because it’s bomb proof!

I have done many of industrial coatings on the local military base (Hill airforce Base). The best products don’t hold up to welding long term, but about all other trades it does great unless it’s purposely destroyed by ignorant employees. But My personal garages have been both polished and single tone epoxy. My parents house epoxy is going on 20 years and still cleans up nice.


Sent from my iPhone using Tapatalk
 

Pntyrmvr

Well-known member
Joined
Feb 16, 2021
Messages
141
Location
Headwaters of the GTA, Ontario
I had concrete finishers polish up a floor nice and smooth in a shop years back. Oil spills wouldn't soak in. They wiped up easily.

Then I stepped on the floor with snow in the treads of my boots and landed on my tailbone.

Careful what you ask for!
 

bigdave_185

Well-known member
Joined
Feb 14, 2021
Messages
423
Location
Utah
They do have products you can polish onto the concrete to make them non slip,


Sent from my iPhone using Tapatalk
 

Armorpoxy

Well-known member
Joined
Aug 18, 2013
Messages
3,731
Location
NJ
If you want to fill with something hard you can use our Epoxy Mortar which is around 10,000 psi. That being said if/when your slab moves and you have epoxied over it, you will develop small cracks.

Unfortunately as stated above since the epoxy is not flexible that is why we don't recommend coating over these areas or expansion joints.
 
OP
N

noles

Member
Joined
Mar 13, 2021
Messages
16
Location
Two car attached in Charlotte, NC
Ok, so I’m cleaning up the expansion joints that I can’t easily baseboard over. Will caulk after epoxy. Anyone know what is going on with concrete here though?

a58d68f00a1c8ca12d4d325218292640.jpg

Concrete at edge looks like it almost rotted in places. It’s brown and pitted. What’s the best prep of areas like this before trying to put down a coating?
 

Attachments

  • a58d68f00a1c8ca12d4d325218292640.jpg
    a58d68f00a1c8ca12d4d325218292640.jpg
    147.4 KB · Views: 12
To avoid these ads, REGISTER NOW!
OP
N

noles

Member
Joined
Mar 13, 2021
Messages
16
Location
Two car attached in Charlotte, NC
Epoxy is extremely hard and does not flex. The joints you want to epoxy over will expand and contract. If you fill those joints and epoxy over them, then you stand a high chance of the coating cracking over these joints. This is why it is not done.


Yes, but don’t you recommend a more elastic epoxy-like filler in the article below as an alternative? Something that fills the cracks but isn’t as hard as the coating? Or was their advice just for contraction at joints in the middle of the driveway and not the expansion joints at the perimeter?

https://allgaragefloors.com/can-i-fill-my-contraction-joints/
 
Last edited:

Shea

Well-known member
Joined
Sep 19, 2012
Messages
2,864
Location
California
That is for contraction joints. Expansion joints are used when the slab is completely separated from an adjacent slab or structure. In your case, the slab is placed / poured separately from the stem walls, so an expansion joint is created.

When you fill expansion joints you want to use a very flexible joint sealer, such as Sikaflex or similar, due the amount of movement that those joints can be subjected to. Coating do not react well at all to the amount of movement in expansion joints.
 
Last edited:

CombatNinja

Well-known member
Joined
Aug 24, 2013
Messages
1,456
Whatever you do with the stem wall and baseboard situation, I would still seal those massive expansion joints with something to prevent critters from using it as an ingress point to the shop. Either fiberboard or foam backer rod and sika. No way I would just cover that up.
 

Armorpoxy

Well-known member
Joined
Aug 18, 2013
Messages
3,731
Location
NJ
We would recommend epoxy the floor first. While coating paint some epoxy on a piece of cardboard and if you need more epoxy for the stem walls, go to a local paint store and have the, match up a container of gloss paint since the stem walls don’t need epoxy.

Once complete fill the joints with sand, leaving about 3/8” of depth so the sand will support the joint filler. Last, fill the joints with a flexible filler like Sikaflex or a more color matched product like RS-88 which comes in over 100 colors.

If you fill the perimeter with a hard product when the slabs or walls move due to temperature swings, it will crack.
 

rkstr

Active member
Joined
Jul 28, 2010
Messages
30
Similar to your dilemma, trying to hide the 2” vertical insulation for the heated floor was a challenge. After cutting the insulation level with the floor, my buddy used three pieces (16’ lengths) of solid viny from a siding supply house, two wood shoe moldings, and a standard 5.25 baseboard to cover everything up. Using such long lengths, it didn’t take all that long to install.
 

Attachments

  • IMG_4666.JPG
    IMG_4666.JPG
    127.6 KB · Views: 69
  • IMG_4651.JPG
    IMG_4651.JPG
    132.8 KB · Views: 64
  • IMG_4646.jpg
    IMG_4646.jpg
    53.7 KB · Views: 59
  • IMG_4644.jpg
    IMG_4644.jpg
    64.5 KB · Views: 59

Menifee Valley Speed Shop

Well-known member
Joined
Aug 31, 2013
Messages
367
Location
Menifee CA
I used Legacy, it was super easy to use, filled some wide expansion joints, Epoxymaster over them, a year later I'm quite happy 5a335b16beffdc52f97bd9e8523252b7.jpg

Sent from my SM-G973U using Tapatalk
 

Attachments

  • 5a335b16beffdc52f97bd9e8523252b7.jpg
    5a335b16beffdc52f97bd9e8523252b7.jpg
    114.3 KB · Views: 10

Retroman

Well-known member
Joined
Jan 21, 2018
Messages
1,364
Location
Mojave Desert
Get some Resiweld 1000 and silica sand, clean out all the paper in the joints with a wire wheel. Use either backer rod or sand to fill the deep spots. mix up the resiweld adding sand to extend it. Let it harden and grind it off flush and your good to go. Mine is going on three years and none has cracked out looks perfect. Never understand why people don't fill the joints before they epoxy. The expansion/contraction joints just weaken the plane to control the crack when the concrete contracts.
 

Hilltopmasonry

Well-known member
Joined
Oct 12, 2015
Messages
2,166
I would use polyurethane sealant after you do the floors

Pollier thing is some strong stuff

Run a line of tape, apply the sealant then remove the tape for a nice straight edge
 
OP
N

noles

Member
Joined
Mar 13, 2021
Messages
16
Location
Two car attached in Charlotte, NC
The responses on the thread have been really helpful. I decided to use 1x baseboards to cover up the expansion joints in areas without stem walls, and to use polyurethane caulk to fill the expansion joints where they could be seen.

Here are the baseboards in progress and after:

IMG_2702.JPG

IMG_2704.JPG

I’m currently working on the expansion joints now. Went with Sika 1a but probably should have went with the SL stuff since it’s taken some practice to learn how to use neatly.
 

Attachments

  • IMG_2702.JPG
    IMG_2702.JPG
    114 KB · Views: 61
  • IMG_2704.JPG
    IMG_2704.JPG
    144.2 KB · Views: 62
OP
N

noles

Member
Joined
Mar 13, 2021
Messages
16
Location
Two car attached in Charlotte, NC
Finished caulking expansion joints. Looks fine from afar.

IMG_2716.JPG


But definitely not thrilled with irregular surface in places.

IMG_2717.JPG

I used Sika 1a with 409 to tool the caulk, and a topping of fine silica sand.

If I pulled the tape right away, I was left with a “fold” of caulk that I struggled to tool into the bulk of the joint without getting it up the walls past where the tape was (negating the point of the tape). If I waited too long to pull the tape, I was stuck with a partially dried strip of caulk that I wasn’t able to incorporate into the bulk caulk.

If I had to do it again, I would probably use self-leveling (SL) caulk or practice with the regular caulk elsewhere first to get the technique down better. I didn’t use the SL caulk because I thought the driveway slope (2.5 inches over 22’) would be too high but I think it would have been fine, especially if I split it up into two stretches.

Considering my only option now is probably to rip it out and start again, I think I’ll live with it for now. Gotta move on to the next stage of the renovation so I can get my garage back.
 

Attachments

  • IMG_2716.JPG
    IMG_2716.JPG
    120.7 KB · Views: 79
  • IMG_2717.JPG
    IMG_2717.JPG
    136 KB · Views: 87
OP
N

noles

Member
Joined
Mar 13, 2021
Messages
16
Location
Two car attached in Charlotte, NC
After seeing a Family Handyman article suggesting the use of a spoon to tool sealant, I figured I’d try to improve the look of the sealant.

Well I couldn’t get the hang of the spoon technique, even with liberal use of 409. However, I liked the idea of building the sealant up against the wall a bit because it creates a convex “wedge” rather than a concave depression that can collect dirt and debris.

Here is the improved version.

IMG_2778.JPG

This required the use of “rough surface” painter’s tape in order to stick to the wall and floor while trying to smooth the caulk.

I’m much happier with the look now and anything that lands on the joint now is directed onto the floor.
 

Attachments

  • IMG_2778.JPG
    IMG_2778.JPG
    140.1 KB · Views: 69
Last edited:

Hilltopmasonry

Well-known member
Joined
Oct 12, 2015
Messages
2,166
Depending on the type of polyurethane the best lubricant is either a fine mist of mineral spirits or Dawn dish soap and water
 

T VETTE

Well-known member
Joined
May 19, 2009
Messages
452
Location
Kalifornia, below Yosemite National Park.
I just came from a local contractor store and now see this thread. I see you used Sika 1a so I was looking at Sika 1c SL not sure of the difference. Did not buy yet as I wanted to see what was at Garagejournal.com Tube states High perf self leveling 1 part polyurethane sealant.

I have an issue with my expansion joints inside my shop that are fairly large. This is just a plain cement floor. I am not trying to fill them but have a pretty good crack in all of them, now would like to put in enough to keep bugs, ants etc. out and have a better look. Do you know the difference or does any body reading this have experience? Maybe I should start a new thread.........
 

T VETTE

Well-known member
Joined
May 19, 2009
Messages
452
Location
Kalifornia, below Yosemite National Park.
So I used the Sika self leveling for my cement control joints and it worked well except for one section that had quite a few bubbles come to the surface and not pop then left with a bulge bubble. Went back to pop them but too late. Maybe it was an old tube that dried too quick, but none were expired, well one was a couple months old past date. Overall it worked well to get rid of ugly cracks in the control joints and level off the joints.
 
To avoid these ads, REGISTER NOW!
Top Bottom