To avoid these ads, REGISTER NOW!

Filling gaps in hardwood floors

evercl92

Well-known member
Joined
Jun 16, 2017
Messages
186
Location
Columbus, OH
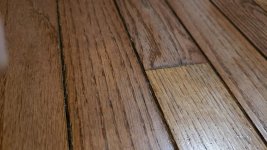
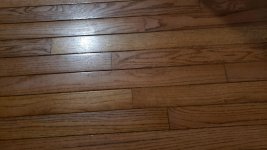
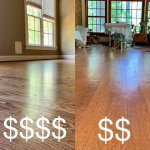
My house has the older-style oak boards, 2 1/2in wide. These were installed with 1/16" gap in between each board. Maybe that was the look 20 years ago, but I tire of dirt and debris settling in these cracks. Along with this, of course I have some scratches and marks. I got a quote to sand and refinish the area for $3000. Yeh, that ain't happening. I could tear it all out and replace with brand new for far cheaper.

I'm hoping there's some sort of resin or epoxy or similar that's designed for this application.

Any thoughts or advice would be appreciated.
 
To avoid these ads, REGISTER NOW!
OP
E

evercl92

Well-known member
Joined
Jun 16, 2017
Messages
186
Location
Columbus, OH
Let me know if those aren't sufficient
 

Attachments

  • 20190419_202819.jpg
    20190419_202819.jpg
    149.5 KB · Views: 162
  • 20190419_202825.jpg
    20190419_202825.jpg
    129.7 KB · Views: 131

PelicanPines

ALLIANCE MEMBER
Joined
Apr 30, 2014
Messages
38,118
Location
New Jersey, USA, Earth, My own reality
Ahhh haaaa... yea... that's prefinished planks of unknown thickness. It's not a traditional hard wood install... its a DIY floor. Sorry... it's not a gap as much as a routed edge. To hide any variations in board height.

I have seen those floors cause all kinds of issues... mold from moisture between the boards. Don't wetmop that floor.

That's gonna be tricky to fix.
 

ez-duzit

Well-known member
Joined
Jun 24, 2013
Messages
5,101
Location
Marina del Rey
The gaps were created to prevent buckling due to moisture absorption. If you fill them with epoxy you may experience buckling eventually. If you choose to fill them at all use a flexible compound, like deck caulk from Teak Decking Systems..
 
OP
E

evercl92

Well-known member
Joined
Jun 16, 2017
Messages
186
Location
Columbus, OH
Ironically, I added to the existing floor (during a bathroom remodel, where they didn't install it under the vanity) and I was able to obtain a very minimal gap. I assume this is partly due to lazy / easier install.
 

wrenchguy

Well-known member
Joined
Sep 22, 2011
Messages
4,698
Location
NW Indiana
Ahhh haaaa... yea... that's prefinished planks of unknown thickness. It's not a traditional hard wood install... its a DIY floor. Sorry... it's not a gap as much as a routed edge. To hide any variations in board height.

I have seen those floors cause all kinds of issues... mold from moisture between the boards. Don't wetmop that floor.

That's gonna be tricky to fix.

this! if i was u, change it out.
 

wrenchguy

Well-known member
Joined
Sep 22, 2011
Messages
4,698
Location
NW Indiana
Ironically, I added to the existing floor (during a bathroom remodel, where they didn't install it under the vanity) and I was able to very minimal gap. I assume this is partly due to lazy / easier install.

no, i'd say its the nature of that type flooring over the years..
 

The Cobbler

Super Moderator
Staff member
Joined
Oct 24, 2013
Messages
25,930
Location
Niagara Region, Ontario, Canada
what you have is factory finished with a beveled edge so height differences don't show .
alot of material has to come off to get that bevel off. probably why you go the porice you got.
anything you put in there to fill the groove will look worse than it does now, IMO
 

JoeMcGov

Well-known member
Joined
Sep 8, 2018
Messages
830
Location
Birmingham, Alabama
what you have is factory finished with a beveled edge so height differences don't show .
alot of material has to come off to get that bevel off. probably why you go the porice you got.
anything you put in there to fill the groove will look worse than it does now, IMO

This ^^^. You need to avoid NOW getting yourself into a "dear Gawwwwwd. The 'fix' is actually worse than having just left it alone."
 
To avoid these ads, REGISTER NOW!

markhm

Well-known member
Joined
Mar 4, 2017
Messages
264
Location
NY
Yes, above answers are right. It was prefinished 3/4" oak. The bevel is to hide differences in height. The bevel is deep enough that sanding down will get you too close to the tongue and groove.

Only real option is to fill it in with caulk or epoxy. It will then need to be sanded anyway and you will regret what you started.
 

bugnut

ALLIANCE MEMBER
Joined
Jul 14, 2012
Messages
3,950
Location
Central Ohio
This may be installed as a floating floor and not nailed to the subfloor. To determine this you'll need to remove some of the baseboard or quarter round molding and investigate. If it is you can remove the molding, remove the flooring reinstall using the correct tools and methods. By doing this correctly, though it is a lot of work, the gaps between will become smaller and the bevel will shoulder to shoulder reducing the gaps. The cost will only be your labor and maybe some new trim molding.
 

jake00

Well-known member
Joined
Aug 21, 2005
Messages
2,645
Location
illinois -- NW Burbs
I do hardwood for a living. Yes, it’s a microbeveled factory finished floor. It’s nailed down, the bevels can be sanded out, we do it all the time, How many sqft?
 
OP
E

evercl92

Well-known member
Joined
Jun 16, 2017
Messages
186
Location
Columbus, OH
Its stapled down, i was able to see it when i did the additional flooring for the bathroom.
Prob about 400-500 sq ft
 

jake00

Well-known member
Joined
Aug 21, 2005
Messages
2,645
Location
illinois -- NW Burbs
6 bucks a foot, that seems a little high, but not too far off considering the extra sanding needed to sand out the bevels,

Sure you could replace again w prefinished, but you’d have bevels again.
 

Miss the Pontiacs

Well-known member
Joined
Nov 7, 2016
Messages
16,497
Location
Saskatchewan Canada
Microbevel will sand out with a refinish. Chances are excellent you will have a better feel and look to your new floor than original. You can DIY and save a few bucks or start finding space to temporarily store all your furniture and call in the flooring dudes.
 
OP
E

evercl92

Well-known member
Joined
Jun 16, 2017
Messages
186
Location
Columbus, OH
Microbevel will sand out with a refinish. Chances are excellent you will have a better feel and look to your new floor than original. You can DIY and save a few bucks or start finding space to temporarily store all your furniture and call in the flooring dudes.

This is just in the kitchen, dining, hallway, bathroom. Not even furniture to move.

With all this advice, seems like it would almost make more sense to tear it all out and replace it with something more reasonable.
 

Miss the Pontiacs

Well-known member
Joined
Nov 7, 2016
Messages
16,497
Location
Saskatchewan Canada
If it were a laminate I totally agree. If it is hardwood you recover, you should have no problem getting rid of the material to someone who wants to recycle it.
For that matter save yourself the demo and offer it up for sale as you want it, you recover it.:thumbup:
 

JR 42

Well-known member
Joined
Nov 2, 2013
Messages
966
Location
Sunny Seattle
I think of that style being a macrobevel, not a microbevel- we salvaged a bunch of it at a prior job - and saw some NOS Bruce product with a similar deep and wide bevel. All the stuff I saw was your standard 3/4" thick tongue and groove. My guess is that your floor is 3/4" solid.

I'm no expert at hardwood refinishing, but I'd think you'd be better off scraping the grooves and squeezing in filler where needed, not sanding 1/8" off your floor, if you want to refinish that stuff.

It might be less work to tear it out and install a new prefinished floor. I don't think anyone uses a giant honkin bevel like that any more.


Some general knowledge stuff the wood flooring industry talks about all the time, in response to some replies in the thread:

Don't wet mop any hardwood floor. Ever. Just don't do it. You wouldn't wet mop your antique wood furniture. Wood moves around when temperature and moisture levels change.

You will always have the potential for seasonal gapping in solid wood. You can minimize it by having a tight building envelope and adding humidity control to your HVAC. Wood moves around when temperature and moisture levels change. You can install screaming tight in the winter, and have buckling in the summer; install tight in late spring and have gaps open in winter; etc. etc.

:beer:
 

Mustang1167

Well-known member
Joined
Aug 29, 2011
Messages
949
Location
Pittsburgh, PA
Your contractor may have just given you a high bid. Wait until after Christmas when most contractors aren’t busy and call a few more.

I got a quote on a similar size job for $1600. But that’s with me moving all the furniture and at the time I had carpet installed over the wood that I had to remove for that price.
 

jake00

Well-known member
Joined
Aug 21, 2005
Messages
2,645
Location
illinois -- NW Burbs
Sanding a floor is a bit like auto body work. You get what you pay for
 

Attachments

  • 883602DD-3B4F-4748-9CE0-84B69FC00082.jpeg
    883602DD-3B4F-4748-9CE0-84B69FC00082.jpeg
    131 KB · Views: 36
OP
E

evercl92

Well-known member
Joined
Jun 16, 2017
Messages
186
Location
Columbus, OH
As a side note - this floor has several areas that are squeeky - is this a good candidate for the screw-through-the-top fixes? Or not a good idea because of the shrink / expand ?
 
To avoid these ads, REGISTER NOW!
Top Bottom