To avoid these ads, REGISTER NOW!

Finally it's my turn! 50x60x12

440-6 Shaker

Well-known member
Joined
Jun 9, 2012
Messages
103
Location
Kansas City, MO
Like my dad always says, first you start with a box.
So here we go...
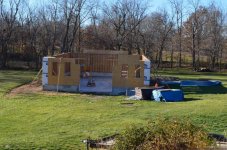
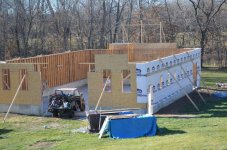
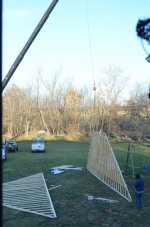
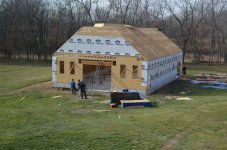
40x60x12 main building
10' lean to off one side
Upstairs room 16x60x10
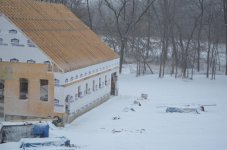
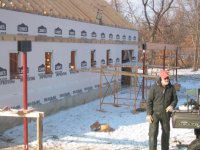
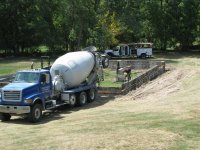
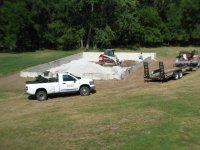
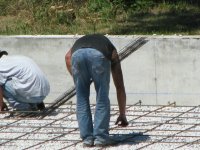
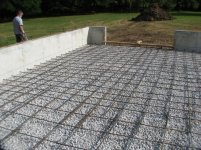
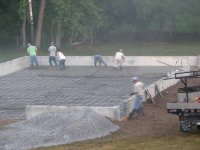
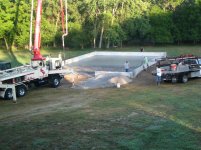
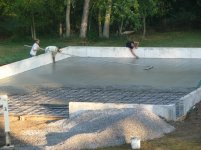
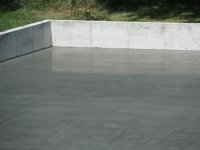
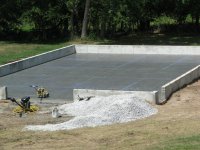
I've built this a hundred different ways in my head since we moved in in 2005, I just couldn't get over starting the project off with that giant kick in the crotch also referred to as concrete... it's the one part of the build I have no interest in doing myself.
Want to know what something cost or have questions about any of the build just ask.
 

Attachments

  • IMG_3311.jpg
    IMG_3311.jpg
    146.4 KB · Views: 455
  • IMG_3312.jpg
    IMG_3312.jpg
    146.6 KB · Views: 418
  • IMG_3315.jpg
    IMG_3315.jpg
    147.9 KB · Views: 390
To avoid these ads, REGISTER NOW!
OP
4

440-6 Shaker

Well-known member
Joined
Jun 9, 2012
Messages
103
Location
Kansas City, MO
I know there are hundreds of thousands of pole barns out there that have stood for decades, but I have issues with poles in the dirt... Well let's face it I have a variety of issues...
So here's what I did, 3' of concrete below grade (a footing plus 2' of 8" wall) and 2' above, then set a 10' tall 2x6 wall on top of a 2' above grade stem wall for a 12' ceiling.
So 5' of concrete total - footing plus 2' below and 2' above.
Not the cheapest route but I sleep really well at night knowing there's 2' of concrete between the wood and the dirt also really nice for hosing out the inside.
 

Attachments

  • IMG_4360.jpg
    IMG_4360.jpg
    146.2 KB · Views: 465
  • IMG_4361.jpg
    IMG_4361.jpg
    145.1 KB · Views: 483
  • IMG_4363.jpg
    IMG_4363.jpg
    149.6 KB · Views: 513
  • IMG_4364.jpg
    IMG_4364.jpg
    149.5 KB · Views: 482
  • IMG_4370.jpg
    IMG_4370.jpg
    146.1 KB · Views: 524
OP
4

440-6 Shaker

Well-known member
Joined
Jun 9, 2012
Messages
103
Location
Kansas City, MO
I was quite happy with the end result. Door openings were off, I think they measured from the inside of the wall and I was going off the outside, not a big deal.
3 openings
12W x 10H
9W x 8H
36" man door
 

Attachments

  • IMG_4371.jpg
    IMG_4371.jpg
    149 KB · Views: 470
  • IMG_4398.jpg
    IMG_4398.jpg
    149 KB · Views: 483
  • IMG_4405.jpg
    IMG_4405.jpg
    149.8 KB · Views: 479
  • IMG_4410.jpg
    IMG_4410.jpg
    141.6 KB · Views: 721
OP
4

440-6 Shaker

Well-known member
Joined
Jun 9, 2012
Messages
103
Location
Kansas City, MO
440-6 waht kind of Mopar do you have?

I have a very unhealthy Mopar addiction... thankfully I have a very understanding wife.

1966 Charger
1968 Charger RT
1971 Challenger

And in what little spare time I have I work on John Troxell's "MoparCrazy" Nostalgia Funny Car.
Its an original funny car from 71, it was driven by Della Woods.
417 blown Donovan Hemi on alcohol.
Runs 7.60's in the 1/4 @ 180ish mph.
Currently tuned by Roland Leong.

I'm the tall one on the left, w/ Roland in front and John Troxell car owner in back.
 

Attachments

  • 131.jpg
    131.jpg
    82.1 KB · Views: 482
  • KilKare12.jpg
    KilKare12.jpg
    103 KB · Views: 771
Last edited:
OP
4

440-6 Shaker

Well-known member
Joined
Jun 9, 2012
Messages
103
Location
Kansas City, MO
130 tons of 3/4" to 1-1/4" rock brought in for the base.
I like steel... lots of it...
#4 rebar 16" centers on one half 12" centers on the other half.
I'll be putting a 2 post 10k lift on the 12" side.
Rebar up on 1.5" chairs
Slab will be 6" - 8" thick.
 

Attachments

  • IMG_4414.jpg
    IMG_4414.jpg
    141.2 KB · Views: 469
  • IMG_4416.jpg
    IMG_4416.jpg
    145.1 KB · Views: 436
  • IMG_4422.jpg
    IMG_4422.jpg
    148.5 KB · Views: 568
  • IMG_4427.jpg
    IMG_4427.jpg
    148.7 KB · Views: 460

Graham08

Well-known member
Joined
Dec 10, 2007
Messages
713
Location
Iron Station, NC
Very cool project. Also extremely cool that you help with a funny car tuned by Roland Leong! He's forgotten more about tuning nitro cars than most people will ever know.
 
OP
4

440-6 Shaker

Well-known member
Joined
Jun 9, 2012
Messages
103
Location
Kansas City, MO
Very cool project. Also extremely cool that you help with a funny car tuned by Roland Leong! He's forgotten more about tuning nitro cars than most people will ever know.

Roland is THE MAN, period! He's an absolute, flat out trip to work for.
He could do even more for us if we'd run nitro but we're just not that smart enough yet. That and I don't think our original 1970 Logghe chassis would stand up to too many nitro passes. It's currently certified to 6.50 but we're starting to push the limits as it is.
 

Attachments

  • profilepic10767_2.jpg
    profilepic10767_2.jpg
    108.3 KB · Views: 416
OP
4

440-6 Shaker

Well-known member
Joined
Jun 9, 2012
Messages
103
Location
Kansas City, MO
The big pour!
I figured they would bring trucks back and either just chute it or possibly get a conveyor truck.
I was pretty surprised when they showed up w/ a pumper. He decided at the last minute to make it a little easier and quicker on his guys.
5 1/2 bag mix
1/2 bag fly ash
Buckeye fibers
Concrete was $106 yd the day we poured.
Footing, wall, slab 85 yards total.
 

Attachments

  • IMG_4455.jpg
    IMG_4455.jpg
    132.1 KB · Views: 535
  • IMG_4456.jpg
    IMG_4456.jpg
    141.5 KB · Views: 496
  • IMG_4462.jpg
    IMG_4462.jpg
    144 KB · Views: 504
  • IMG_4465.jpg
    IMG_4465.jpg
    149.8 KB · Views: 473
  • IMG_4468.jpg
    IMG_4468.jpg
    147.8 KB · Views: 517
  • IMG_4476.jpg
    IMG_4476.jpg
    145.9 KB · Views: 517
  • IMG_4477.jpg
    IMG_4477.jpg
    139.2 KB · Views: 553
OP
4

440-6 Shaker

Well-known member
Joined
Jun 9, 2012
Messages
103
Location
Kansas City, MO
Now time to make it slick.
 

Attachments

  • IMG_4481.jpg
    IMG_4481.jpg
    145.8 KB · Views: 420
  • IMG_4487.jpg
    IMG_4487.jpg
    144.2 KB · Views: 425
  • IMG_4494.jpg
    IMG_4494.jpg
    148.6 KB · Views: 393
  • IMG_4495.jpg
    IMG_4495.jpg
    133.8 KB · Views: 443
OP
4

440-6 Shaker

Well-known member
Joined
Jun 9, 2012
Messages
103
Location
Kansas City, MO
Cutting the slab and old school full pond water cure.
My concrete guys said they had recently done a full pond water cure with the same set up and mix as mine then had it tested.
It went to 5600psi.
 

Attachments

  • IMG_4499.jpg
    IMG_4499.jpg
    147.9 KB · Views: 581
  • IMG_4500.jpg
    IMG_4500.jpg
    135.6 KB · Views: 643
  • IMG_4506.jpg
    IMG_4506.jpg
    147.8 KB · Views: 697
  • IMG_4511.jpg
    IMG_4511.jpg
    142.3 KB · Views: 811
OP
4

440-6 Shaker

Well-known member
Joined
Jun 9, 2012
Messages
103
Location
Kansas City, MO
Shop looking good. Was you at Indy with them for the monster mopar race ? I have a flew mopars also hehehe..

Yeah... I'm trying to remember, they all tend to run together by the end of the season.
I think we were in Indy about the 3rd week of September.
That's where we dead hooked, did a wheel stand and snapped off both wheelie bars, came down so hard turned a 1.750" solid front axle into a big smiley.
Roland had the motor set on kill, I think he was attempting to rotate the earth in the opposite direction.
 

USAF_POL

Active member
Joined
Nov 26, 2012
Messages
41
Subscribed! Looking forward to watching this one. One day I would like to build a large shop and am looking for some good ideas and yours is a fresh build! Looking forward to watching all the progress.

Must be very exciting to get to work on hot rods with R. Leong! I love drag racing :)
 
OP
4

440-6 Shaker

Well-known member
Joined
Jun 9, 2012
Messages
103
Location
Kansas City, MO
2x6x10' walls, double top & bottom plates, 16" centers.
I framed the walls then using scaffolding we lifted the 10' wall on top of the 2' stem wall.
Built the walls in 10' to 14' sections.
Did the window and door headers after the walls were up.
 

Attachments

  • IMG_4810.jpg
    IMG_4810.jpg
    144.3 KB · Views: 564
  • IMG_4811.jpg
    IMG_4811.jpg
    146.6 KB · Views: 513
  • IMG_4813.jpg
    IMG_4813.jpg
    146 KB · Views: 470
  • IMG_4814.jpg
    IMG_4814.jpg
    142.4 KB · Views: 457
  • IMG_4815.jpg
    IMG_4815.jpg
    142.1 KB · Views: 477

BFalfa

Well-known member
Joined
Nov 24, 2012
Messages
105
going to be a nice shop for sure, i have seen you run before, and im located just straight east from you on the other side of the state. sure is a bummer that kcir is gone.
 
To avoid these ads, REGISTER NOW!
OP
4

440-6 Shaker

Well-known member
Joined
Jun 9, 2012
Messages
103
Location
Kansas City, MO
going to be a nice shop for sure, i have seen you run before, and im located just straight east from you on the other side of the state. sure is a bummer that kcir is gone.

Cool, good to hear from you.
Yeah, what happened to KCIR was nothing short of a crime. It really ***** for us because we used to test there. We could get 8 hours of track time for about $600. Now we have to travel to test and pay 2-3 times that.
 

wdrumheller

Well-known member
Joined
Nov 15, 2012
Messages
198
Location
Virginia
I'd never hear of pond water curing for concrete before. Very interesting method. Learning new things is so fascinating!

Love the size of the building. Just right!
 
OP
4

440-6 Shaker

Well-known member
Joined
Jun 9, 2012
Messages
103
Location
Kansas City, MO
I'd never hear of pond water curing for concrete before. Very interesting method. Learning new things is so fascinating!

Love the size of the building. Just right!

Based on my research the ponding method tends to result in slightly higher cured strength.

I tried to make it smaller but when you mess around with a lot of car stuff 40' wide is a must in my experience. It was either going to be 40x60 or 80...

I hope I don't regret not putting heat in the floor. I'm from northern MN so the weather here in KC MO is very mild by my standards... I decided to use that portion of the budget for a 2 post 10K lift. i think I'll use the lift more that the floor heat.
I'm sure I'll end up putting an oil burner or a woodstove to take the chill out of the air.
 
OP
4

440-6 Shaker

Well-known member
Joined
Jun 9, 2012
Messages
103
Location
Kansas City, MO
You are doing it right. Great job on the concrete.


It was not exactly the cheapest route but I sleep very well at night knowing that the walls are two feet up, basically sitting on a big concrete tub.
I don't think I'll regret pouring that much concrete it was just a hard check to write to start the project off..
 
OP
4

440-6 Shaker

Well-known member
Joined
Jun 9, 2012
Messages
103
Location
Kansas City, MO
C'mon Sally, you've got a 12' wide load and 12' - 5/16" between the trees...
You want be to call my wife out here to drive this through there...

DSC_0270.jpg
DSC_0276.jpg


This is where my dad is saying "These are how big? How exactly are we getting these up there? how big are these things again?"

DSC_0552.jpg
 

Attachments

  • DSC_0277.jpg
    DSC_0277.jpg
    148.3 KB · Views: 464
  • DSC_0280.jpg
    DSC_0280.jpg
    147.9 KB · Views: 471
  • DSC_0272.jpg
    DSC_0272.jpg
    148.9 KB · Views: 507
  • DSC_0553.jpg
    DSC_0553.jpg
    151.7 KB · Views: 549

Cobra4B

Well-known member
Joined
Feb 26, 2006
Messages
1,200
Location
Virginia Beach, VA
Impressive... funny how shops always look small when you first dig the outline in the ground and then once you get going you see how huge the space really is.
 
OP
4

440-6 Shaker

Well-known member
Joined
Jun 9, 2012
Messages
103
Location
Kansas City, MO
Impressive... funny how shops always look small when you first dig the outline in the ground and then once you get going you see how huge the space really is.

No kidding...
3 seconds after the dirt guys left I was out there w/ a tape measure double checking because it looked about 30x40 at best to me...
When I realized it was in fact 40x60 I almost added another 20 feet to it.
 
OP
4

440-6 Shaker

Well-known member
Joined
Jun 9, 2012
Messages
103
Location
Kansas City, MO
So far I've managed to only have to pay pros twice during my build.
The first was the stem wall & slab... that one hurt!
The second was setting the trusses. I think i could have done it with a SkyTrax or a Lull but getting the right kind of crew together was an issue. For the safety factor alone it was money well spent.

The trusses are piggybacks, the lower truss is 40' x 12' tall the the caps are 12' x 5' 3" tall, 10/12 pitch so the complete truss is 40' wide and 17' 3" tall.
The guys showed up at 7am and were pretty much done by about 3:30.

I kind of liked the look of it without the peaks on...
 

Attachments

  • DSC_0600.jpg
    DSC_0600.jpg
    109.4 KB · Views: 528
  • DSC_0610.jpg
    DSC_0610.jpg
    149.5 KB · Views: 540
  • DSC_0635.jpg
    DSC_0635.jpg
    152.4 KB · Views: 578
  • DSC_0641.jpg
    DSC_0641.jpg
    147.8 KB · Views: 511
  • DSC_0649.jpg
    DSC_0649.jpg
    151.8 KB · Views: 800
  • DSC_0651.jpg
    DSC_0651.jpg
    147.8 KB · Views: 730
  • DSC_0653.jpg
    DSC_0653.jpg
    148.6 KB · Views: 790
Last edited:

Graham08

Well-known member
Joined
Dec 10, 2007
Messages
713
Location
Iron Station, NC
That's nice! What is the pitch on that roof? Looks pretty steep.

I did exactly the same thing with my trusses. It was well worth the money to hire guys with experience to do it...that one one of the few things that got contracted out on my shop.
 
OP
4

440-6 Shaker

Well-known member
Joined
Jun 9, 2012
Messages
103
Location
Kansas City, MO
That's nice! What is the pitch on that roof? Looks pretty steep.

I did exactly the same thing with my trusses. It was well worth the money to hire guys with experience to do it...that one one of the few things that got contracted out on my shop.

It's 10/12 pitch which at 40' wide makes it 29' 3" from the ground to the ridge.
I think I'm going to have to invest in a 40' extension ladder.

Yeah it was money well spent. For $1800 I got a 5 guy crew for about 9 hours plus a boom truck, operator and hook up man for about 5 hours.
 

FITO

Well-known member
Joined
Dec 1, 2007
Messages
205
Location
East of KC
Thinking about your shop as this storm blows outside. Were you able to get it sealed up in time? Thanks for sharing your build!
 
OP
4

440-6 Shaker

Well-known member
Joined
Jun 9, 2012
Messages
103
Location
Kansas City, MO
Thinking about your shop as this storm blows outside. Were you able to get it sealed up in time? Thanks for sharing your build!

Negative... The unfortunate down side of trying to do it all yourself.
I finished building the left side eave, and got the piers poured to support the lean-to columns.
The big to do list-
Build lean-to on right side
Build front & rear gable eaves
Deck it
Roof it... still trying to decide between metal standing seam and asphalt shingles.

My job is really getting in the way of my barn building!
 

Attachments

  • DSC_1050.jpg
    DSC_1050.jpg
    146.6 KB · Views: 353
  • DSC_1051.jpg
    DSC_1051.jpg
    135.5 KB · Views: 308

matouse3

Well-known member
Joined
Feb 19, 2012
Messages
289
Location
Mid-Michigan
Man, looking sharp. If you can swing it, I would run with the standing seam over the asphalt, especially on a pitch and size roof like that. You want to do that job the least number of times possible. I, of course can say that because I went the less expensive route and did shingles. If I had the money at the time and could do over, I would have done metal. Shingles got the job done for me for now, maybe on the replacement I'll run metal. The cost might be easier to stomach then when I don't have the cost of the entire project looming.

Good luck toughing out the storm.
 
OP
4

440-6 Shaker

Well-known member
Joined
Jun 9, 2012
Messages
103
Location
Kansas City, MO
Things are moving along...
I did a few things to try to break up the huge gable roof. On one side I came out w/ the eave 2' and then returned into the truss @ a 4.5/12 pitch.
I'm going to do the same thing on the other side but I'll come out 10' and return back to the truss @ a 4.5/12 pitch creating a lean to.
This was at lunch today beams in and getting started on the joists.

I'm a machinist & welder so I make a lot of stuff for myself here are some beefy beam pockets I made to secure the lvl beams.

The beam is 4 lvls 2 34's and 2 32's they went in pretty easy. My 62 year old father and I set them by ourselves.

Lean to rafters are next.
 

Attachments

  • IMG_1266.jpg
    IMG_1266.jpg
    143.1 KB · Views: 468
  • IMG_1267.jpg
    IMG_1267.jpg
    143 KB · Views: 396
  • IMG_1268.jpg
    IMG_1268.jpg
    144.3 KB · Views: 465
  • IMG_1269.jpg
    IMG_1269.jpg
    146 KB · Views: 409
  • IMG_1274.jpg
    IMG_1274.jpg
    150.7 KB · Views: 464
  • IMG_1272.jpg
    IMG_1272.jpg
    138.8 KB · Views: 422
  • IMG_1273.jpg
    IMG_1273.jpg
    140.4 KB · Views: 360
To avoid these ads, REGISTER NOW!
Top Bottom