To avoid these ads, REGISTER NOW!

Finally making some progress on my 3 car garage.

OP
R

Rockey

Well-known member
Joined
Jun 1, 2010
Messages
168
The pour turned out great and I cant wait till the other half is finished up in 2 weeks. He got started at 8:00 am and didnt leave the house until about 9:00 pm. He said it was because it was runny in order to get it raked back tot he far corner and wall. He came back out this morning to put the sealer on. Now the guy that delivered all the pea gravel has got me thinking about just putting a gravel apron and driveway back to the garage. Mayhaps.

Looking at some cedar siding this evening and then I have a bobcat coming to put the rest of the gravel in. I may just be spending money faster than i am making it.:confused:
 

Attachments

  • IMG00278-20101023-1140.jpg
    IMG00278-20101023-1140.jpg
    142.5 KB · Views: 123
  • IMG00272-20101023-1127.jpg
    IMG00272-20101023-1127.jpg
    141.4 KB · Views: 94
To avoid these ads, REGISTER NOW!

Mr. Welsh

Well-known member
Joined
May 21, 2007
Messages
1,425
Don't let the concrete guy cheat too much. Adding excess water to the mix will significantly reduce the strength of the concrete. It is sometimes necessary to add some water to the mix, but don't overdo it just to make the concrete easier to rake.

If he balks, you could pay a few extra dollars per cubic yard for a plasticizer which will have the same effect without reducing strength.

It may not matter...but you never know. http://en.wikipedia.org/wiki/Water-cement_ratio
 
Last edited:
OP
R

Rockey

Well-known member
Joined
Jun 1, 2010
Messages
168
I didn't expect to have any progress to report so quickly but the guy that delivered all my pea gravel for backfill got me thinking. He gave me some numbers on what it would take to put a gravel driveway and apron around the garage. Since the garage is going to be used for just ATVs a gravel drive seems perfect. So I had a bobcat delivered late Saturday and I got the garage backfilled Saturday night and moved the leftover gravel behind the garage Sun morning. I then proceeded to try and dig 6 inches up for the gravel driveway. 3 problems. 1 - It was my first time operating a bobcat. 2 - this is the worst drought we have had for decades. 3- The hard packed clay had a gravel truck run over it 15 times in the past couple of weeks.

It seemed that no matter what angle I tried the toothed bucket at it would eiether drag across the dirt or dig right in and stall. I beat myself and the bobcat up for hours to get this much done. I was very surprised atg how straight it looks. Oh and the best part was that I found the property rebar stake that I spent weeks and had a White rep with his equipoment out trying to loacate it way back in the spring. Turns out all I had to do was rent a bobcat and have at it.
 

Attachments

  • IMG00281-20101025-1206.jpg
    IMG00281-20101025-1206.jpg
    146.6 KB · Views: 235
  • IMG00280-20101025-1205.jpg
    IMG00280-20101025-1205.jpg
    151.5 KB · Views: 211
  • IMG00282-20101025-1207.jpg
    IMG00282-20101025-1207.jpg
    146.3 KB · Views: 244

Clinotus

Active member
Joined
Aug 18, 2010
Messages
38
I had to keep staring at the picture and then refer to earlier in the thread but I swore up and down that there was a tree in the middle of the driveway and you cleared around it as prep for the pour. :lol_hitti
 
OP
R

Rockey

Well-known member
Joined
Jun 1, 2010
Messages
168
I had to keep staring at the picture and then refer to earlier in the thread but I swore up and down that there was a tree in the middle of the driveway and you cleared around it as prep for the pour. :lol_hitti

Nah, I would've built a bridge over it.
 
OP
R

Rockey

Well-known member
Joined
Jun 1, 2010
Messages
168
I found a great score on craigslist! Clear Western Red Cedar siding panels. Here is what it looks like leaning against the garage. I got 12+ panels like that for $150.00. It should be enough to cover the front of the garage. It'll cost me about 4-5k more to finish the rest of the garage, unless I find another great deal on CL. I was very excited to find a good honest person out there with a great deal.

Just got the stair landing done tonight. It was a bit easier than I thought it would be. The EZ stair kits should be here tomorrow so I can hopefully get them done in a few hours in time for a few friends that will be stopping over. I might get a few night pictures because of some work lights I got tonight. If not, pics of the stairs tomorrow! Framing inspection should be ready soon.
 

Attachments

  • IMG00286-20101029-1407.jpg
    IMG00286-20101029-1407.jpg
    145.9 KB · Views: 97
  • IMG00287-20101029-1803.jpg
    IMG00287-20101029-1803.jpg
    121.5 KB · Views: 95
Last edited:

more toys

Active member
Joined
May 15, 2009
Messages
31
Location
Arkansas
Nice score on the siding, Craigs list is the best. Let us know how the EZ stair kit goes, I have been looking at one of the kits.
Mike
 
OP
R

Rockey

Well-known member
Joined
Jun 1, 2010
Messages
168
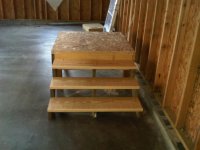
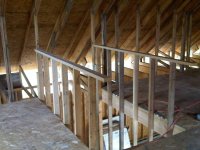
The stairs are in. Details on the build ain the next paragraph. Overall I was very impressed with the stairs and the final product. The president of the company called me on Friday to apologize for the continued dealys on shipping the kits out to me. He explained that the kits had finally come in and would be shipping out to me. I explained to him that I ordered them a week earlier in anticipation of a get together of some friends this weekend. I asked if he would upgrade to saturday delivery for free and he obliged - A++. The kit showed up via UPS about noon yesterday and I got real busy putting it together and had it done by about 5:00. I haven't rushed any of the build up to this point because I know thats when most mistakes are made. Luckily this one went off without a hitch.

I didnt take pictures during stages of the build because of the time constraint but everything is just like you see on their website and this kit really was easy to build, even if its a 1 man project. You start by doing some simple calculations and can figure out 1) what length stringers to get. I got lucky here. I went to Lowe's and was planning on just getting 2X6X14. they didnt have 14' so I got 16' and was debating on just getting 12' because i thought for sure that would be long enough. Getting the 16' was a wise choice as I wouldve had to take the 14' or 12' back to get the 16'. My calculations came to 15.8' stringers so the 16' worked out perfect.

With this length stringer the spacer that they sent to use only had about 13 adjustments on it labeled a-m( I think). It turns out I needed a slot before the "a" to work out perfect. After using the spacers to place the brackets on the 2X6 stringers you just screw in 2 pivot screws and then after you have them in you rotate the brackets until you reach the correct riser height. Very easy - and then lock it in place with the rest of the screws - thats a lot of screws. Most of your time will be spent screwing and you will need a lot of them. I think I needed around 300+ after its all said and done.

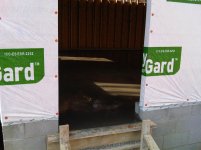
Next you make your cuts on the ends to finalize the stringer length. Once again pretty straight forward. After that I had to decide whether I was going to hang the stringers one at a time or prebuild the stairs and then hang them. I decided a compromise by doing two end treads and risers to hold it all together and then put both stringers in place and build it. I still had to put a double header up on the second floor and this took about an hour because I had to cut the OSB back and then lift a doubled up 2X112 header and hang them with joist hangers, by myself. That alone was as difficult as lifting the stringers and walking up the ladder and holding them in place while nailing in the angled corner hangers.

Anyway after getting them done and walking up and down I noticed the stairs do tilt on a 3-5 degree angle becaus of the limitation on the spacer kit. This is barely noticable and I can easily add a washer shim on the treads to correct this. I can't believe I got them all done in time for company last night. Now I am really close to being able to get the framing inspection done. I am very happy right now. I almost forgot I went 45" wide on the stairs and you can go up to 9' using this kit. It is an extremely strong design. Have a look:

IMG00290-20101031-1016.jpg


IMG00291-20101031-1017.jpg


IMG00289-20101031-1015.jpg


IMG00295-20101031-1023.jpg
 

Clinotus

Active member
Joined
Aug 18, 2010
Messages
38
Those stairs came out great, they look nice and solid. I read the instructions online when you first posted the link to the kit and from what you wrote it sounds like there were no complications to the building and they installed like they said. I hate it when the instructions don't mesh with the implementation. Looks good!
 

JC23

Well-known member
Joined
Dec 31, 2009
Messages
11,718
Location
Northcoast
Day-Ammm!

That is one big azz set of steps! You plan on driving up to the second level? haha

From the photos, it almost looks like they are in the middle of the garage. Or is that landing against the back wall?

Nice place.
 
OP
R

Rockey

Well-known member
Joined
Jun 1, 2010
Messages
168
Those stairs came out great, they look nice and solid. I read the instructions online when you first posted the link to the kit and from what you wrote it sounds like there were no complications to the building and they installed like they said. I hate it when the instructions don't mesh with the implementation. Looks good!

Thanks. It is money well invested. I have an extra spacer kit that I ordered by mistake. Your more than welcome to it, just pay shipping. Pm me if you decide to go with the stairs.

Day-Ammm!

That is one big azz set of steps! You plan on driving up to the second level? haha

From the photos, it almost looks like they are in the middle of the garage. Or is that landing against the back wall?

Nice place.

Haha - The stair landing is along the back wall. With the 14 steps on that stringer it was a big mama. I found it a bit of a drawback that the garage was designed with the stairs in the middle of the garage, but I didnt want to stray from the original plans and put the stairs along a sidewall. I'll live with it.
 

Clinotus

Active member
Joined
Aug 18, 2010
Messages
38
Thanks. It is money well invested. I have an extra spacer kit that I ordered by mistake. Your more than welcome to it, just pay shipping. Pm me if you decide to go with the stairs..

We have a new kid on the way so my time isn't mine for the next few months, I greatly appreciate the offer though! Very kind of you. :bowdown:
 
OP
R

Rockey

Well-known member
Joined
Jun 1, 2010
Messages
168
Here are the latest. Just a few loose ends to tie up and I can schedule the framing inspection next week. Woohoo. And then I can fix everything he tells me is too redneck to work. Speaking of which I'm not so sure the stairs are going to pass inspection the way I framed around them. I am going to start a new post in the general forum to see what some builders think.
 

Attachments

  • IMG00300-20101106-1553.jpg
    IMG00300-20101106-1553.jpg
    137.2 KB · Views: 161
  • IMG00301-20101106-1613.jpg
    IMG00301-20101106-1613.jpg
    139.3 KB · Views: 138
  • IMG00302-20101106-1639.jpg
    IMG00302-20101106-1639.jpg
    146.9 KB · Views: 131
  • IMG00304-20101106-1641.jpg
    IMG00304-20101106-1641.jpg
    137.4 KB · Views: 144
  • IMG00305-20101106-1642.jpg
    IMG00305-20101106-1642.jpg
    139.5 KB · Views: 131
  • IMG00306-20101106-1644.jpg
    IMG00306-20101106-1644.jpg
    141.7 KB · Views: 124
OP
R

Rockey

Well-known member
Joined
Jun 1, 2010
Messages
168
Got some windows in. It adds a little more character. The floor behind the knee wall will be done tomorrow in the loft. Then the handrail and a few odds and ends so the framin inspection can be done this coming Monday. I have to get a lot of cleaning done tomorrow also, its been a long time coming. I cant believe how much scrap was produced building this garage and its not even done. Anyway I have a new camera so I will get a lot of pictures of the interior tomorrow.

2010-11-13_13-43-06_218.jpg
 

nmanitou

Well-known member
Joined
Mar 17, 2009
Messages
221
Location
Michigan
Holy Schnikies! - That's one big Garage-Mahal!! Looks great, and the bonus room above should be a nice feature.
 

John in OH

Well-known member
Joined
Jun 2, 2007
Messages
2,444
Location
SE Ohio & Eastern Virginia
Great looking garage! You are to be commended for doing so much of the labor yourself. When my kids were young, I never seemed to have time for any extra projects such as a garage!

Maybe I missed it somewhere in the previous posts, but what is the ceiling height?
 
OP
R

Rockey

Well-known member
Joined
Jun 1, 2010
Messages
168
Holy Schnikies! - That's one big Garage-Mahal!! Looks great, and the bonus room above should be a nice feature.

Thanks, the freed up space with attic loft trusses makes it an easy sell when deciding which garage style to go with. I get the feeling it will fill up fast.

Nice progress and great scoreon thecedar panels
Thanks, I am anxious to get the siding started. Hopefully the framing inspection will be over with tomorrow.

Great looking garage! You are to be commended for doing so much of the labor yourself. When my kids were young, I never seemed to have time for any extra projects such as a garage!

Maybe I missed it somewhere in the previous posts, but what is the ceiling height?

Thank you. First off the celing height is about 9'6" I never even thought about a lift when deciding on a garage and I dont have any regrets right now because it will be a home for my 4 wheelers. But who knows, in the future I might wish it was a bit more headroom.

As far as time, you are very right. I have had to compromise a lot of time. I only made it to a bit over half of my kids sports event over the summer. I still took time off to get on the trampoline with my daughters to help and get in the pool and spend some time there. We didn't have time for a vacation so we are heading to Gatlinburg for tgiving week to spend in a cabin. That and my sons wrestling season has started and I help coach. So time will be scarce for garage building until late March.
 
To avoid these ads, REGISTER NOW!
OP
R

Rockey

Well-known member
Joined
Jun 1, 2010
Messages
168
Well the Building Inspector walked through on Monday. He liked everything except the hurricane clips on the doubled girders. According to my truss prints they have a rated upload factor of 690 lb's. He said the Simpson H2.5 was only rated at 175. Its actually 4XX but I wasn't going to argue, its still undersized. So I went out and got some H6's These are huge and a bit of everkill but it should make him happy. Its an absolute pain driving a 16 penny nail through the connector plates and absolutley inpossible on a couple because the next truss is only a foot away. Take a look at the H6 and how it wraps around the top plates:

2010-11-17_17-09-37_561-1.jpg
 
OP
R

Rockey

Well-known member
Joined
Jun 1, 2010
Messages
168
That looks too easy, almost like cheating. I hope Harbor Freight carries one cause its going to be a 1 time use for me and i only have 4 more clips to put up.
 
OP
R

Rockey

Well-known member
Joined
Jun 1, 2010
Messages
168
Back from the dead. After a multi year hiatus we are finally getting the siding done. Should be completed in the next 2 weeks.


68macmus

New member
Joined
Dec 14, 2012
Messages
1
Just came across this build, looks awesome! I am planning something similar. Sorry if you already mentioned but the ceiling height is 9ft 6. 28x46 dimesion what is the total height to peak? Did you order trusses? Did you free hand the dormers or in a kit? Thanks in advance, any plans would be great.
 
OP
R

Rockey

Well-known member
Joined
Jun 1, 2010
Messages
168
Just came across this build, looks awesome! I am planning something similar. Sorry if you already mentioned but the ceiling height is 9ft 6. 28x46 dimesion what is the total height to peak? Did you order trusses? Did you free hand the dormers or in a kit? Thanks in advance, any plans would be great.

Overall height is 24'. I found the plans that I used: http://www.cadnw.com/details.asp?plan=G4628A

I had a local truss company make the trusses and I hand built the dormers. Looking back, it was a huge undertaking but well worth it.
 
OP
R

Rockey

Well-known member
Joined
Jun 1, 2010
Messages
168
Thanks guys. I really like the western red cedar siding a lot. Its hard to capture how good it looks in person and it definitely looks better in the sunlight. I worked with wester red cedar for years making outdoor furniture in my spare time and always finished it with Sikkens Cetol. The Sikkens finish looks second to none but the maintenance made it undesirable for garage siding so i went with Penofin blue label. Im thinking about going a shade darker red on the lap siding next year so it matches the shingles on the dormer better.
 
OP
R

Rockey

Well-known member
Joined
Jun 1, 2010
Messages
168
Thanks, the kraut mobile is a 2008 CL65.

We are getting closer!


Audicon

Well-known member
Joined
Apr 12, 2009
Messages
139
Just came across this thread. The garage is stunning. Appears to fit well behind the house. Almost loos lie an extension of the current garage.

Love the CL. MY boss has me looking for either a CL or CLS right now in my open time. Anything I should look for specifically?

Can't wait to see more of the garage.Thanks for sharing.
 
OP
R

Rockey

Well-known member
Joined
Jun 1, 2010
Messages
168
Love the CL. MY boss has me looking for either a CL or CLS right now in my open time. Anything I should look for specifically?

I test drove a CLS before buying the CL. I liked the CLS and wish mine had two more doors but the v12 is soooo.....

However when advising others on purchasing a CL, specifically a W215 or W216 I cannot emphasize enough the importance of a warranty. I purchased mine with a 3 year unlimited mileage warranty and so far after about 14 months of ownership it has saved me about 40-45k in warranty work that has been performed.
 

Audicon

Well-known member
Joined
Apr 12, 2009
Messages
139
Thanks Rockey. Great info to know.

And now back to our regular scheduled programming
 
To avoid these ads, REGISTER NOW!
Top Bottom