To avoid these ads, REGISTER NOW!

Finally ready for blast cabinet. Suggestions needed

OP
K

katit

Well-known member
Joined
May 5, 2006
Messages
862
Location
St. Louis, MO
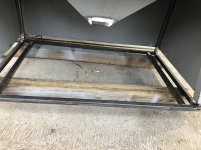
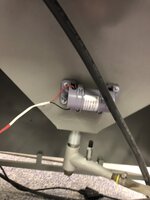
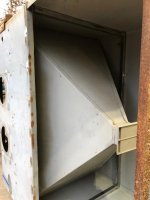
Welded in brace to stabilize sheetmetal and cabinet all around. Spot welded around. Next step is to put it on legs, I plan to make same rectangular platform from 1x1 and weld legs in a corners. Good part - I had some leftover 1x1.

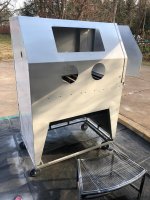
Bought some 5in wheels (2 locking) - this should bring cabinet to comfortable height.

Looks like a lot of work and it is. But seeing how it's made I would want something like that on new one anyways..

Not like I needed another project but oh well. Tried DA sander - works well, painting will be a quick task.
 

Attachments

  • IMG_3458.jpg
    IMG_3458.jpg
    77.3 KB · Views: 53
  • IMG_3457.jpg
    IMG_3457.jpg
    61.9 KB · Views: 48
To avoid these ads, REGISTER NOW!

Jswain

Well-known member
Joined
Apr 26, 2013
Messages
2,457
Location
Calgary, AB
Metal window screen. Can you share type/size of holes?

The same type you have in your windows at home. As long as your cabinet is well lit it makes a world of difference.

If you need to change the hoses/pickup tube anyways I would change it to a metering valve at the bottom of the hopper & add a triggerless gun to the foot pedal. All can be done very cheap and/or there are kits out there
 
OP
K

katit

Well-known member
Joined
May 5, 2006
Messages
862
Location
St. Louis, MO
The same type you have in your windows at home. As long as your cabinet is well lit it makes a world of difference.

If you need to change the hoses/pickup tube anyways I would change it to a metering valve at the bottom of the hopper & add a triggerless gun to the foot pedal. All can be done very cheap and/or there are kits out there

What is metering valve? With foot pedal I already have triggerless gun
 

metlmunchr

Well-known member
Joined
Sep 10, 2011
Messages
1,278
The gun you have is a Campbell Hausfeld that's sold for sticking a pickup tube in a bucket of sand to blast. The problem is it only uses ceramic nozzles which wear really fast, and replacement nozzles are only available as a part of a kit that includes a couple other parts. You end up paying 2/3 of the price of the complete gun to get a nozzle IF you can find anyone who stocks it, when other ceramic nozzles typically sell for $2 to $3 apiece. The nozzle wear is a major issue as, for example, a 1/8" nozzle will need twice as much air to function properly when it's worn to 3/16".

The skat blast C-35-C blast gun with a carbide nozzle is $129. A carbide nozzle will last 30 times as long as a ceramic nozzle, so using ceramic nozzles is false economy in general, and particularly so in the case of the C-H gun where new ceramic nozzles will cost $20 or more each.

Unless I had some specific need for it, I'd stay far away from soda blasting for two reasons. One, it turns to dust on impact so it isn't recycled in the cabinet like other abrasives, so this makes it extremely expensive to use as compared to other media. And, two, it is known to cause problems with subsequent paint to the extent that the major automotive paint manufacturers will not guarantee their products when applied on a soda blasted surface. Initially they stressed the importance of removing all traces of the soda, but eventually adopted a "Use it at your own risk" policy.
 

Jswain

Well-known member
Joined
Apr 26, 2013
Messages
2,457
Location
Calgary, AB
https://images.app.goo.gl/M4FSdMEogGUnrUwZA

Just a different and much improved way of picking up media vs a siphon tube setup like you have. It will make your cabinet more efficient and you can use way less media without sputtering etc. I can run mine on like one or two Dixie cups full of media which makes changing between media's very fast.

The gun you posted a picture of has a trigger
This style will make your cabinet more efficient as well especially at lower pressures and is much easier on the hands & carbide nozzles can be had cheap. Or one of the name brand triggerless guns sized to your compressor.
https://images.app.goo.gl/hJt2f7sMquS4meN46
 
OP
K

katit

Well-known member
Joined
May 5, 2006
Messages
862
Location
St. Louis, MO
The skat blast C-35-C blast gun with a carbide nozzle is $129.

Understood. Mine as well get a gun while I am there.
SKAT has 2 different guns though.

C-35 for $69
https://www.tptools.com/C-35-Series-Foot-Pedal-Operated-Power-Gun,8593.html?b=d*8026

and

C-35-C for $129

Is carbide that much better?

Unless I had some specific need for it, I'd stay far away from soda blasting for two reasons. One, it turns to dust on impact so it isn't recycled in the cabinet like other abrasives, so this makes it extremely expensive to use as compared to other media. And, two, it is known to cause problems with subsequent paint to the extent that the major automotive paint manufacturers will not guarantee their products when applied on a soda blasted surface. Initially they stressed the importance of removing all traces of the soda, but eventually adopted a "Use it at your own risk" policy.

I guess this is specific need then. I am restoring motorcycle and will need to blast engine casings, carburetors, fork tubes and perhaps some other parts.

For sure, for majority of my other work with rusty metal brackets/etc won't need soda.
 
OP
K

katit

Well-known member
Joined
May 5, 2006
Messages
862
Location
St. Louis, MO
https://images.app.goo.gl/M4FSdMEogGUnrUwZA

Just a different and much improved way of picking up media vs a siphon tube setup like you have. It will make your cabinet more efficient and you can use way less media without sputtering etc. I can run mine on like one or two Dixie cups full of media which makes changing between media's very fast.

Understood! And looks like I will solve 2 problems at the same time.
Door on my cabinet needs new spring/gasket ($20 from SKAT) and there is rust on a bottom (bad one).

Going to weld a cap on a bottom fixing rust and at the same time create platform for metering tube and get rid of original dump door. Looks like those valves serve as a dump as well. Sounds like win-win in my cituation.

Another question. While watching video I noticed that hose going to cabinet wasn't through grommet, rather there was union installed (airtight) and hose clamped on both sides. I kind of like this idea, but for media pickup tube, wouldn't it "eat" this union?

Now looks like I am going to have 3 holes. One for media, and 2 for gun/blow off gun.

Or.. How hard/bad to close metering valve so I can use a gun as a blow-off gun?
 

metlmunchr

Well-known member
Joined
Sep 10, 2011
Messages
1,278
I'll look up and post a couple other gun options later today with lower pricing and nozzles that will outlast even tungsten carbide by several times over. Got to get a bit of real work done at the present.
 
OP
K

katit

Well-known member
Joined
May 5, 2006
Messages
862
Location
St. Louis, MO
I'll look up and post a couple other gun options later today with lower pricing and nozzles that will outlast even tungsten carbide by several times over. Got to get a bit of real work done at the present.

Thank you! Will wait for info before I post order with TP Tools. Btw, they will sell me decal kit and original paint :)
 
OP
K

katit

Well-known member
Joined
May 5, 2006
Messages
862
Location
St. Louis, MO
Idea...

Since I need soda blasting, I was going to order TP soda kit. But what it is - basically plastic hopper which mount on a side. 3 cons:
1. On a side - takes space.
2. Expensive
3. Means it's got it's own tube for pickup, requires switching.

Main idea is to not reuse media, right?

So, what if I do this: Make simple metal cover which will be "shelf" on a picture. I can install it easily by lifting screen. Or figure out something to leave it on permanently for all medias.

This way I can open it, fill with soda, place it on top. Then, spent media will fall on this shelf. I can use valve to empty remaining good media. And I can lift this shelf emptying spent media and then I can remove spent media via valve as usual. So, basically this shelf will be a storage for spent media and prevent mixing/reuse.

Will something like this work? Will use same metering valve, etv.
 

Attachments

  • IMG_3479.jpg
    IMG_3479.jpg
    128.3 KB · Views: 20

nutjob

Well-known member
Joined
May 8, 2008
Messages
805
Location
NE, PA
Before spending money and/or extra work on soda, why not wait till the cabinet is up and running and try some different media to see how they clean. Glass beads come in some very fine sizes and with lower pressure may provide the finish needed. Also, you can try walnut shells or plastic.

Kevin
 
OP
K

katit

Well-known member
Joined
May 5, 2006
Messages
862
Location
St. Louis, MO
Before spending money and/or extra work on soda, why not wait till the cabinet is up and running and try some different media to see how they clean. Glass beads come in some very fine sizes and with lower pressure may provide the finish needed. Also, you can try walnut shells or plastic.

Kevin

Kevin,

Seems like soda is a way to go for delicate motorcycle parts from what I researched. Right now it's no big deal to fit this shelf I pictured, later it will be PITA after I finish refurbishing process.
 

ZRX61

Well-known member
Joined
Aug 15, 2006
Messages
28,716
Location
Solar Blight Valley, SoCal
I guess this is specific need then. I am restoring motorcycle and will need to blast engine casings, carburetors, fork tubes and perhaps some other parts.

For sure, for majority of my other work with rusty metal brackets/etc won't need soda.
I have two kinds of plastic media. One is hard as hell & the other is nylon. The nylon is half the size of the hard stuff & does a great job removing paint & clag. The *go-to* for m/c engine cases is vapor blasting.. but only after the parts have already been cleaned.
I use the nylon & then go to glassbead in my 960. Nylon for the clean, glassbead for the aesthetic finish.


You could rig up one of those $10 homemade soda blasters outside in the yard to give a slightly different finish on the m/c parts. (ideal for carbs). I made one of these years ago & it works really well... but makes one hell of a mess until it rains or the sprinklers turn on.

The great thing about soda blasting outside is the authorities kinda like it as the stuff neutralizes a bunch of bad **** that ends up in the drains.


Here's the $10 soda blaster instructions:
http://www.how-to-build-hotrods.com/soda-blaster.html


What bike are you restoring?
 
Last edited:
OP
K

katit

Well-known member
Joined
May 5, 2006
Messages
862
Location
St. Louis, MO
I have two kinds of plastic media. One is hard as hell & the other is nylon. The nylon is half the size of the hard stuff & does a great job removing paint & clag. The *go-to* for m/c engine cases is vapor blasting.. but only after the parts have already been cleaned.
I use the nylon & then go to glassbead in my 960. Nylon for the clean, glassbead for the aesthetic finish.
Btw, I got 960 cabinet. TP representative confirmed :)
So, nylon and then glassbead won't damage aluminum? Outer fork tubes, for example?

You could rig up one of those $10 homemade soda blasters outside in the yard to give a slightly different finish on the m/c parts. (ideal for carbs)
Can you point me to one of those? Mostly need it for carbs to clean and make them look outside.
 

ZRX61

Well-known member
Joined
Aug 15, 2006
Messages
28,716
Location
Solar Blight Valley, SoCal
Btw, I got 960 cabinet. TP representative confirmed :)
So, nylon and then glassbead won't damage aluminum? Outer fork tubes, for example?


Can you point me to one of those? Mostly need it for carbs to clean and make them look outside.
I just use paint stripper on fork tubes & then polish them with a buffer on a bench grinder. The white polishing stuff intended for stainless steel make short work of polishing aluminum.


Updated previous post with soda blaster link
 
OP
K

katit

Well-known member
Joined
May 5, 2006
Messages
862
Location
St. Louis, MO
I just use paint stripper on fork tubes & then polish them with a buffer on a bench grinder. The white polishing stuff intended for stainless steel make short work of polishing aluminum.

I've seen someone blasting forks aluminum and then clear-coating. I like that look better than polished aluminum. Which media would you use for that?

And for carbs, anything other than soda will work nicely?


Also... reading on soda more - if I do it - it have to be in cabinet. Neighbors won't tolerate white clouds for sure.
 

ZRX61

Well-known member
Joined
Aug 15, 2006
Messages
28,716
Location
Solar Blight Valley, SoCal
I've seen someone blasting forks aluminum and then clear-coating. I like that look better than polished aluminum. Which media would you use for that?

And for carbs, anything other than soda will work nicely?


Also... reading on soda more - if I do it - it have to be in cabinet. Neighbors won't tolerate white clouds for sure.


Not sure, all my forks are either polished or painted black. I've seen people rub the snot out of them with grey scotchbrite to give a brushed aluminum finish.


You could use find glass bead on the carbs & just not get too carried away.


There's only white clouds of soda on windy days, on calm days it will end up on the ground within a few feet & just hoses away. Most of it will end up on you.


The absolute best finish is vapor blasting, but that's an entire other cabinet set up with glass beads and water.

 
OP
K

katit

Well-known member
Joined
May 5, 2006
Messages
862
Location
St. Louis, MO
Almost done with structural stuff. Ready for sanding and paint

There was a lot of rust on bottom where they left media inside. Since I am converting to metering setup I cut out original door and welded sheet metal. Just need to make a hole for metering valve.

I will have pedal, metering valve and blow gun setup. Plus pressure regulator wit moisture filter. Any suggestions on where to mount all this and organize hoses neatly?
 

Attachments

  • D65F072C-6163-4B12-AD8B-9584BFD18DBD.jpg
    D65F072C-6163-4B12-AD8B-9584BFD18DBD.jpg
    153.6 KB · Views: 31
  • 79CF774A-C7B7-4B58-A91E-06FCE9C4232E.jpg
    79CF774A-C7B7-4B58-A91E-06FCE9C4232E.jpg
    48 KB · Views: 29
  • 9FADA60B-72D5-429A-8E54-8CDA6F206ADE.jpg
    9FADA60B-72D5-429A-8E54-8CDA6F206ADE.jpg
    64.8 KB · Views: 32

larry4406

Well-known member
Joined
Jan 27, 2006
Messages
19,154
Location
Northern Virginia
https://images.app.goo.gl/M4FSdMEogGUnrUwZA

Just a different and much improved way of picking up media vs a siphon tube setup like you have. It will make your cabinet more efficient and you can use way less media without sputtering etc. I can run mine on like one or two Dixie cups full of media which makes changing between media's very fast.

Interesting gizmo...
I need to look into this. Thanks for the tip.
 

dodge610

Well-known member
Joined
Aug 22, 2010
Messages
5,467
Location
North Canton Ohio
Almost done with structural stuff. Ready for sanding and paint

There was a lot of rust on bottom where they left media inside. Since I am converting to metering setup I cut out original door and welded sheet metal. Just need to make a hole for metering valve.

I will have pedal, metering valve and blow gun setup. Plus pressure regulator wit moisture filter. Any suggestions on where to mount all this and organize hoses neatly?

I mounted mine to side of cabinet on some angle iron leaving enogh room to drain the moisture collector. I have a moisture collector on the side of the cabinet and 2 more between the compressor and the blast cabinet. When your blasting moisture is not your friend. Ask me how i know lol
 
To avoid these ads, REGISTER NOW!
OP
K

katit

Well-known member
Joined
May 5, 2006
Messages
862
Location
St. Louis, MO
Getting close. Working with weather, so paint should happen tomorrow. Now cabinet is at comfortable height, all primed and painted from inside. Just need to put a nice coat of SKAT paint on top before reassembly.

Do you think it makes sense to put some kind of baffle on a vacuum port just like in breather port? I guess it will make "vacuuming" worse, but at the same time it will cut down on particles going to vacuum.

What fitting would you use to put air hose inside? I think instead of grommets I want to put some kind of fittings so it's all insulated and not leaking media/dust

Another question, what is the best way to put media supply hose inside of the cabinet and insulate? I guess I don't want any kind of fitting in a way of media or it doesn't matter?
 

Attachments

  • IMG_3528.jpg
    IMG_3528.jpg
    49.3 KB · Views: 33
  • IMG_3521.jpg
    IMG_3521.jpg
    124.1 KB · Views: 47

Jswain

Well-known member
Joined
Apr 26, 2013
Messages
2,457
Location
Calgary, AB
I used grommets for both and with a vacuum running leaking is not a problem. Yes I would definitely baffle your vacuum fitting on the inside to minimize the larger particles being sucked away. Or use the one at the back which is baffled to hook your vacuum into and attach an air filter to the one at the side.
 
Last edited:
OP
K

katit

Well-known member
Joined
May 5, 2006
Messages
862
Location
St. Louis, MO
Project completed! On-board pressure regulator and moisture trap. Added metering valve, blow gun, and baffle on vacuum port. Put on roller wheels. Rebuilt pedal valve. New gun, new hoses.
 

Attachments

  • IMG_3538.jpg
    IMG_3538.jpg
    152 KB · Views: 54
  • IMG_3539.jpg
    IMG_3539.jpg
    112 KB · Views: 53
  • IMG_3540.jpg
    IMG_3540.jpg
    146.9 KB · Views: 55

larry4406

Well-known member
Joined
Jan 27, 2006
Messages
19,154
Location
Northern Virginia
Katit - nice refurb! New stickers and all? I am interested in your performance.

Seeing that you removed the trap door dump from the bottom of the chute, does the bottom plug on the mixer valve act as the dump to change media? What is the diameter of this port?

Any reason you mounted the regulator and filter so low?

Does the front welded cross bar interfere with "toe kick" space? The prior owner of my Skat cabinet welded a similar bar at this location and it gets in my way
 
OP
K

katit

Well-known member
Joined
May 5, 2006
Messages
862
Location
St. Louis, MO
Larry,

Yes, TP tool sells paint and stickers, those not listed but once you send them pictures of the box they can sell

Regulator should be about 1ft higher, but I made mistake and welded reinforced plate lower so... and it’s convenient for hoses, I put some keepers on inside

Drain hole is little over 1 inch. Don’t know how it’s going to work yet. Hopefully it will be fine.

Front frame doesn’t bother me, but I wish I made some kind of mount for pedal so I can easily store it and roll around
 

Jswain

Well-known member
Joined
Apr 26, 2013
Messages
2,457
Location
Calgary, AB
The drain will be fine and way better than a trap door. For small jobs you can probably run 1-2 Dixie cups of media so there won't be a lot to drain out in between anyways.

You did an awesome job on that cabinet it looks great!
 
OP
K

katit

Well-known member
Joined
May 5, 2006
Messages
862
Location
St. Louis, MO
Had a minute to run test. Started with soda on some old carbs laying around.
I don't have any other media yet.

I see soda clumbs in a pickup hose, but it goes steady through the nozzle. What is the point of adjusting metering valve? What to look for and how to adjust?

This is results I have. This bottom cover is where I was working. Dark spots wouldn't go away. Rust came off drain screw pretty good. But overflow tube (brass?) didn't brighten up.

So, I am not sure what to conclude on soda. Is that it? It wouldn't do more? Started with 60psi and then cranked to 80-90, no visible difference.

P.S. TPTool vacuum didn't strike me as a good purchase for the money. Not much in it. Need to think if I should attach it to cabinet to make it portable "together"
 

Attachments

  • IMG_3547.jpg
    IMG_3547.jpg
    119.5 KB · Views: 35
  • IMG_3546.jpg
    IMG_3546.jpg
    91.6 KB · Views: 26
  • IMG_3545.jpg
    IMG_3545.jpg
    88.2 KB · Views: 27
  • IMG_3544.jpg
    IMG_3544.jpg
    90.8 KB · Views: 25
  • IMG_3543.jpg
    IMG_3543.jpg
    94.7 KB · Views: 27
  • IMG_3542.jpg
    IMG_3542.jpg
    102.6 KB · Views: 30
Last edited:

Jswain

Well-known member
Joined
Apr 26, 2013
Messages
2,457
Location
Calgary, AB
Adjust the metering valve so that it is all the way open to atmosphere allowing as much air in as possible. Then slowly close it until the gun starts clumping or slugging and then open it back up a hair until it stops

I've never used soda so no help there.
 

dodge610

Well-known member
Joined
Aug 22, 2010
Messages
5,467
Location
North Canton Ohio
Getting close. Working with weather, so paint should happen tomorrow. Now cabinet is at comfortable height, all primed and painted from inside. Just need to put a nice coat of SKAT paint on top before reassembly.

Do you think it makes sense to put some kind of baffle on a vacuum port just like in breather port? I guess it will make "vacuuming" worse, but at the same time it will cut down on particles going to vacuum.

What fitting would you use to put air hose inside? I think instead of grommets I want to put some kind of fittings so it's all insulated and not leaking media/dust

Another question, what is the best way to put media supply hose inside of the cabinet and insulate? I guess I don't want any kind of fitting in a way of media or it doesn't matter?

Skat blast offers a collection chamber that goes between the vacuum and the cabinet works very well i have had one on mine for years. Saves a lot of re usable media.
 

ZRX61

Well-known member
Joined
Aug 15, 2006
Messages
28,716
Location
Solar Blight Valley, SoCal
This is results I have. This bottom cover is where I was working. Dark spots wouldn't go away. Rust came off drain screw pretty good. But overflow tube (brass?) didn't brighten up.

So, I am not sure what to conclude on soda. Is that it? It wouldn't do more?
It should come out looking better than that from soda.
 

Attachments

  • Carb1ab.jpg
    Carb1ab.jpg
    72.3 KB · Views: 31
  • Carb1ac.jpg
    Carb1ac.jpg
    50.9 KB · Views: 33
OP
K

katit

Well-known member
Joined
May 5, 2006
Messages
862
Location
St. Louis, MO

Experimented more yesterday and got results closer to what you show. Some dark spots just wouldn't go away but cleaning and surface smoothness is perfect.

On cabinet:

1. Doesn't matter how I regulate valve - this is what happens. Clump about 1/2 feet long get's sucked to the gun, then it blows/works, then surges and another clump comes in. If I let too much air - clumps don't happen or small 1 inch clumps come in but it constantly surges. So I am not sure what I need to adjust. What pressure to run with soda? And do you measure pressure with trigger pulled or static?

2. Where do you get glass bead media? What size to use? For engine casings, fork tubes. And maybe frame members cleaning before paint..
 
OP
K

katit

Well-known member
Joined
May 5, 2006
Messages
862
Location
St. Louis, MO
Small update after using box for first project.
This time I was using crushed glass media. Used for cleaning rusty parts from truck suspension. Maybe 1-2hr use at most.

Here is my observations:

1. I do need better light. Just one bulb on left is not that great. Always trying to turn work to the light but not always easy with bigger parts. So, need to figure out something with that.

2. Do need to clean parts before sand-blasting. Especially when paint flakes off in pieces. Much better to quickly go over with grinder/metal brush and don't get those flakes in a media.

3. Probably good idea to install ******** to help media go down.

4. Need to figure out whats up with vacuum. I got TP Tools vacuum and it's powereful!! No need for filter in intake port. With a sponge - there is huge negative pressure, sleeves get "erected" :) However, after 1-2 hr filter in a vacuum was completely plugged with dust. Not sure if this is common and I have to clean filter every hr or so? Bunch of dust collected on a bottom so overall it works great. No dust in cabinet, I keep reusing media and I have no dust in garage.

5. Metal tip completely wore out (on top) from this 1-2hr of use. I assume crushed glass is a very aggressive media but still.


Next project I will be trying glass beads.

Changing media was PITA. Lots of banging to get soda out. Thats why I think vibration device will be very helpful

Other than those things - everything works as it should, I was blasting inside garage and didn't notice any dust or anything like that. So, I am happy
 
OP
K

katit

Well-known member
Joined
May 5, 2006
Messages
862
Location
St. Louis, MO
Lot of time since last update. Those things still PITA: Change media, not enough (could be more) light situation.

But biggest problem is media not flowing to the bottom. Have to put a LOT to make it uninterrupted blasting. So, vibration device is something I am ready to add right now.

However, TPTool is out of them and none back-ordered. Any suggestions on alternatives?

 
OP
K

katit

Well-known member
Joined
May 5, 2006
Messages
862
Location
St. Louis, MO
Happy to report this vibration motor works great! Ebay special connected to 12v power supply and it runs on a switch together with vacuum
 

Attachments

  • EC010B9F-3F44-4ADF-9D0E-32245CD35BC0.jpeg
    EC010B9F-3F44-4ADF-9D0E-32245CD35BC0.jpeg
    178.5 KB · Views: 15
  • 0357E8CF-306F-42A3-8194-664E5EBE321D.jpeg
    0357E8CF-306F-42A3-8194-664E5EBE321D.jpeg
    160.8 KB · Views: 15

tester19

Well-known member
Joined
Apr 25, 2021
Messages
225
Location
chigago
Yes the ******** from TP tools does not work very well. Just not enough vibration. You can get just about any strength ******** on EBay. About $100 or so and that will keep your media flowing properly. Note I have 120V on my box but not 12 VDC so easier for me to use a 120 VAC model.

********

Vibrator.jpg

Next you will forever have a fine layer of dust all over your shop unless you vent the box outside. I tried several different ways and TPTools makes a final filter but it just can't catch all the fine stuff.

Final Filter

Final Filter.jpg

The best thing I added was a dust Deputy or some kind of cyclonic cleaner BEFORE whatever vacuum system you decide to run.

Dust Deputy


Dust Deputy.jpg

This works amazingly well and my vacuum has very little in it plus the filter in the vacuum lasts just about forever now that your not loading it with dirt. The stuff in the dust deputy looks like flour and it must catch at least 95%+ what comes out of the box.

Note you can make your own too plus there are several different version from dust deputy. It was just cheaper/easier/faster to buy the dirt deputy. I really did not believe it would work so well either!
.
.
.
 
OP
K

katit

Well-known member
Joined
May 5, 2006
Messages
862
Location
St. Louis, MO
Final Filter

Final Filter.jpg

The best thing I added was a dust Deputy or some kind of cyclonic cleaner BEFORE whatever vacuum system you decide to run.

Dust Deputy


Dust Deputy.jpg

This works amazingly well and my vacuum has very little in it plus the filter in the vacuum lasts just about forever now that your not loading it with dirt. The stuff in the dust deputy looks like flour and it must catch at least 95%+ what comes out of the box.

Note you can make your own too plus there are several different version from dust deputy. It was just cheaper/easier/faster to buy the dirt deputy. I really did not believe it would work so well either!
Ok, final filter goes after vacuum, right?

And this is last remaining issue for me - clogging filter in a vacuum. I have to take it outside and clean filter every hour or so. Very annoying, especially with soda. So, I install Dust Deputy and my problem going to be solved? THAT WOULD BE GREAT!

That little ******** was like $30 and it does it's job perfectly. I just used little 12V brick I had laying around, motor uses .5A and brick rated 0.75. I just plug it into 120 switched plug so it's pretty much easy deal. Not like powerful transformer needed.

EDIT: Another issues - wet media. I had soda sitting for awhile and it started clumping. Not like I have wet garage, but still. Any tricks to keep media dry?
 

csp

Well-known member
Joined
Mar 23, 2010
Messages
5,719
Location
Franktown, CO
The cyclonic cones do an amazing job of capturing most of the dust. Even the cheapie chinese versions on Ebay.

My 5 gallon bucket was 3/4 full the last time I checked the vacuum filter, and the filter wasn't needing to be cleaned out yet.
 
To avoid these ads, REGISTER NOW!
Top Bottom