To avoid these ads, REGISTER NOW!

Finally started on new building

steve w

Member
Joined
Dec 31, 2010
Messages
19
Location
WI
I have been reading the threads on this forum for a long time and have picked up so many great ideas from everyone. I will post pics as my project moves along and hopefully it can help someone else as they plan their project.

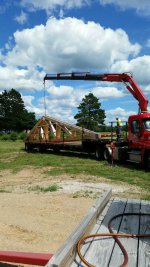
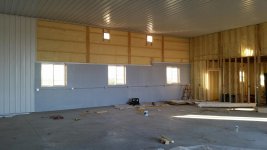
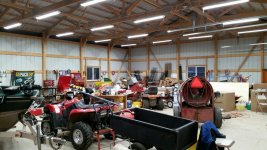
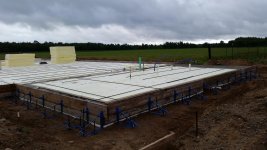
The building will be located in Northern WI on our Christmas tree farm that we started in 2010. The main part of the building is 45' x 96' which will be separated into a 42' x 45' cold storage and a 54' x 45' heated area. There will be a heated 18' x 36' area attached on one end that will have a bathroom, mechanical room, and reception area.

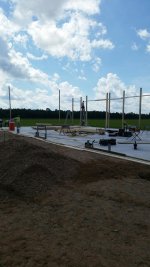
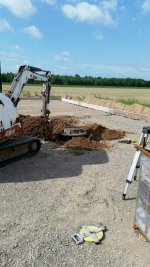
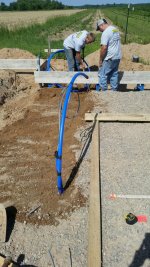
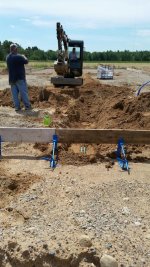
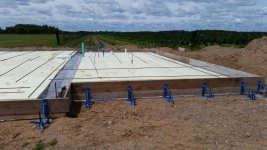
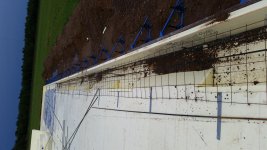
The excavators started prepping the site yesterday so the concrete guys can start putting up their forms. There will be 2" of XPS, vapor barrier, and 5" of concrete with PEX in the slab.
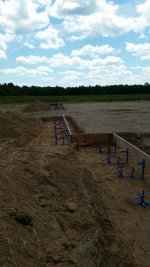
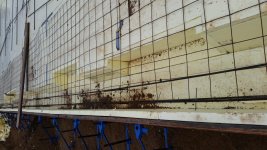
 

Attachments

  • exc7.jpg
    exc7.jpg
    144.7 KB · Views: 107
  • exc8.jpg
    exc8.jpg
    147.3 KB · Views: 113
  • exc9.jpg
    exc9.jpg
    145.8 KB · Views: 120
To avoid these ads, REGISTER NOW!

FANTM58

Well-known member
Joined
Feb 21, 2015
Messages
575
Location
Brighton, Co
What are you planning for the cold storage portion ?
The reason I ask is that is what I do, Cold storage
We use Bally panels, that cam lock together, polyurethane poured between metal
Skins.
 
OP
S

steve w

Member
Joined
Dec 31, 2010
Messages
19
Location
WI
When I stated cold storage I just meant unheated. It will not be refrigerated.

The building will be used to store tractors and related equipment for the tree farm and a few other toys. I'm looking forward to having a warm area to work on things in the winter time.
 
OP
S

steve w

Member
Joined
Dec 31, 2010
Messages
19
Location
WI
The concrete guys were out on Thursday and Friday. We got the building sited in the right location, and they were able to get most of the forms for the concrete installed. They left an opening on the front so the plumber and electrician can get in to do their work for the drain lines and install conduit under the slab for some of the electrical. I'm hoping they will have the rough-in work completed by Thursday.
 

Attachments

  • concrete forms 3.jpg
    concrete forms 3.jpg
    148.6 KB · Views: 140
  • concrete forms 2.jpg
    concrete forms 2.jpg
    148.2 KB · Views: 170
  • concrete forms 1.jpg
    concrete forms 1.jpg
    148.1 KB · Views: 143
  • Digging footings.jpg
    Digging footings.jpg
    148.3 KB · Views: 123
  • building layout 1.jpg
    building layout 1.jpg
    144.1 KB · Views: 124

matt_i

Well-known member
Joined
Mar 14, 2008
Messages
10,722
Location
SE Michigan
Those blue supports are pretty cool, are they like a mechanical jack to promote leveling?

I'm guessing more forms get added underneath and they get removed...
 

sbd4de3

Well-known member
Joined
Sep 20, 2014
Messages
131
Wow! That's going to be an incredible place!! Good luck, subbed here for sure!
 
OP
S

steve w

Member
Joined
Dec 31, 2010
Messages
19
Location
WI
The concrete guys said the blue supports hold the forms better than just the spikes and the board. They ran out of spikes so they stopped until they come back with more. They can then put up additional supports. I'm not sure if the supports adjust or not, but they get removed after the pour. The insulation will form a box for the grade beam all around the perimeter of the building and there will be a separate grade beam between the 45' x 96' section and the 18' x 36' section of the building.

I currently live about 4 hours south of the Tree Farm and will be heading back up in a couple of days to meet with the plumber and electrician. The weather is supposed to be good so hopefully things can keep progressing.
 
OP
S

steve w

Member
Joined
Dec 31, 2010
Messages
19
Location
WI
Well some more got accomplished on the building. The electrician got his lines buried in the ground for ease of running the wires. They also ran a line underground to the rear of the building for the future back up generator. We get quite a few power outages in the area so the back up gen will really help out.

The plumber arrived next and was able to get the catch basin in for the floor drain, run the line out to of the building for the septic, and do the rough plumbing for the toilet, shower, the sinks, and the drain in the mechanical room.

I almost forgot to have the well guys out to the site to install the line that will go from the well to the pressure tank in the mechanical room. I was glad they were able to show up the same day as the plumber so everyone knew where their lines were being run.

I had to leave the building site last night and return to Milwaukee for a few days. The plumber was going to compact the area that was dug up to run the drain lines today.

The concrete guys were going to return to final grade the area, hand dig the extra area for the enlarged footings which will be beneath the support columns, and then start to install the 2" insulation.

So far things are going as planned and I will add more pics when I get back up to the farm.
 

Attachments

  • electrical 1.jpg
    electrical 1.jpg
    150.6 KB · Views: 116
  • electrical 2.jpg
    electrical 2.jpg
    150.6 KB · Views: 113
  • electrical 3.jpg
    electrical 3.jpg
    149.3 KB · Views: 107
  • catch basin.jpg
    catch basin.jpg
    145.5 KB · Views: 101
  • catch basin 2.jpg
    catch basin 2.jpg
    145.8 KB · Views: 98
  • catch basin 3.jpg
    catch basin 3.jpg
    148.9 KB · Views: 96
OP
S

steve w

Member
Joined
Dec 31, 2010
Messages
19
Location
WI
Some more pics of the rough plumbing
 

Attachments

  • pressure tank line.jpg
    pressure tank line.jpg
    149.4 KB · Views: 84
  • rough plumbing.jpg
    rough plumbing.jpg
    151.4 KB · Views: 73
  • Drain pipe to septic.jpg
    Drain pipe to septic.jpg
    152.1 KB · Views: 70

hdhogman

Well-known member
Joined
Oct 8, 2009
Messages
227
Location
West Michigan
Do those footings include a frost wall to a certain depth ? I am from West Michigan and was told that I would be required a frost wall 42" deep to construct a stick built garage, sound un reasonable or not ?
 

hnsy

Well-known member
Joined
May 3, 2015
Messages
111
Excited for more updates

Sent from my Nexus 5 using Tapatalk
 
OP
S

steve w

Member
Joined
Dec 31, 2010
Messages
19
Location
WI
hdhogman: The plan calls for thickened grade beams around the slab ranging from 16" wide x 20" deep with 4 rows of #4 rebar around the 18' x 36' area to 14" wide x 16" deep with 3 rows of #4 rebar around the 45' x 96' area. The plan also states that when footings don't go below the frost line that perimeter insulation will be placed 4' out horizontally from the building and non-frost susceptible fill will be used. The footings under the where the columns will go range from 20" wide by by 3'6" long to 24" wide by 6' long. I'm sure it will be a pain for the concrete guys to hand dig the enlarged footers for the columns. They are also doing the insulation which will have to be placed vertically and horizontally around the grade beams and footers.

We will be placing the 4' perimeter insulation around the building so hopefully this will help with the frost issue and keep some more heat in the building in winter. Hopefully you can figure out a way to get your foundation approved without costing you too much.

Blackhawks63: We are planting trees that are 4 years old when we get them and then they take another 7-10 years to grow to an 8' tall tree. The Fraser fir trees are growing slower than the balsam firs that we have planted.
 
OP
S

steve w

Member
Joined
Dec 31, 2010
Messages
19
Location
WI
We got some more accomplished this past week, but the weather sure made things difficult. The concrete guys returned to clean out the area by the footings, and did the final grading. The winds started to pick up just as the vapor barrier was going down so my my son and I helped the guys out with placing the vapor barrier. Then the rain started and it rained on and off for the rest of the day. We also helped them with the 2" rigid insulation. Rebar was placed on top of the insulation to prevent the wind from blowing it away. They will be returning on Monday to finish up insulating around the grade beams and placing the thermal break between the heated and unheated areas. The Pex also arrived on site late Friday so hopefully by mid week the Pex will be installed.
 

Attachments

  • vapor barrier.jpg
    vapor barrier.jpg
    148.7 KB · Views: 67
  • vapor barrier 1.jpg
    vapor barrier 1.jpg
    146.3 KB · Views: 59
  • Foam insulation 3.jpg
    Foam insulation 3.jpg
    148.8 KB · Views: 66
  • foam insulation 2.jpg
    foam insulation 2.jpg
    149.2 KB · Views: 77
  • Foam Insulation 1.jpg
    Foam Insulation 1.jpg
    151.3 KB · Views: 70
To avoid these ads, REGISTER NOW!
OP
S

steve w

Member
Joined
Dec 31, 2010
Messages
19
Location
WI
Unfortunately the progress has been slow this past week. The HVAC guys couldn't install the pex for the in floor heat due to the concrete guys not having the insulation and rebar finished.

The concrete guys had to form the insulation around the enlarged footing areas which took them quite a while in the 90 degree heat we had this past week. They also made the 4' x 4' cutout sections for the extra deep footings for a two post lift in the future.

Hopefully the Pex goes in on Monday and the concrete is scheduled to be poured on Thursday.

In the meantime we are staying busy pruning and shearing the Christmas trees.
 

Attachments

  • two post lift area.jpg
    two post lift area.jpg
    142.8 KB · Views: 40
  • enlarged footings 2.jpg
    enlarged footings 2.jpg
    148.9 KB · Views: 43
  • footing area1.jpg
    footing area1.jpg
    153 KB · Views: 49

matt_i

Well-known member
Joined
Mar 14, 2008
Messages
10,722
Location
SE Michigan
I'm really interested in the notched and angled/sloped areas that seem to alternate around the perimeter, that seems like a lot of detail and I can't guess its reason :) I would think it to just be a squared-off trench that consumes concrete but thickens the edge. In other words, using more concrete to fill it but at the benefit of less labor in the insulation.
 
Last edited:
OP
S

steve w

Member
Joined
Dec 31, 2010
Messages
19
Location
WI
Matt_i: Normally the slabs in the area are poured with a reinforced grade beam around the perimeter of the slab to support the load. Unfortunately we had to do more than just the grade beam for this building. The notched out areas are for the enlarged footings that the state required. These footings are to help support the load on the posts that will be anchored to the top of the slab above the footings. Some of the footings had to be 3'6" long and others had to be 6' long depending on the calculated load from above. The enlarged footings are 24" wide.

The engineer thought it was way overkill, but he had to do it that way in order to get the state to approve the plan. It was a ton of extra work for the concrete guys to form out with the XPS insulation as well.

The state inspector showed up to the site last week to check things out and was pleased with how the insulation and rebar had been installed. Hopefully things keep moving along and we can get it poured this coming week.
 
OP
S

steve w

Member
Joined
Dec 31, 2010
Messages
19
Location
WI
I was up at the tree farm for the past couple weeks and we got some more done for the building. The HVAC guys arrived and put the PEX tubing down. My job was tying the tubes to the rebar along the edges of the slab. They stapled the PEX to the insulation in all the other areas, and put in the manifolds. They also pressurized the system to make sure everything was ok for the pour. After a day the pressure had dropped to 0 so I immediately called the HVAC guys. They returned and found a cracked fitting which got replaced and all was good.

The concrete guys returned to finish installing the rebar and put in the thermal break between the heated and unheated storage area. The concrete pump truck arrived first and then the concrete trucks started arriving at 6am and within about 3 hours all of the concrete was placed. They used a laser screed to assist in the pour and it seemed to work pretty nice for them. The operator told me that the screed adjusts 4 times per second to make a really level floor. This is the first time I have ever seen a unit like this operate. After the floor was finished they did the saw cuts the same day. They also put down the 2" XPS insulation on the perimeter and did a rough grade. I asked them to leave the areas open by where the electric needs to come in, the water pipe from the well, and the drain pipe which will lead to the septic.

I was able to rig up a watering system with a generator, a submersible pump and some tanks on my hay wagon so I could keep the concrete wet for a few days to assist in the curing. I can't wait to eventually get electricity at the farm so I can give the generator a rest.

The concrete guys plan on applying the densifier in the next week to 10 days and then hopefully the building crew can start on the building. In the meantime I have plenty of christmas trees to shear.
 

Attachments

  • watering the slab.jpg
    watering the slab.jpg
    150 KB · Views: 76
  • concrete saw cuts and xps.jpg
    concrete saw cuts and xps.jpg
    149.9 KB · Views: 78
  • concrete finishing.jpg
    concrete finishing.jpg
    154.2 KB · Views: 86
  • laser screed 2.jpg
    laser screed 2.jpg
    149.7 KB · Views: 82
  • laser screed.jpg
    laser screed.jpg
    150.3 KB · Views: 83
  • PEX manifold.jpg
    PEX manifold.jpg
    155 KB · Views: 89
  • PEX.jpg
    PEX.jpg
    149.7 KB · Views: 85
OP
S

steve w

Member
Joined
Dec 31, 2010
Messages
19
Location
WI
The concrete has now cured enough that the densifier and hardener could be applied. They sprayed it on and then burnished it. The concrete had to be kept wet for 30 minutes after the application. The 18 x 36 area was not treated. I plan on acid staining that area after the interior walls are up.

The roof trusses and LVL beams were dropped off at the site, and on Thursday the crew arrived with a truckload of lumber. The sill plates and columns started going up, and then I had to leave the farm for a few days. It's been a long time coming so it sure is nice to see the actual construction on the building. Hopefully more will be accomplished next week when I head back up to the farm.
 

Attachments

  • Densifier application.jpg
    Densifier application.jpg
    133.3 KB · Views: 46
  • roof trusses arrive.jpg
    roof trusses arrive.jpg
    151.9 KB · Views: 45
  • building columns going up.jpg
    building columns going up.jpg
    146.3 KB · Views: 48
OP
S

steve w

Member
Joined
Dec 31, 2010
Messages
19
Location
WI
Unfortunately it has been raining just about every other day at the farm. The crew was able to get the walls up, roof trusses on the main area of the building, and the 2 x6 walls done for the office area. Just as I was leaving the farm on Thursday they got the Tyvek installed and were just starting to put up the roof trusses in the office area. They hope to have the walls and roof on within the next week as long as the weather cooperates. I can't make it back up to the farm until after Labor Day so hopefully things keep moving along.
 

Attachments

  • tyvek installed.jpg
    tyvek installed.jpg
    146.6 KB · Views: 41
  • more roof trusses.jpg
    more roof trusses.jpg
    155.1 KB · Views: 44
  • first roof truss.jpg
    first roof truss.jpg
    151.9 KB · Views: 45
OP
S

steve w

Member
Joined
Dec 31, 2010
Messages
19
Location
WI
When I returned to the farm I was happy to see that the building is getting closer to being weather tight. I need to frame in the walls before the spray insulation can be applied and the ceiling can be installed. The overhead doors can then be installed after the metal ceiling is up in the heated area.

I dug the trench for the 100a service that will supply the old building from the new building. I initially started digging the trench by hand but then realized that it would be much easier to do with the bucket on the tractor. The electricians then installed the 200a panel in the new building and the 100a panel in the old building. The conduit was then laid underground and covered up before the rain came again. I just ordered the transfer switch for the future back up generator and hopefully that can be installed next week. The power company can then run the 200a service to the new building.

The ridge vents had to be re-ordered so hopefully they will arrive soon so that the roof can get closed up. So far that hasn't been any issues with theft on the site, but I sure would like to get things locked up as soon as possible.

I plan on putting plywood on the walls from the floor to 8' then my choices are more plywood, white steel (to match the wash bay area and ceiling), or drywall. The wall separating the office area and the heated shop area will be drywall. I am concerned about the echoing with so much steel on the walls and ceilings. Any thoughts?
 

Attachments

  • heated areas.jpg
    heated areas.jpg
    149.5 KB · Views: 69
  • interior 42x45.jpg
    interior 42x45.jpg
    141.2 KB · Views: 60
  • interior 18x36.jpg
    interior 18x36.jpg
    143.9 KB · Views: 62
  • interior 45x54.jpg
    interior 45x54.jpg
    148.7 KB · Views: 68
  • exterior 18x36.jpg
    exterior 18x36.jpg
    150.5 KB · Views: 64
  • exterior.jpg
    exterior.jpg
    146.6 KB · Views: 67
OP
S

steve w

Member
Joined
Dec 31, 2010
Messages
19
Location
WI
We got some more done on the building the past couple of weeks. I framed in the horizontal girts on the walls in the heated shop area and above the 2 x 6 partition wall between the shop/office area. I had to get this done before the insulation got sprayed.

The electrician was also out and got the transfer switch installed as well as the meter base. I'm waiting for the power company to give me a date when they will be out to get electric to the site. It is about a 250' run along the road and then another 200' to my meter base.

The building crew got the vapor barrier installed on the ceiling, and installed the metal panels on the partition wall in the wash bay area. They also got the ridge vents and the cupolas installed.

The insulation guy sprayed the closed cell foam on at 2 1/2" - 3" thick on the walls and got it all done in about 6 -7 hours. I was very happy with his work.

After the insulation was sprayed the building crew installed the ceiling and finished the end wall of the wash bay area.

The garage doors are supposed to be installed this Thursday, and I will start to frame in the interior walls. I'm waiting for the shower enclosure to arrive before framing in that section of the bathroom.

I'm going to look at some rusty corrugated tin tomorrow to use in the reception area on the ceiling. Hopefully it looks as good in person as it does in the pictures.

I'm trying to work on the building in between pruning and shearing the trees. We only have about another month and snow will be flying!
 

Attachments

  • spray insulation.jpg
    spray insulation.jpg
    145.6 KB · Views: 49
  • spray insulation 2.jpg
    spray insulation 2.jpg
    142.8 KB · Views: 52
  • cupolas and ridge vents.jpg
    cupolas and ridge vents.jpg
    147.9 KB · Views: 45
  • ceiling installation.jpg
    ceiling installation.jpg
    141.2 KB · Views: 46
OP
S

steve w

Member
Joined
Dec 31, 2010
Messages
19
Location
WI
The garage door guys arrived and put up two of the overhead doors. I was not happy with how one of the openers and springs were mounted. After a conversation with the owner of the company I was told that they ordered the wrong tracks and that he was ordering all 4 sets of tracks now with low overhead clearance tracks. They are about two weeks away from being delivered so hopefully they arrive sooner and the building can finally be closed in.
I'm hoping to get the electric company out to run their lines within the next week to 10 days.
In the meantime I was able to put up almost all of the 1/2" plywood on the walls where I wanted it to go, and I framed in the wall between the office and the bathroom. I'm waiting for the shower to show up so we can check clearance before I start on the other walls.
I picked up some primer and paint at Sherwin Williams so hopefully I can get some of the plywood done this week in between shearing the trees.
 

Attachments

  • office and bathroom wall.jpg
    office and bathroom wall.jpg
    142.1 KB · Views: 35
  • unheated area plywood.jpg
    unheated area plywood.jpg
    145.7 KB · Views: 39
  • shop entrance plywood.jpg
    shop entrance plywood.jpg
    138.4 KB · Views: 32
  • East Wall plywood.jpg
    East Wall plywood.jpg
    141.7 KB · Views: 33
  • west wall plywood.jpg
    west wall plywood.jpg
    137.4 KB · Views: 37

C_F

ALLIANCE MEMBER
Joined
Jan 21, 2005
Messages
9,675
Location
Utah...SNOW BLOWS!
Good looking building you have there!:thumbup:

In today's update, the first photo shows two small square openings up near the ceiling. Just wondering what those are for?
 
OP
S

steve w

Member
Joined
Dec 31, 2010
Messages
19
Location
WI
C_F: Thanks for the response. The holes in the wall up near the ceiling are for a make up air vent and and for the vent pipe for the modine heater. When the building was classified as a commercial building I had to add the vent and the heater for air turnover. I had hoped that I wouldn't need it due to heating the area already with the radiant heat in the slab, but the state required it. They also required a PTAC unit, (Heat/Vent/A/C) like in hotel rooms, in the reception area because the air had to be turned over so many times per hour. The unit will go in the opening down by the floor on the exterior wall of the reception area.
 

Bib Overalls

Well-known member
Joined
Dec 4, 2006
Messages
3,318
Location
Jonesboro, Arkansas
Excellent spray foam work. Goober did mine. Got a lot more than I paid for which was good but the bad was all the high points that I will need to cut down.

Will this building have living quarters?
 
OP
S

steve w

Member
Joined
Dec 31, 2010
Messages
19
Location
WI
Bib Overalls: I was really pleased with the guy doing the spray foaming. When he was all done spraying he took an ice scraper and scraped the edges of the 2 x 4's where I would be installing the interior steel and plywood. I had planned on having to do that myself, but it was nice not to have to do that part.

There won't be any living quarters in the building so the wall separating the 18 x 36 area from the shop area will not be considered a fire wall. The reception area will have some kitchen cabinets with a sink and frig but no stove. The area will be used as a break room and a warming area for customers to pay for their christmas tree after they cut it down in the field.
 
OP
S

steve w

Member
Joined
Dec 31, 2010
Messages
19
Location
WI
A few more things got accomplished since last time.
They installed a transformer at the road and buried the electric line coming into the new building. The electrician then wired some outlets in the new building and ran the underground wire to the old building to get power in there. I can now use the lights that I had installed a couple of months ago in the old building. They are the Lights of America LED shop lights from Sam's Club and I really like the light they throw (and no humming).

I was able to get the plywood on two of the walls painted and installed the metal base trim above the plywood. Soon I will be hanging the white metal panels on the wall above the plywood so the modine heater and vent can then be installed.

The septic system got installed and I had them bring in two loads of gravel for the drive. Our drive was looking like a pond everytime it rained so hopefully this will help.

The plumber dropped off the shower stall so now I can start building the interior walls.

The garage door guys are coming on Wed. and Thur. to hopefully finish the doors and put openers on the old and new building.
 

Attachments

  • painted walls 1.jpg
    painted walls 1.jpg
    139.9 KB · Views: 27
  • painted walls 2.jpg
    painted walls 2.jpg
    136.5 KB · Views: 25
  • painted walls 3.jpg
    painted walls 3.jpg
    139 KB · Views: 30
  • 36 x 48 shop lighting.jpg
    36 x 48 shop lighting.jpg
    154.2 KB · Views: 34

Bib Overalls

Well-known member
Joined
Dec 4, 2006
Messages
3,318
Location
Jonesboro, Arkansas
When you said shower stall earlier I thought you might be building in "watchman's quarters." A couch with a fold out will give you some flexibility when the days run long.
 
To avoid these ads, REGISTER NOW!
Top Bottom