To avoid these ads, REGISTER NOW!

Finishing OSB Sheeting

Psycareyo

Active member
Joined
Jul 20, 2015
Messages
44
Location
Plattsburgh, NY
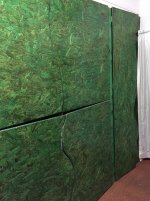
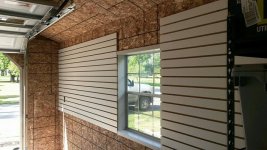
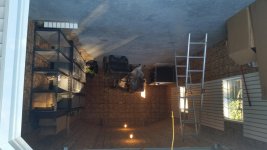
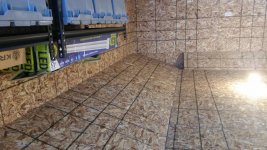
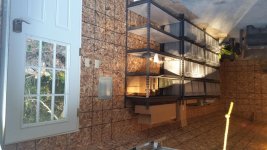
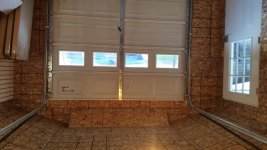
I have no idea why all my images conrinue to upload the opposite of their display prior to uploading. Yup, they are up-side-down! Literally, my entire 14'x28' garage (business building) is (meaning it's already done) finished in OSB. The walls and ceiling are completely OSB. I have not caulked the seems. My garage has a electric ceiling mounted heater and a in-wall AC/heater unit. I prefer not to let that run, unless I am in the garage working.

I will have some slatwall up where I do YouTube related video and pictures for products offered on my website. I'd like to paint it. I'm not expecting it to look like finished sheetrock. However, I would like it to appear clean, uniform and bright.

I'm sure this question gets asked all the damn time! I've done a little research and it would appear that two coats Kilz oil based stain block primer, followed by a couple coats of latex paint, is the way to go.


Would anyone like to offer their experience(s)?
 

Attachments

  • 20150927_174051.jpg
    20150927_174051.jpg
    139.6 KB · Views: 43
  • 20150927_174131.jpg
    20150927_174131.jpg
    156.4 KB · Views: 41
  • 20150927_174119.jpg
    20150927_174119.jpg
    154.8 KB · Views: 34
  • 20150927_174216.jpg
    20150927_174216.jpg
    150.3 KB · Views: 30
  • 20150927_174104.jpg
    20150927_174104.jpg
    150.9 KB · Views: 32
  • 20150927_174059.jpg
    20150927_174059.jpg
    139.6 KB · Views: 30
  • 20150927_174225.jpg
    20150927_174225.jpg
    143.2 KB · Views: 34
Last edited:
To avoid these ads, REGISTER NOW!

Zeke

Well-known member
Joined
Aug 13, 2009
Messages
17,176
Location
Long Beach CA, the sewer by the sea.
I'll admit that I dislike OSB quite a bit. I do understand the economics. If I had OSB, I would use Zinzer 123, or a less expensive substitute that should be available at a pro paint store, as a base coat. I would then either skim coat or spray texture (or both) followed by more 123 to sandwich the compound. After that, regular paint of choice.

Also, any area that I could cover with a slat board or other wall decoration to obliterate the OSB would be in my favor. Even corrugated sheet metal although I'm not in that camp either. I don't care too much for peg board but if it's not white it can be better. Someone makes a wood grain peg board that I could live with.

b5906fedcfa7477c4f6500fc3c85d0d9.jpg
 

speed bump

Well-known member
Joined
May 28, 2008
Messages
6,317
Location
Butte Montana
Personally I would recommend trying something thick for a primer. Zinzer triple thick peel stop or Sherwin Williams has something equivalent. It's really thick (about yogurt consistency) but 2-3 coats later it has nicely filled the gaps in my not so nice t-111 siding.
 

James-W

Well-known member
Joined
Feb 3, 2013
Messages
12,432
Location
Southeastern Wisconsin
If you want to finish off OSB and make it look really good, use a belt sander and sand down any rough areas, especially at the seems. Then use drywall compound and run a thin coat on the OSB. Then, when it dries, apply another coat that is a little thicker. Once that is done and dry, you can do a 'knockdown" or whatever type of finish you want, or you can just apply a primer and then paint. If you do it right, it will look just like drywall when you are finished.
 

06switchback

Well-known member
Joined
Sep 17, 2015
Messages
139
Are you looking to smooth the osb or just a coat of paint to brighten it up?

I would do like you said and put a couple coats of a stain blocking primer and finish it with a couple coats of the color of choice in a flat finish the flatter the finish coat the more imperfections it will hide I would stay away from semi-gloss it will show everything

Sent from my SAMSUNG-SGH-I537 using Tapatalk
 

k-os

Well-known member
Joined
Dec 29, 2012
Messages
995
Location
WI
When I sheeted the single bay side of my garage I went over all the sheets with a sander prior to hanging. After hanging I caulked all the seams with an acrylic based caulk and sanded the seams after it cured. I then put on 1 coat of Kilz and two coats of a Latex Exterior. It definitely doesn't look like drywall when up close, but that's not the lok I was intending for either.
 

BruceMc

Well-known member
Joined
Jan 17, 2015
Messages
2,167
Location
Fairbanks, AK
When I sheeted the single bay side of my garage I went over all the sheets with a sander prior to hanging. After hanging I caulked all the seams with an acrylic based caulk and sanded the seams after it cured. I then put on 1 coat of Kilz and two coats of a Latex Exterior. It definitely doesn't look like drywall when up close, but that's not the lok I was intending for either.

I did pretty much the same thing last month for my entire garage - 2 coats of Kilz, caulked the seams and nails with a paintable 30 yr acrylic, then a coat of good off-white semigloss latex. The OSB really ***** up primer, so don't go short on it. I didn't bother sanding at any point. The caulk really helps close up the shadow lines you'll get at the seams, particularly where the walls and ceiling meet. Personally, I like the textured look of OSB as well (or better) than any sheetrock texture.
 
OP
P

Psycareyo

Active member
Joined
Jul 20, 2015
Messages
44
Location
Plattsburgh, NY
I'm just looking to create a uniform appearance and brighten the space up. I'm not after a drywall like finish (or I would have used drywall).

I'm definitely not sanding it lol.
 

cdestuck

Well-known member
Joined
Nov 13, 2013
Messages
1,462
Location
Altoona, Pa
I did my garage and shop with OSB and love it. Tuff stuff and won't get banged up. Use the best primer you can get and after its dried you'll prob have to go back over it and pick off any flakes that might have swelled or loosened

Then look for any dark flakes or areas that bled through and give them a second coat of primer. I used a good semi gloss topcoat and 21 years later it still looks great. I did take extreme caution when putting up osb to fit it tight together. Unless you look very close you can't see a seam.
 

Ainsley

Well-known member
Joined
Jun 12, 2014
Messages
557
Location
Ontario, Canada
I went with osb on the interior of my shop and definitely don't regret it. Although my shop is less aesthetically pleasing than many of the shops I see on here.
I did pretty much the same as everyone is recommending:
- caulked all the seams with a siliconized acrylic paintable caulking
- Sherwin Williams oil based exterior wood primer - 2 coats on the walls
- quick sand to knock off the nubs
- 2 coats of sherwin Williams shercryl industrial acrylic in gloss white.
I went with gloss so that it was easier to clean up if the need arises.
 

Falcon67

Well-known member
Joined
Jun 11, 2009
Messages
18,371
Location
Merkel, TX
I'm all OSB, walls and ceiling. I caulked the seams to help with AC and heat retention. Screw the paint, left it as-is.
 
To avoid these ads, REGISTER NOW!

tncatadjuster

Well-known member
Joined
Jan 3, 2010
Messages
2,001
Location
Memphis, TN
Polyurethane with a dab of color added. Interior of doors I did white DTM (no primer needed), and white with the green rolled on top.
 

Attachments

  • Green-doors.jpg
    Green-doors.jpg
    95.4 KB · Views: 143
  • white-door.jpg
    white-door.jpg
    71.8 KB · Views: 125
  • White-with-green.jpg
    White-with-green.jpg
    113.7 KB · Views: 117

NUTTSGT

Super Moderator
Staff member
Joined
Sep 14, 2009
Messages
51,030
Location
Northern Central Ohio
I've had good luck using Kilz oil based (2 coats) and topping it with some latex paint. Since my garage is heated, I used a regular interior paint, Kilz Pro-X 170. The house garage, since it's not heated and more susceptible to the humidity, I spent a few dollars more and bought an exterior grade latex paint.

I also caulked the joints and obvious nail holes with some painters caulk.
 

Dave in Mass

Well-known member
Joined
Jan 29, 2013
Messages
635
Location
Massachusetts
I used a 3' x 8' piece of OSB as a shelf in my garden shed this weekend. Never liked the stuff but at 12 bucks for a 4' x 8' sheet to hold my lawn mower attachments (It is framed underneath), it was good enough for me.

Weird observation though, and maybe someone can explain. There was basically a smooth side and a rough side. The smooth side was still OSB and just seemed to have been sprayed with a sealer at the factory.

But the rough or unsprayed side had the "framing lines" marked across the front of the board. Marked every 8 inches I think to help in hitting studs in either a 16" or 24" on center frame.

This meant the smoother or sealed side was facing in, or down in my case (If I had gone that way, I didn't as it was easy to see where the joists were from the end of the shelf platform and easy to stay on line for only 3 feet of span)

But does that make sense? Why would the smoother side be facing in?
 
OP
P

Psycareyo

Active member
Joined
Jul 20, 2015
Messages
44
Location
Plattsburgh, NY
The smoother side usually has a ton more glue showing. From my research, most people use the side with the stud markings and rough texture. They said it takes the paint better. With the stain blocker, the glue residual chemicals don't leech through and stain the finish coat over time.
 

Duck tape Bill

Well-known member
Joined
Jul 6, 2012
Messages
294
Location
Maryland
The smoother side usually has a ton more glue showing. From my research, most people use the side with the stud markings and rough texture. They said it takes the paint better. With the stain blocker, the glue residual chemicals don't leech through and stain the finish coat over time.

This was my experience too. I used a Killz latex primer and a Killz latex paint (gloss white). I put up a wall and constructed storage shelves in my basement. The wall had the smooth side out, but I painted the back side & studs where the shelves where attached, so I did both the smooth and rough side at the same time and with the same paint. The smooth side took an extra coat of paint to cover up the bleed through, while the rough side was done with one coat primer, and one paint.
 

Dave in Mass

Well-known member
Joined
Jan 29, 2013
Messages
635
Location
Massachusetts
This was my experience too. I used a Killz latex primer and a Killz latex paint (gloss white). I put up a wall and constructed storage shelves in my basement. The wall had the smooth side out, but I painted the back side & studs where the shelves where attached, so I did both the smooth and rough side at the same time and with the same paint. The smooth side took an extra coat of paint to cover up the bleed through, while the rough side was done with one coat primer, and one paint.

Thanks guys, Seemed weird. but I suppose for walls or something you wanted to paint, it made sense. Mine was a basic shelf for some fairly big pieces (Spreader, Baggers etc) so smooth side up for increased slide-ability.

I would treat OSB painitng / staining like I treat some of my exterior stuff. I call it the Fenway Park system. Anyone who has ever been to Fenway and seen or touched the railing will know what I mean.

Don't get too fancy. Put it on thick, get maximum coverage, and when it needs to be re-done, just slather away over the old stuff.
 

Ainsley

Well-known member
Joined
Jun 12, 2014
Messages
557
Location
Ontario, Canada
I should correct myself. If you read the product data sheets on primers they usually say to caulk on top of the primer!
 

amkluttz

Well-known member
Joined
Sep 8, 2014
Messages
279
Location
Concord, NC
I put up an entire wall of OSB in my garage last weekend. I just used two old cans of latex Valspar primer. Nothing special about it except that it was old so it was fairly thick coming from the can. I mixed two gallons together and got this...


A close up...


I just had to keep the roller fairly wet so it would get in all the crevices. The above was after a heavy first coat and a much lighter second coat.

-Andy
 

k-os

Well-known member
Joined
Dec 29, 2012
Messages
995
Location
WI
Here's an example of the wall I did in my parent's garage. This wall was sanded up to 120 I believe. I think this was 2 coats of Killz and then 2 coats of a standard latex.


ssdave

Banned
Joined
Apr 11, 2015
Messages
2,913
Location
Eastern Oregon
I used a 3' x 8' piece of OSB as a shelf in my garden shed this weekend. Never liked the stuff but at 12 bucks for a 4' x 8' sheet to hold my lawn mower attachments (It is framed underneath), it was good enough for me.

Weird observation though, and maybe someone can explain. There was basically a smooth side and a rough side. The smooth side was still OSB and just seemed to have been sprayed with a sealer at the factory.

But the rough or unsprayed side had the "framing lines" marked across the front of the board. Marked every 8 inches I think to help in hitting studs in either a 16" or 24" on center frame.

This meant the smoother or sealed side was facing in, or down in my case (If I had gone that way, I didn't as it was easy to see where the joists were from the end of the shelf platform and easy to stay on line for only 3 feet of span)

But does that make sense? Why would the smoother side be facing in?

Rough side is to let worker safely walk on it when it is used as roof sheathing.
 
OP
P

Psycareyo

Active member
Joined
Jul 20, 2015
Messages
44
Location
Plattsburgh, NY
Wow, the sanding seems to have made a huge difference. That looks really nice.


Here's an example of the wall I did in my parent's garage. This wall was sanded up to 120 I believe. I think this was 2 coats of Killz and then 2 coats of a standard latex.

 
OP
P

Psycareyo

Active member
Joined
Jul 20, 2015
Messages
44
Location
Plattsburgh, NY
I decided to place everything else in the space before painting it. After the cabinet set is placed on the opposite side that you see in the images, I really won't have that much to paint lol. I have a little more slatwall to install on this 28' (two windows) section and then this side is done except for the lower cabinets and work top.
 

Attachments

  • slat1.jpg
    slat1.jpg
    71.1 KB · Views: 37
  • slat2.jpg
    slat2.jpg
    92.4 KB · Views: 44
To avoid these ads, REGISTER NOW!
Top Bottom