To avoid these ads, REGISTER NOW!

Firefighter table

NUTTSGT

Super Moderator
Staff member
Joined
Sep 14, 2009
Messages
50,855
Location
Northern Central Ohio
I've been meaning to sart this thread for a few weeks but I just never feel like posting it up an dlinking pics. Now the project is almost done, I should get busy typing.

A few circumstances created the idea for this project. One was the fact that we are working short handed at the station due to lay-offs and budget short-falls. Guys are working many double shifts and missing families. It's nothing unusual for us to work doubles/triples and 4 days straight at the fire house. (enough of that, not wanting to get political) It was suggested to the Chief that we turn one of the offices into a loungue, in addition to the regular TV room. this would allow guys to get away from each other and spend some private with their family if they came to the FD. (no conjugal visits:spit:). Two offices were consolidated and some furniture was donated by members along with a TV. Now we needed a table in front of the couch.
We also had some old equipment laying around and I didn't want it to walk off. I wanted to put it to use. I also wanted a winter project. One of the guys (laid off and second generation) had brought in a section of the old wooden floor hoping somebody would do something with it.

I though of a few things and the idea was born. I was going to make a table for the station, in memory of those that have served our department, past, present and those no longer with us. I got permission from the Chief to take a few items for the build and asked him not to say anything as I wanted it to be unknown what I was doing.

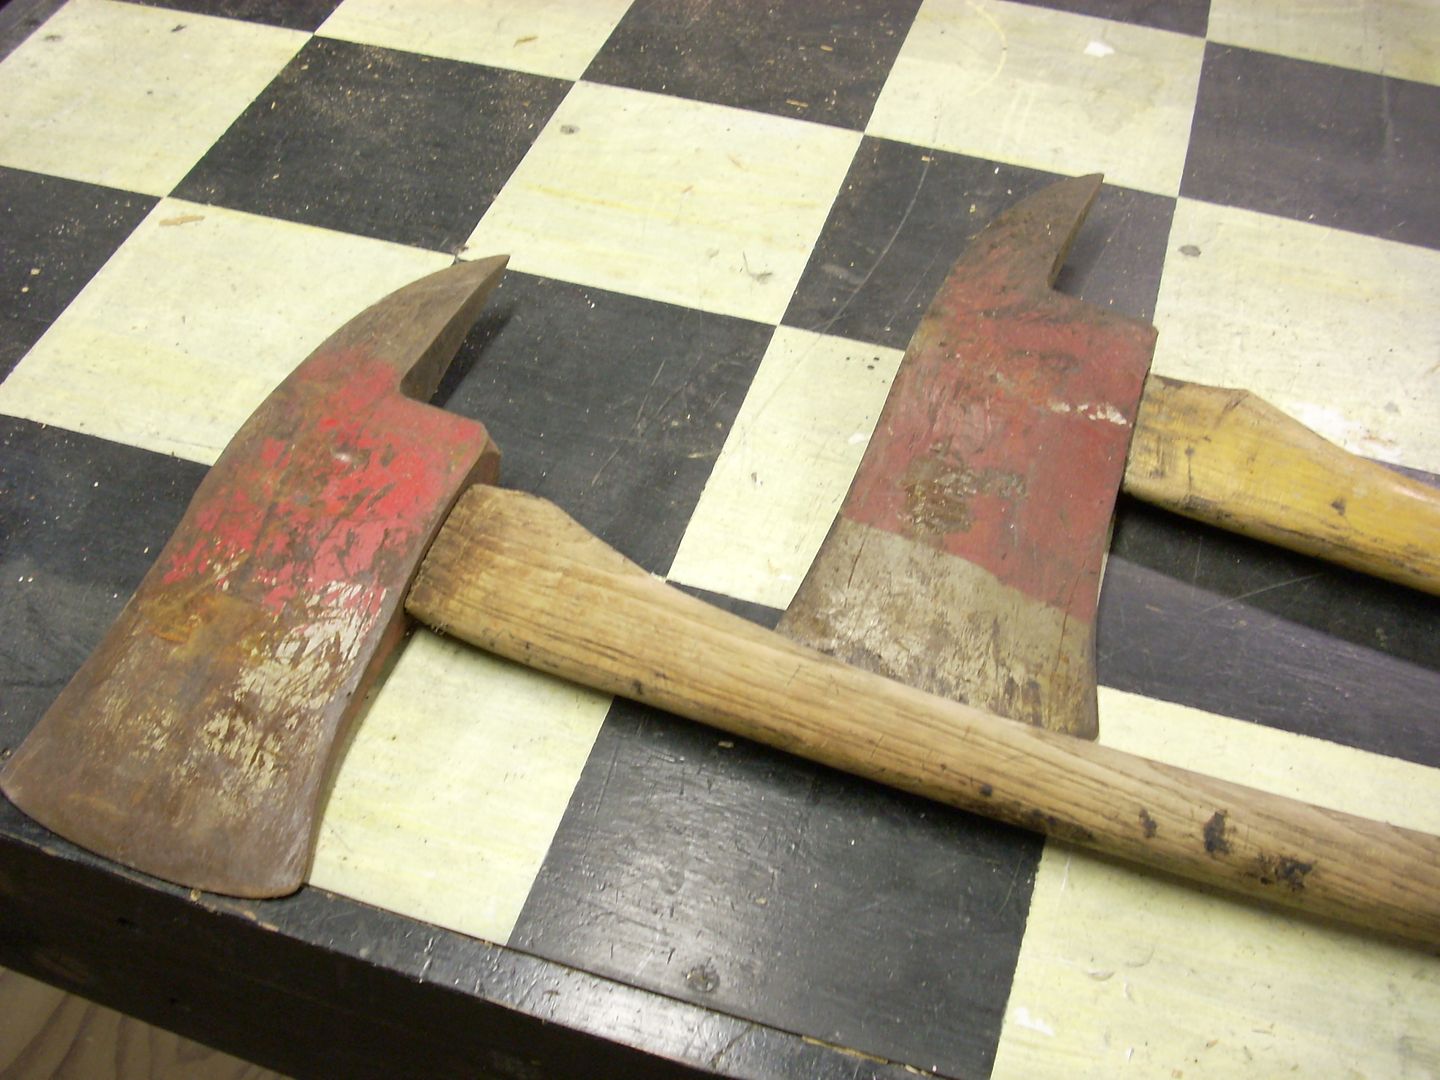
Sorry for the long (boring) story but I felt the need for a back story. These are the pieces I started with.
A section of old floor. It has been taken apart and glued back together, not in the correct order but that doesn't mean anything. There's also two pick head axes and two spanner wrenches.
01262012001.jpg


I also bought some steel to match what I had on hand. My mind was racing as to how to put this together. I hope the guys at work like it.

02212012weldingtablemods002.jpg
 
To avoid these ads, REGISTER NOW!
OP
N

NUTTSGT

Super Moderator
Staff member
Joined
Sep 14, 2009
Messages
50,855
Location
Northern Central Ohio
I tried to biuld the table in proportion to the floor section as that would be the top. I tried to lay it out and then I cut some steel.

02212012weldingtablemods001.jpg


Then things started getting put together.
03032012fftable001.jpg

Added another piece and this will be the end.
03032012fftable002.jpg


One thing you might notice if you have seen my welding table before. I replaced the expanded metal top with some 1/4" flat plate. This caused a delay in working on the table as I found that I couldn't lay anything out on the old top.
02212012weldingtablemods003.jpg

02212012weldingtablemods006.jpg
 
OP
N

NUTTSGT

Super Moderator
Staff member
Joined
Sep 14, 2009
Messages
50,855
Location
Northern Central Ohio
The spanner wrenches were going to get added at the ends. One of them was broken. So it needed repaired.
03032012fftable004.jpg


The older fire hose had small round tab on the couplings. The loop on the spanner hooked into the coupling when you were tightening/loosening it. It didn't have to be perfect, but I wanted it intact.
I needed something round to get the shape. Knowing the weld wouldn't stick to brass, I grabbed one of my drifts.. . . yep looks like it'll work.

03032012fftable006.jpg
 
Last edited:
OP
N

NUTTSGT

Super Moderator
Staff member
Joined
Sep 14, 2009
Messages
50,855
Location
Northern Central Ohio
Into the blast cabinet it went, along with the other one. Needless to say, the other end had been welded some years prior.

I've never welded cast before so this would be a learning project for me. I heard that it should be preheated, so thats what I did.
03042012fd-table001.jpg


Then I started on the other side, heated and welded.
03042012fd-table002.jpg

What I ended up with before cleaning it up.
03042012fd-table003.jpg


Honestly, it looked better in person than in those pics.
 
Last edited:
OP
N

NUTTSGT

Super Moderator
Staff member
Joined
Sep 14, 2009
Messages
50,855
Location
Northern Central Ohio
Next came the axes. I thought I could come up with a way to mount them down the long side of the table. I figured some rod in the ends would work but how to attached the rod to the axe got me thinking.

These are the axes. As you can see the pick head opposite of the blade. For those that don't know, it can be used to pry things, making the axe somewhat double duty.
03042012fd-table004.jpg


They came off two different trucks over the years. One of them came off the old ladder tower I believe when it got burned, along with one of the guys back in '83 or '84. It was mounted on the outside of the truck. You can see the unburned section where it hooked into the mount.
03042012fd-table005.jpg


I hit the axe heads with a scotchbrite roloc and then tossed then in the blast cabinet. I took care to wrap the handles when they went into the cabinet.
03042012fd-table006.jpg
 
Last edited:
OP
N

NUTTSGT

Super Moderator
Staff member
Joined
Sep 14, 2009
Messages
50,855
Location
Northern Central Ohio
After the heads were clean, I added a piece of steel to cover the end of the handle and welded some rod to that.
03052012fdtable006.jpg


I couldn't weld anything to the handle so it went different. The rod was welded to a piece of sheetmetal. A hole was drilled into the handle and two holes will get screws to keep it from rotating on the rod.
03082012002.jpg
 
OP
N

NUTTSGT

Super Moderator
Staff member
Joined
Sep 14, 2009
Messages
50,855
Location
Northern Central Ohio
Man this *****, I should have started this awhile ago.

The handles were sanded and varnished. they got three coats and the table top got 4.
03102012002.jpg


I gave the heads a coat of silver POR15 and when it was dry, I masked off the silver on the blade end. I painted the rest of the head red to make it look traditional.
030142012013.jpg


One thing that I was worried about was the burnt handle. I was hoping that when I sanded the old varnish off it wouldn't harm the burned handle. I wanted it on there to add some character.
 

c/o say

Well-known member
Joined
Mar 8, 2011
Messages
322
Location
Indiana
Thats going to be a awesome addition to the station. The guys are going to love it.
 
OP
N

NUTTSGT

Super Moderator
Staff member
Joined
Sep 14, 2009
Messages
50,855
Location
Northern Central Ohio
Thank you.

Prior to painting the axes, I tried to lay them out so I would know where to drill the holes for the rods. Since both axes were different, I had to lay each one out.

03052012fdtable004.jpg


I tried to mock them up and make sure everything would look right.

03052012fdtable005.jpg
 
OP
N

NUTTSGT

Super Moderator
Staff member
Joined
Sep 14, 2009
Messages
50,855
Location
Northern Central Ohio
Then I started to weld the ends together with the middle sections. I had to do it on the floor as my welding table isn't big enough.

03192012fftable001.jpg


03192012fftable002.jpg


Once this was done, I thought it might be slightly top heavy and easy to tip over. So it needed some type of feet.
 
OP
N

NUTTSGT

Super Moderator
Staff member
Joined
Sep 14, 2009
Messages
50,855
Location
Northern Central Ohio
I tried to find some feet locally without orderign anything so I could get this project completed. I thought about some washers on the bottom but that wouldn't look good. The I thought if I could cover them up, it'd work.

What could I cover them up with ? Then it hit me.

How about some old brass couplings ? About 8 years ago, I bought some old fire hose at the city auction. It has been sitting around waiting for the right project. I cut the hose off and polished the brass a little.

03192012fftable003.jpg


Then I needed a way to hold them over the washers. So I cut out some sheet metal.
03192012fftable005.jpg

03192012fftable006.jpg


Drew around the coupling, centered some sq tubing, center punched the holes. I took them over to the drill press, cut the rest with some snips and cleaned them up with a carbide bit and die grinder.
 
OP
N

NUTTSGT

Super Moderator
Staff member
Joined
Sep 14, 2009
Messages
50,855
Location
Northern Central Ohio
Then it was a matter of laying the spanners on the ends, heating them and welding them on. I cleaned some stuff up and wiped it down with some lacqueer thinner and sprayed it with self-etching primer.

whoa crappy pic alert.
03192012fftable007.jpg

03192012fftable008.jpg


Today I shot the first coat of paint, nothing fancy. I used some flat black Rustoleum so it could be touched up in the future if it gets knicked. Since it's coming out of my pocket, I wasn't going expensive either. If I used gloss it would have showed imperfections and I wasn't going to fill,sand and smooth out some body filler.
 
OP
N

NUTTSGT

Super Moderator
Staff member
Joined
Sep 14, 2009
Messages
50,855
Location
Northern Central Ohio
Today before noon, I put on the second coat of paint. I'll pull the masking paper and tape off tomorrow. Then the top will get lagged on.

03202012fftable001.jpg


03202012fftable002.jpg


03202012fftable003.jpg


I was hoping to have it done for tomorrow evening as we have a union meeting. I forgot that I will not have the outside trim done as it still needs cleaned and bleached more to get it whiter.
 
To avoid these ads, REGISTER NOW!

ladderwell

Well-known member
Joined
Mar 14, 2010
Messages
60
Location
Willamette Valley Oregon
You just gave me a great idea for our firehouses. We have quite a bit of the same type of old, out of service equipment that would work well for this type of thing, or perhaps retirement gifts.
 

geologist

Well-known member
Joined
Dec 14, 2011
Messages
5,326
I probably just would have cleared the axe heads (perhaps after an overnight vinegar soak) but that table is looking fan-friggin-tastic.
 
OP
N

NUTTSGT

Super Moderator
Staff member
Joined
Sep 14, 2009
Messages
50,855
Location
Northern Central Ohio
I finished up the table last night. I posted earlier that I wanted it done in time for the meeting we had last night, that didn't happen. Yesterday morning I washed the hose again with some bleach and again with some concentrated Tide detergent. Then I took it to the car wash and power washed it. I left it in the sun to dry and by later inthe evening it was dry enough.

I lagged the top on to the frame and marked the center with some masking tape.

03221012fftable001.jpg


03221012fftable002.jpg


03221012fftable003.jpg
 
OP
N

NUTTSGT

Super Moderator
Staff member
Joined
Sep 14, 2009
Messages
50,855
Location
Northern Central Ohio
It would have been nice if the top was bigger but that's what I had to work with, so I had to make due. I didn't finish the sides as smooth as the top since it was getting bordered with the hose. After the top was on, I wondered if I should have left it as is. I decided to continue the project as planned as the hose was now clean after some work and the brass couplings had some polish work on them.

I wish I could have fastened the hose another way, to hide the fasteners. The problem is, the hose is too heavy and needed something in the means of a mechanical fastener, so it got screws in plain site.

03221012fftable004.jpg

03221012fftable006.jpg

03221012fftable007.jpg

Here's a better picture of the same view, I deleted that last pic from PB.
03232012fftable001.jpg


Done, it'll be taken in today to the station and I can start back on my other projects. I had more hours in this project than I originally thought I would. Between design, lay out, fab work, cleaning, priming and painting it added up.


Pics are somewhat crappy, maybe I better get some new ones before I take it in.
 
Last edited:
OP
N

NUTTSGT

Super Moderator
Staff member
Joined
Sep 14, 2009
Messages
50,855
Location
Northern Central Ohio
I greatly appreciate the compliments. I got an email from my Capt today, telling me he liked it and was glad that I wasn't slacking while I had been off work. :lol:
 
To avoid these ads, REGISTER NOW!
Top Bottom