To avoid these ads, REGISTER NOW!

First Post! My Miter Saw Work Bench

Joanders24

Active member
Joined
Jul 22, 2012
Messages
28
Hi All,

Well I thought I would make my first post about the Miter Saw Work Station I have just finished building. I was struggling on how to store/use my new Makita Sliding Compound Miter Saw since it is a fairly large tool. I am in the process of building a new house, and so I am going to build my own workbench out of Aluminum and Birch. My goal is to have a fairly plain workbench constructed of 2"x2" aluminum, with a solid Birch Top. This Miter Workbench is going to slide under one side of the Large workbench, and I am going to build another rolling cabinet to fill the other side (with an opening in the middle of the workbench for my chair). Anyways...long story short...here is my Mobile Miter Work Station...

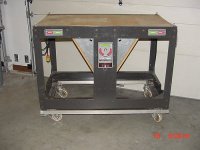
Here is the mobile station all folded up...
photo-7_zpsd34af6bd.jpg

Right Side:
photo-8_zps97f3a169.jpg

Back:
photo-9_zpse739df69.jpg

Left Side:
photo-10_zps57c60b10.jpg

Wings unfolded:
photo-11_zps43f753ec.jpg

Wings unfolded, Miter Saw rotated up:
photo-12_zps30f9a0ca.jpg

Ready to Cut:
photo-13_zpsacda760d.jpg

Under Wing:
photo-15_zps47dffe4f.jpg

Drawer Open:
photo-16_zpsb86859e1.jpg

Built-In Ruler:
photo-17_zps4920bb92.jpg

Finished:
photo-18_zps53916c79.jpg

This was constructed with 1"x2" Aluminum Tube, which was coated with Truck Bed Liner (spray paint), the wood is all 1/2" or 3/4" Birch that is finished with 5 Coats of Gloss Polyethelene (Natural Color).

Thanks for all of the great ideas...I love this forum!

John
 
To avoid these ads, REGISTER NOW!

Steevo

Well-known member
Joined
Aug 18, 2009
Messages
8,738
Location
43.49600, -112.04300
That is a really nice miter saw bench.
Great workmanship and excellent design.
People would pay for a bench like that to put their saw on, but it looks like you have a lot of time in the fabrication, so probably not a profitable endeavor.

Nicely done.
 

KEH

Well-known member
Joined
Jan 31, 2010
Messages
5,142
Great bench. I like the tape measure on each side.

KEH
 

NUTTSGT

Super Moderator
Staff member
Joined
Sep 14, 2009
Messages
50,849
Location
Northern Central Ohio
Welcome to GJ, glad to see you start posting instead of lurking. Building stuff like that, you'll do just fine here.

I truly hope you don't mind, but there's going to be copies of your stand being made.
 

Buford T. Justice

Well-known member
Joined
Jan 20, 2010
Messages
607
Location
Montague County
That is amazing!! I have an identical Makita to yours and have tried (unsuccessfully) to come up with something like you did. your workmanship is amazing and if you ever get around to it, could you please PM me some plans? The product you made is exactly what I have in my mind as a picture I'd like, I just can't get it to finished state...:thumbup:

Nice work and thanks for sharing on your first post no less!
 

Journaler

Well-known member
Joined
Apr 25, 2012
Messages
572
That is a nice workbench. Good job!

what a great job. I've never seen anything like that before. That has to be patentable.

I've seen the design before. Sears used to sell one with 3 "tops" for saw+grinder+whatever.
 

Attachments

  • 634151.jpg
    634151.jpg
    33.5 KB · Views: 277
OP
J

Joanders24

Active member
Joined
Jul 22, 2012
Messages
28
Thanks everybody for the kind words. I really didn't have a set of plans to use, it was more just generic measurements that I needed to confine it to (so it will roll under my workbench). I searched and searched the internet for something like this, but was never able to find anything exactly how I wanted. I either found a "Mobile Work Station" that had folding wings, but kept a "fixed" miter saw (which wouldn't be able to roll under the workbench), or I would find a "Rotating Work Station" that had plans for the saw to rotate up, but was more "built in" to the work bench. So I just kind of combined the two ideas and came up with this design.

Originally I was going to construct it all out of wood, but the more I thought about it, the more I liked the idea of using aluminum tube. It is much stronger and it will allow me to limit the overall size to fit under the work bench. Luckily, I have access to a Mig Welder at my shop, and there is plenty of scrap aluminum lying around for me to "play" with.

I honestly wish I had created a set of plans so I could share them. Maybe soon I will take some measurements and model this in Google Sketchup. The critical part of this build was the ability of the saw to fit within every dimension. So I literally had to build this "around" the saw. Even if I did model this and share it, it would probably only work with the 10" Makita Saw (one of the reasons I chose it, it is labelled the most compact).

Anyways, if any of you are interested in building this or something like it, just shoot any questions my way, hopefully I will have some answers or at least be able to tell you the mistakes I made along the way.

John
 
To avoid these ads, REGISTER NOW!

Cobra_Bob

Well-known member
Joined
Jun 3, 2011
Messages
202
Location
Virginia
Wow! Great work. I'm going to do something similar, but my vision of what I am going to build is nowhere near as nice as what you have produced. I think I’ll raise the bar a little.
 

slickgt1

Well-known member
Joined
Oct 11, 2010
Messages
1,674
Wow, that is really nice. I wouldn't mind getting more detail on that bench. Very precise work if it all lines up correctly.

Did you recess the ruler into the extensions?
 
OP
J

Joanders24

Active member
Joined
Jul 22, 2012
Messages
28
No, I didn't recess the ruler into the wood, however, the 5 coats of lacquer I put on the wood made the ruler embedded (so to speak). You can't even feel the ruler is there.
 

tthornto

Well-known member
Joined
Mar 11, 2011
Messages
743
Nice work, that design looks like it could also work for a router table, or have both the Miter saw and a router mounted on interchangeable bases.
 
OP
J

Joanders24

Active member
Joined
Jul 22, 2012
Messages
28
I thought about trying to add something else to the table (i.e. router, planer, etc), but the rotating table is somewhat difficult to attach. I have it attached on each side with 1/2" Stainless Steel bolts, with Nylon Bushings to tighten up the wiggle room and make it rotate easy. It isn't very practical to build another "top" due to this reason.

But yes, it would be sweet to have a "fleet" of these with all of your large power tools attached. I am thinking seriously about building another one with a small bench drill press attached. Now I may have too...

John
 

LSU

Well-known member
Joined
Dec 4, 2011
Messages
701
Very well done.

How long did it take you to:

a. Think it up;

b. Build it?
 
OP
J

Joanders24

Active member
Joined
Jul 22, 2012
Messages
28
Geez it's tough to actually add it up. I probably spent the course of a week researching it and "dreaming" it up, but there was no plans to begin with. And, I kind of tweaked it as I went so the planning really was taking place while I built it. I would say I have at least 12-15 hours of "build" time into it, mostly because I would squeeze an hour in here and there at the end of the work day, then tinker with it at night at home. It probably took me 3-4 weeks start to finish since I was building it like this. If I had a true set of plans an all o the materials could it have been done in a weekend? I think so (maybe except for all of the coats of poly). Hopefully it gives you some idea how much time I spent.
 

kyles974

Well-known member
Joined
Aug 22, 2010
Messages
881
Location
Florida/Alabama
I could build a table like that.... it would be easy, all I would need is about two weeks and if the design calls for .....oh lets say 4 hinges, I would need at least 8-10....and if the design called for one 1x6x8...then I would need 4 of them.

...why all the extras? ...because that would be how many I would go threw from screwing it up.:lol_hitti

...and really I could never make it look like that!

That is awsome...and welcome to GJ!;)

I love the design!!
 
OP
J

Joanders24

Active member
Joined
Jul 22, 2012
Messages
28
ALPINEWHITE: I really just tried to measure twice and cut once. The height of the deck of the saw relative to the bottom of the saw is the most critical measurement of the entire setup. That height is what I used to find the pivot point measurement. To be honest with you...my head hurt for a little bit trying to figure out the correct measurements. But luckily, I was within about 1/8" when I did final assembly and was able to correct it perfectly with a couple fender washers under the saw base. I will take some more pictures of the pivot today and post them.
 
OP
J

Joanders24

Active member
Joined
Jul 22, 2012
Messages
28
So I drew up a diagram of how I found the "pivot point". You need to find your height from the base of the saw to the deck of the saw (in my case 4 3/8"), and you need to know your Swivel Base height (mine is 8" tall). You can see in the picture below how I found the dimensions to make the swivel function properly.

Doc-Oct2820128-18AM.jpg

Here is a close-up of the nylon bushings I used between the base and the side support

photo-7.jpg

Here is a picture of the outside, with a 1/2" stainless steel bolt and a nylon washer

photo-8.jpg

And here you can see a closeup of the cotter-less pin that keeps the base from swiveling. There is one on each side.

photo-9.jpg

Hope this helps...
 
To avoid these ads, REGISTER NOW!
Top Bottom