To avoid these ads, REGISTER NOW!

First time building a work bench, came out ok

Ambrose Wolfinger

Well-known member
Joined
Apr 2, 2018
Messages
77
Location
Arlington, TX
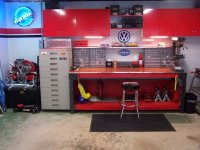
I don't post here much these days since all my questions are answered by searching. But after reading the work bench threads, I settled on the EAA 1000 design. I've not done any kind of wood work before, didn't even own a saw, but really needed a bench for car maintenance, amateur radio projects, occasional repairs to my drum and percussion gear, and other random DIY stuff. Trying to use the top of my HF 44" box was no longer sufficient.

I had a few minor problems along the way, but nothing terrible. Dimensions are 39"H, 60"W, 30"D. I would've made it longer but I only have a one car garage. Anyway, I appreciate the wealth of knowledge and ideas here, I'll be mounting a vise soon and have already been combing through vise threads. bb6cdc9b19813da7603400ecfd513352.jpg
 

Attachments

  • bb6cdc9b19813da7603400ecfd513352.jpg
    bb6cdc9b19813da7603400ecfd513352.jpg
    203.8 KB · Views: 7
To avoid these ads, REGISTER NOW!

captain14

Well-known member
Joined
Dec 19, 2012
Messages
7,032
Location
Near College Park Maryland 20740
Looks great and it’s a confidence builder.

I can do that. After using it awhile, you may decide to add something to make it function better. Is it bolted to the wall? Consider that if you are using the vise for heavy work.
 
OP
A

Ambrose Wolfinger

Well-known member
Joined
Apr 2, 2018
Messages
77
Location
Arlington, TX
Looks great and it’s a confidence builder.

I can do that. After using it awhile, you may decide to add something to make it function better. Is it bolted to the wall? Consider that if you are using the vise for heavy work.
No, I'm in a rental, so I'd rather not do that. anything I put in a vise will probably be light to medium duty anyway. Not doing any really heavy work with it.
 
Last edited:
OP
A

Ambrose Wolfinger

Well-known member
Joined
Apr 2, 2018
Messages
77
Location
Arlington, TX
Correction.....beer shelf.

Looks great for a first time. Benches in my opinion have an evolution of their own. I never will take mine or the cupboards to my next place.
Thanks. I'm a little bothered that the top isn't perfectly centered but it's not noticeable unless you look for it.

Mine will come with me and it should last a while. All the workbenches I remember from my youth were home made, the idea of buying one didn't appeal to me at all.
 

theoldwizard1

Well-known member
Joined
Feb 22, 2011
Messages
43,127
Location
SE MI
Looks nice !

One issue first timers run into when building a wooden work bench is somewhere they wind up screwing into end grain. End grain will not hold screws well long term. If you run into this dilemma, first screw the joint together using as few screws as possible. Buy a 1/2" forstner bit. Drill through the outer 2x4 and and at least 2" in to the end grain. use a hardwood dowel and a liberal amount of glue. Aft 2 are installed you can remove the original screw and add more.

Not an original idea.

Simple sturdy workbench build
 
To avoid these ads, REGISTER NOW!

PhantomEB

Well-known member
Joined
Feb 6, 2006
Messages
6,728
Location
Medicine Hat, AB, Canuckistan
How do you mean not centered? I can’t find it.....

HF 44, still got that? I built mine around my tool boxes and beer fridge but I did start out with just a sheet of plywood on the box and progressed from there.
 

Attachments

  • 9DF74FDA-161C-46A6-9DDD-935182F56921.jpg
    9DF74FDA-161C-46A6-9DDD-935182F56921.jpg
    112.7 KB · Views: 52

Joemctag

Well-known member
Joined
Aug 11, 2017
Messages
813
Location
Outside raleigh nc
Overhang like marctrees said. I prefer about 2 1/2” and stiffened by gluing, say, a 5/4 strip under the overhang. Actually, OP can clamp stuff, he just needs to have big C-clamps or “Bessey” type.
The proportions he has, with the bottom shelf about a foot high, are how I do mine.
I Like the horizontals being recessed into the posts.
 

Dan in Pasadena

Well-known member
Joined
Feb 18, 2009
Messages
13,124
Location
Pasadena, CA
I'm certain I will get **** for admitting it but I'm building one of these with the plastic legs. If imitation is the most sincere form of flattery well, whoever owns this will be very flattered because I'm copying it exactly. The red will work in my garage.

I found it on Pinterest but I'm pretty sure a GJ'er posted it here in the past.

PS: Not to hijack but anyone know where to get the plain shiny metal edging he used with the pre drilled holes? It used to be everywhere carpet and flooring is sold but I've not found it at Lowe's, HD, Amazon, etc.
 

Attachments

  • DC4E942D-611C-4ED9-91D1-B5D102CA2F19_1_105_c.jpeg
    DC4E942D-611C-4ED9-91D1-B5D102CA2F19_1_105_c.jpeg
    80.7 KB · Views: 59

4 Ever-Fish N

Well-known member
Joined
Jul 20, 2011
Messages
350
Location
Deep East Texas
My bench is very similar to this as far as design and materials. I did not put a metal edge on it though. I'm pretty sure I bought the kit from Northern Tool.

I'm certain I will get **** for admitting it but I'm building one of these with the plastic legs. If imitation is the most sincere form of flattery well, whoever owns this will be very flattered because I'm copying it exactly. The red will work in my garage.

I found it on Pinterest but I'm pretty sure a GJ'er posted it here in the past.

PS: Not to hijack but anyone know where to get the plain shiny metal edging he used with the pre drilled holes? It used to be everywhere carpet and flooring is sold but I've not found it at Lowe's, HD, Amazon, etc.
 

Miss the Pontiacs

Well-known member
Joined
Nov 7, 2016
Messages
16,436
Location
Saskatchewan Canada
Good job. Now you have to christen it.
Drill a few holes to mount a variety of tools, them drill some more to place tool where it should have been placed originally.
Buff it with a wire wheel to get that special sheen.
Burn it strategically with a torch to give character.
Straighten a few nails on it to give it that worm wood appeal.
Score it with a slotted screwdriver to mimic what could happen if one isn’t careful.
Drill a few Phillips screw below surface and then totally obliterate by camming them out to the point they look like they have been drilled out.
Glue something accidentally to it and scrape off excess with the claw of your hammer.
Overfill chainsaw oil and blend into wood grain for added patina.
I’m sure others can help with other methods to add character to your bench.:lol_hitti
 

bri_man57

Well-known member
Joined
Mar 6, 2013
Messages
189
Location
Windsor Colorado
Spill a half quart of oil on it.

Get slag/ burn marks from welding.

Run an angle grinder tio close to the edge and dig into the side.

Plenty of ball peen marks in that ”one" area.

Mount a power strip in 3 different places because it somehow is never in the right spot.

All joking aside, I always liked taking the 0.99 cent yardsticks from home depot for mixing paint and screwing one or two to the front. Nice for quick and dirty measurements. If you're really cool, youll make one ear of the vice match with the begining of said yardstick so you have a stop to **** up against.

Sent from my SM-N920T using Tapatalk
 

SuperCat

Well-known member
Joined
Jan 6, 2012
Messages
1,100
Location
Sacramento, CA
The best thing I have learned about work benches is to have a top surface that can be easily replaced. Some folks use hard board because it is smooth, some use 1/4 inch plywood, etc. If you do that, you won't get too bent out of shape if you spill something on top of your bench, like dirty, disgusting, smelly, old engine oil. Don't ask me how I know about that. ;^)
 
OP
A

Ambrose Wolfinger

Well-known member
Joined
Apr 2, 2018
Messages
77
Location
Arlington, TX
Looks nice !

One issue first timers run into when building a wooden work bench is somewhere they wind up screwing into end grain. End grain will not hold screws well long term. If you run into this dilemma, first screw the joint together using as few screws as possible. Buy a 1/2" forstner bit. Drill through the outer 2x4 and and at least 2" in to the end grain. use a hardwood dowel and a liberal amount of glue. Aft 2 are installed you can remove the original screw and add more.

Not an original idea.

Simple sturdy workbench build
Most of the plans I saw, including the ones I used, included screwing into the end of of the board to fasten the "ribs" into the upper frame to support the top. It struck me as a less than perfect idea, but I guess now that it's done I will see how it holds up. The YouTube link is good! I'll save it for the future
 
OP
A

Ambrose Wolfinger

Well-known member
Joined
Apr 2, 2018
Messages
77
Location
Arlington, TX
How do you mean not centered? I can’t find it.....


HF 44, still got that? I built mine around my tool boxes and beer fridge but I did start out with just a sheet of plywood on the box and progressed from there.
It's not visible in the pics, but at the read of the bench, the corner of the top is not aligned with the corner of the bench frame by maybe 1/2". Of course it didn't help that when I bought the 2x4s at Home Depot many of the boards were warped. I tried to sort through them as best I could, but one or two were a little off.

Still have the HF box, and I considered building a bench around it, but I plan on buying the upper chest to stack on top soon.
 
Last edited:
OP
A

Ambrose Wolfinger

Well-known member
Joined
Apr 2, 2018
Messages
77
Location
Arlington, TX
Overhang like marctrees said. I prefer about 2 1/2” and stiffened by gluing, say, a 5/4 strip under the overhang. Actually, OP can clamp stuff, he just needs to have big C-clamps or “Bessey” type.

The proportions he has, with the bottom shelf about a foot high, are how I do mine.

I Like the horizontals being recessed into the posts.
It would definitely be easier. I can use my quick grip clamps if I need to. Not sure if my C clamps are big enough
 
To avoid these ads, REGISTER NOW!
Top Bottom