To avoid these ads, REGISTER NOW!

First time working with concrete...success!!! I think...

Mike_72

Well-known member
Joined
Jun 12, 2017
Messages
161
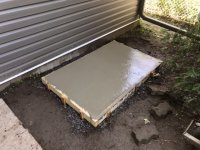
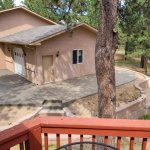
Poured a pad for the condenser unit at the back of my garage today. I think it went pretty well. Slab is 3.5” thick with 10mm rebar. Probably overkill but wanted it to try working with rebar. Feel free to let me know if you see anything that I could have done better.
 

Attachments

  • 92D745A2-6940-4E18-9231-3B415C2F3EDB.jpg
    92D745A2-6940-4E18-9231-3B415C2F3EDB.jpg
    61 KB · Views: 304
  • 81688DBD-9D4A-40E3-9D7B-B6F6C56A847C.jpg
    81688DBD-9D4A-40E3-9D7B-B6F6C56A847C.jpg
    60.7 KB · Views: 350
  • EAF13D9F-AAE4-4367-A220-D07FC183CE40.jpg
    EAF13D9F-AAE4-4367-A220-D07FC183CE40.jpg
    62.2 KB · Views: 340
  • 16C403F1-F784-4BA8-924E-ABEDA55A2D0E.jpeg
    16C403F1-F784-4BA8-924E-ABEDA55A2D0E.jpeg
    122.2 KB · Views: 319
  • BB7220C9-CBE5-4318-AC65-78EEFE625571.jpg
    BB7220C9-CBE5-4318-AC65-78EEFE625571.jpg
    134.1 KB · Views: 332
  • 8E43F04E-9408-4036-8224-ED96A86FBA42.jpeg
    8E43F04E-9408-4036-8224-ED96A86FBA42.jpeg
    95.6 KB · Views: 334
To avoid these ads, REGISTER NOW!

Sawdust_

Well-known member
Joined
Mar 2, 2020
Messages
77
Location
NY
Nice finish for a first timer!It might have been put in later you took the photos but rebar is normally placed on stools or bricks to lift it off the bottom of the slab. Also I cant tell if you wire tied the bars to each other?
 
OP
M

Mike_72

Well-known member
Joined
Jun 12, 2017
Messages
161
Yeah bars are wire tied, the picture with it sitting in the empty forms was just checking it for size. I poured about 2” of concrete and then set the bars in before adding the rest of the concrete. I hope they stayed relatively close to that position as I wasn’t walking over them.
 

Sawdust_

Well-known member
Joined
Mar 2, 2020
Messages
77
Location
NY
Next time place the bars on pieces of brick. The bars likely settled down to the bottom but I wouldn't be that concerned about it there's not going to be much load on your pad it's going to outlast you.
 
OP
M

Mike_72

Well-known member
Joined
Jun 12, 2017
Messages
161
Next time place the bars on pieces of brick. The bars likely settled down to the bottom but I wouldn't be that concerned about it there's not going to be much load on your pad it's going to outlast you.

I even had the chairs in my hand at Home Depot but put them back cause I thought they looked like they would hold the bars too high. Live and learn...
 

bimmer1980

Well-known member
Joined
Feb 5, 2009
Messages
2,104
Location
York, PA
Overall, nice job for your first.

Rebar placement is entirely dependent on the design loads of the slab or footing. They are there to take the tensile loads of the concrete. For future jobs, it just depends. Generally for slabs, you want them in the lower 1/3 of the concrete thickness as that is where your tensile loads are imparted to the slab. Other concrete structure, it will vary.

Personally, I don't like bricks for holding rebar up. I use the plastic chairs where necessary. Doing what you did was more than adequate for rebar placement for this size of slab.

All that to say, it really does not matter with the slab that you poured.

Once the slab has cured to the point where water will not harm the surface, you can cover it to help it stay hydrated. Concrete cures by a chemical reaction initiated with water.

Critical pours will require a 28 day hydrated cure time....

For your job, no worries.... cover it for a couple of days if you desire... Or if there is a chance of rain tonight... otherwise, give it a day or two and set your HVAC unit and keep going...
 

Craig Balzer

Well-known member
Joined
Sep 21, 2005
Messages
863
Location
Colorado Springs
Thanks, the broom finish really hides my lack of experience with a trowel. Any idea at what point I should start misting the surface to help with the cure?

I just had a large apron / patio poured.
Concrete guy said to mist 3x daily for 5-7 days starting the day after the pour.
Framed on Mon
Pour on Tues
Misting started Wed
 

Attachments

  • 13 - Finished I.jpg
    13 - Finished I.jpg
    68.1 KB · Views: 167
  • 14 - Finished II.jpg
    14 - Finished II.jpg
    75.1 KB · Views: 149

Red 17

Well-known member
Joined
Oct 25, 2018
Messages
441
Location
Pasadena CA
Looks better than the one I did.....

The broom is your friend when you are an amateur concrete guy....
 

Daedalus

Well-known member
Joined
Sep 28, 2009
Messages
6,017
I did one of them a few months ago. Made the forms perfectly flat with just the right thickness and slope. Poured the concrete and finished it juuuuust right with no voids. Then the HVAC guys showed up and slapped a plastic base on it to support the compressor. The pad could have been as rough as gravel and it wouldn't matter.
 
OP
M

Mike_72

Well-known member
Joined
Jun 12, 2017
Messages
161
I did one of them a few months ago. Made the forms perfectly flat with just the right thickness and slope. Poured the concrete and finished it juuuuust right with no voids. Then the HVAC guys showed up and slapped a plastic base on it to support the compressor. The pad could have been as rough as gravel and it wouldn't matter.

But if you’re like me, knowing that it’s perfect is all that matters, even if you can’t see it.
 

Jinks

Well-known member
Joined
Aug 28, 2012
Messages
2,885
Location
Daytona Beach
You ALMOST got it right......:sad: Would have been perfect if you had your initials in there somewhere.........:thumbup:
 
OP
M

Mike_72

Well-known member
Joined
Jun 12, 2017
Messages
161
You ALMOST got it right......:sad: Would have been perfect if you had your initials in there somewhere.........:thumbup:

That was actually my plan, but once the concrete was mixed and I started to fill the form I was so focused on making sure I didn’t screw it up that I completely forgot!!
 
To avoid these ads, REGISTER NOW!

830singleshot

Well-known member
Joined
Jan 14, 2018
Messages
62
Put your initials in when you fill the gap between the house and the slab so it doesn't grow up with weeds.
 

Jinks

Well-known member
Joined
Aug 28, 2012
Messages
2,885
Location
Daytona Beach
You ALMOST got it right......:sad: Would have been perfect if you had your initials in there somewhere.........:thumbup:

That was actually my plan, but once the concrete was mixed and I started to fill the form I was so focused on making sure I didn’t screw it up that I completely forgot!!

Damn! Don't you hate it when you get so involved in doing something right that you forget to have fun.........:sad:, :lol:
 
OP
M

Mike_72

Well-known member
Joined
Jun 12, 2017
Messages
161
I covered the pad with plastic last night and it’s seems to have worked great to hold in the moisture. When should I remove the forms? It’s been about 20 hours since I placed the concrete.
 

lilredex

Well-known member
Joined
Apr 29, 2006
Messages
5,956
Location
Toronto
Good job on the concrete!

Would have wall mounted it. Don't know where you are, but you probably have leaves and snow like most of us.
 

Attachments

  • Wall Mounted AC.jpg
    Wall Mounted AC.jpg
    116.4 KB · Views: 66
OP
M

Mike_72

Well-known member
Joined
Jun 12, 2017
Messages
161
My first thought was that although it looks great I would have taken it back to the slab to cut down on the weeds. Also would have saved one side of the form work.

I wanted to put some distance between the pad and the garage. What you see below the siding on the garage is just a thin layer of parging on 2” of rigid foam insulation, I didn’t want any relative movement between two to damage the parging. I will lay down some landscaping fabric and some cedar mulch behind the pad.
 
OP
M

Mike_72

Well-known member
Joined
Jun 12, 2017
Messages
161
Why a broom finish. You won't be walking on it. An opportunity to try a steel trowel finish. That's what I did on mine.

Bill

I started with steel trowel finish, and it was my intent to leave it that way, but I wasn’t too happy with how it looked so chickened out and used the broom. Maybe next time I’ll have the confidence to make a nice enough trowel finish.
 
To avoid these ads, REGISTER NOW!
Top Bottom