Maybe could fit some on the sides above the adjustable legs. Called Lowe’s and they said they could cut the duraboard to size.I would not rule out pegboard completely. But look at several sources for the board itself and for the pegs. Go for thicker board and thicker wire hooks so they fit tightly in the holes. There are also steel pegboards w/ their own style of how the hook attaches to the board. You want hooks that don't fall off the board every other time you grab the tool. If you use hooks like this
or this
there will be little tendency for the tools to fall off while you roll outside. Look at L and HD and any other similar store. One thing to keep in mind is that you want a brand that is long term. Not every brand hook will fit every brand board.


You are using an out of date browser. It may not display this or other websites correctly.
You should upgrade or use an alternative browser.
You should upgrade or use an alternative browser.
First work bench. I’m inexperienced. Looking for suggestions and advice on optimizing this workbench.
- Thread starter mllrwd
- Start date
Have you considered making a workbench on your porch. A heavy flat surface maybe part of the railing, if there, or along the wall or one end. In other times it could be a buffet table, a bar, or whatever. That way you have a multipurpose table to do whatever the time calls for. Make it have a overhang so that you can pull up a stool and sit but also make it high enough to stand at if the job at hand calls for it. Don't get tunnel vision and look for how you can make it versatile for your way of living.
Is your porch in the back or street side?
As a young man I had two 2x12's that spanned two 55 gal barrels for my workbench.
lg
no neat sig line
Is your porch in the back or street side?
As a young man I had two 2x12's that spanned two 55 gal barrels for my workbench.
lg
no neat sig line
Quick & easy cheap workbench- buy another 2 drawer file cabinet the same ht as the one you have. Go to the Habitat Restore and buy a flush solid core wood or even hollow metal door. Wood door is easier to cut to lenght to fit a specific location. Put the lock bore towards the wall. Many years ago, I did this when we rented a house without a garage. If you don't need knee space, add more file cabinets. If you want it higher, built a rectangle of 2x2, 2x4, or 2x6's & place it between the cabinets & the door. Make some shallow stacking plywood boxes for tills in the drawers so you're not stuct with such tall spaces. Only disadvantage is that you need to work thru layers.I don’t have a shop or anywhere to store this bench using a top mount or wall mount pegboard. It’ll have to stay in the house. Woman, nurse by trade, new to tools and repairing things myself. But I’m learning and accumulating as I go. I got this workbench that is adjustable height with option to use casters or rubber feet. Considering adding extra pegboard to this bench if you all feel it’s reasonable to do. I’ll need to be able to roll it out on the porch when I’m working on certain things, so will need to maintain ability to do that. I started out with a dewalt tstack and quickly filled it. My workspace is currently a fold out table on the porch or my dining table. Some of the things I’m storing/organizing: drills, impact driver, multiple dewalt battery chargers and batteries, staple guns, dremels, sanders, bits and attachments for all these, assorted screws, nails, brackets, etc. hand tools like saws, bolt cutters, tin snips, wrenches, screwdrivers, chisels, pliers, files, hammers, levels, tape measures, clamps, etc. plus some small pieces of scrap wood and shims. I have accumulated some basic tools, but no big stuff like saws (I wish). Some of these things can go in my tstacks and sit by the bench. Any and all suggestions and advice to optimize my bench and tools greatly appreciated.
gahrajmahal
Well-known member
A layer of plastic sheet then a layer of crushed limestone would cozy up that space. Digging a trench around the outside of the shed, lining it with a length of 4" perforated tube covered in a sediment sock then covered with more gravel would really make it dry in there. Since you have to repair the roof, add some translucent panels to increase the light in there.That’s awesome. I like the idea of a vise platform. I do have a shed that got hit by a tree and broke the center beam, however, I do have a small still standing area in there I might could do something compact. The floor is dirt though, so it does get muddy in there at times.

Can you give us an idea of what kind of budget you have?I don’t have a shop or anywhere to store this bench using a top mount or wall mount pegboard. It’ll have to stay in the house. Woman, nurse by trade, new to tools and repairing things myself. But I’m learning and accumulating as I go. I got this workbench that is adjustable height with option to use casters or rubber feet. Considering adding extra pegboard to this bench if you all feel it’s reasonable to do. I’ll need to be able to roll it out on the porch when I’m working on certain things, so will need to maintain ability to do that. I started out with a dewalt tstack and quickly filled it. My workspace is currently a fold out table on the porch or my dining table. Some of the things I’m storing/organizing: drills, impact driver, multiple dewalt battery chargers and batteries, staple guns, dremels, sanders, bits and attachments for all these, assorted screws, nails, brackets, etc. hand tools like saws, bolt cutters, tin snips, wrenches, screwdrivers, chisels, pliers, files, hammers, levels, tape measures, clamps, etc. plus some small pieces of scrap wood and shims. I have accumulated some basic tools, but no big stuff like saws (I wish). Some of these things can go in my tstacks and sit by the bench. Any and all suggestions and advice to optimize my bench and tools greatly appreciated.
And as for a power strip, I prefer this kind because large wall warts won't interfere with each other. https://www.harborfreight.com/home/electrical/power-strips/12-outlet-super-power-strip-96737.html
rayra
Well-known member
You always need power. Mount a power strip UNDERNEATH the bench but close to the front. It must be securely mounted as you will be pulling down on the cords to remove them. You can get away with computer power strips because even though youight have multiple items plugged in, you typically will not be using 1 or 2 at a time.

Attachments

rayra
Well-known member
Since you're going to be moving it around, consider a mobile tool cart such as this one. It'll meet all your requirements.
YUKON 46 in. 9 Drawer Mobile Storage Cabinet with Solid Wood Top

btw, this box is on sale right now / today at HF for $289, which is a good deal. Couple years ago I bought the 'Husky' branded same box from Home Depot for a bit more and that box had a built in power strip and usb chargers down low on the right end. I am 99.9% sure the boxes came out of the same factory. Good drawer glides, decent gauge of steel, well made box, very good value for the money.
At the time the Home Depot / Husky branding was $400, I got 10% off that and it had the built in power. So I figured it was worth a bit more to me. But I could have just as easily screwed a power strip to the side of it in the same spot.
That box is $448 at Home Depot today.
Attachments

rayra
Well-known member
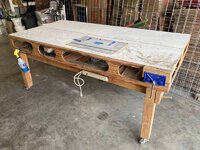
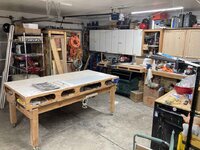
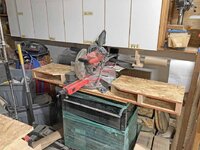
I've also got a smaller rolling 'mechanics tool cart' with a hinged top that I've shanghaied as a base for a compound miter saw / cutting station. I'll probably be expanding on that, bolting a shelf of plywood to the very bottom extending out one side to be a shelf for my shopvac, as dust collection for the saw and as a parking space in general for the vac. And on the back side adding some narrow stowage bins for offcuts, akin to the saw carts you find in the molding aisle at Home Depot. Turning it into a multifunction sort of thing.
When I'm not working on large projects like building furniture, that big rolling work table docks to the wall under the white hanging cabinets. Where that cutting station sits now.
I have one higher 'hobby' workbench that is bolted to the wall under the bare wood kitchen cabinets. Every other toolbox and shelf unit in the broader picture is on wheels. I can rearrange or condense the space anyway I need to. And when these months of furniture making are done, I can wheel it all into the middle bay of my 3-car and clean out all the mess I'm making. And then rearrange everything into a more compact arrangement.
When I'm not working on large projects like building furniture, that big rolling work table docks to the wall under the white hanging cabinets. Where that cutting station sits now.
I have one higher 'hobby' workbench that is bolted to the wall under the bare wood kitchen cabinets. Every other toolbox and shelf unit in the broader picture is on wheels. I can rearrange or condense the space anyway I need to. And when these months of furniture making are done, I can wheel it all into the middle bay of my 3-car and clean out all the mess I'm making. And then rearrange everything into a more compact arrangement.
Attachments


CraigStu
Well-known member
Regarding a vise. I don't know what you might use it for but I probably would not go for a large one. On a wheelable bench, even w/ locking casters, you can only put so much effort into sawing something before the bench starts moving on you. My medium large vise is on a bench that is attached to the wall of my garage so it doesn't even wiggle.
nadogail
Well-known member
Your first Workbench will probably be replaced because after you build it and find your limitations you will rebuild it differently.
That's kind of what makes it a first workbench, no?Your first Workbench will probably be replaced because after you build it and find your limitations you will rebuild it differently.
Fav Onefour
Well-known member
Been there done that.Your first Workbench will probably be replaced because after you build it and find your limitations you will rebuild it differently.
I build workbenches each time I acquire a new place. They have evolved over the years. Latest versions are more solid and less fancy looking. I plan for super duty tops and anything wood is easily replaceable.
I use a Kaizen approach for quick use tool layout on the work surface and wall. I try to put lower use tools in easy to access storage like pull out drawers etc. Cleanup is easier without tools out in the open.
My early shop setups were dreamy to look at but less practical. Later version are efficient and I just close the door when friends walk by.
e015475
Well-known member
I've had a similar metal tube frame workbench for about the last 20 years. Maybe seeing some of the features I have will help 'optimize' your workbench. Mine is around 30x60" with a Formica top and a rubber bullnose. A cutting mat protects the surface. This workbench has some electric jackscrews so you can adjust it for standing or sitting - I've never used it in the desk position. A stool in front of the bench allows for sitting comfortably or just stand and work.
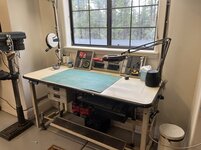
The previous incarnation of this workbench had a pegboard back, and I wasn't too happy with it. Stuff that was anymore than arm-level was a PITA to reach, and when you moved the bench around the shop, tools would fall off the hooks. Here's a pic of that version

The pegboard was repurposed to another part of the garage (stationary) for stuff I don't use regularly-

I made these shadow-boards out of scrap plywood, paint sticks and Harbor Freight foam. The board on the left has mostly pokey/sharp things I use quite often and used to keep in the drawers (with some occasional puncture injuries) The board on the right is just stuff I misplace all the time- tuners, tape measure, drill keys, dial calipers, etc. This arrangement lets me take advantage of the light coming in the window too.

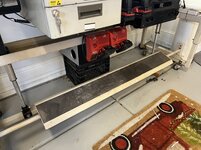
I have two drawers that screw to the bench-top. I keep stuff I don't use quite as often in there. I keep my drill and driver along with their chargers handy underneath the bench, The 'holsters' are just PVC couplings carved to fit the tools. I only have the two electric tools, but I keep four batteries so there's always one charged. The stereo, bluetooth receiver and chargers all run off of a power strip that gets turned off when I'm not in the shop
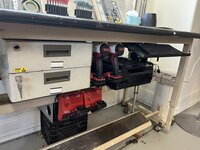
I keep a power-strip at the top of the bench that also turns the lighting on/off. The cord reel takes care of everything that won't reach the power strip

I have a task light with a magnifying lens that swings out of the way when it is not being used (great for extracting slivers). I have an old Alexa too that's handy as an intercom to the kitchen, timer, weather etc (and occasional math problem)

The key to sitting for extended periods in front of the bench is having someplace for your feet IMO
My bench has a florescent fixture hanging over it - suspended from Unistrut. It moves about a foot or so, but mostly it is stationary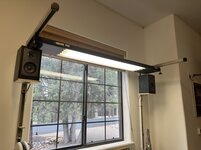
Hope this gives you some ideas for your workbench
The previous incarnation of this workbench had a pegboard back, and I wasn't too happy with it. Stuff that was anymore than arm-level was a PITA to reach, and when you moved the bench around the shop, tools would fall off the hooks. Here's a pic of that version
The pegboard was repurposed to another part of the garage (stationary) for stuff I don't use regularly-
I made these shadow-boards out of scrap plywood, paint sticks and Harbor Freight foam. The board on the left has mostly pokey/sharp things I use quite often and used to keep in the drawers (with some occasional puncture injuries) The board on the right is just stuff I misplace all the time- tuners, tape measure, drill keys, dial calipers, etc. This arrangement lets me take advantage of the light coming in the window too.
I have two drawers that screw to the bench-top. I keep stuff I don't use quite as often in there. I keep my drill and driver along with their chargers handy underneath the bench, The 'holsters' are just PVC couplings carved to fit the tools. I only have the two electric tools, but I keep four batteries so there's always one charged. The stereo, bluetooth receiver and chargers all run off of a power strip that gets turned off when I'm not in the shop
I keep a power-strip at the top of the bench that also turns the lighting on/off. The cord reel takes care of everything that won't reach the power strip
I have a task light with a magnifying lens that swings out of the way when it is not being used (great for extracting slivers). I have an old Alexa too that's handy as an intercom to the kitchen, timer, weather etc (and occasional math problem)
The key to sitting for extended periods in front of the bench is having someplace for your feet IMO
My bench has a florescent fixture hanging over it - suspended from Unistrut. It moves about a foot or so, but mostly it is stationary
Hope this gives you some ideas for your workbench
Attachments

GN4WHLN
Well-known member
I'll show you some of what I did. I welded up a structure out of 2 inch and added a piece of tubing to take a hitch tube with a mount welded to it. This bench is 10 feet long and I have another which is 6 feet and made of a bathroom pullman rather than a tube structure, and a thrid, 5 foot bench, which is a steel bench on rollers, and also has a receiver tube. I use that for welding and dirty or heavy work, and it rolls and stores under the 10 foot bench. I added the receiver so I could move my vise to whichever bench I was going to work from. I also have other tools such as a solid stock bender, a bead roller, other stuff... even a can crusher, that can be slid in and used as needed.
The 10 foot bench stands on legs and is mounted to the back wall. The 6 foot bench stands on legs and is free standing. Both of those benches are topped with 3/4 inch oak flooring. The last picture shows part of the finished 10 foot bench in the background. I don't have any good pictures of them right now.
The two fixed benches have several 20 amp outlets on the wall behind them, Air outlets, good overhead lighting, and storage.


The 10 foot bench stands on legs and is mounted to the back wall. The 6 foot bench stands on legs and is free standing. Both of those benches are topped with 3/4 inch oak flooring. The last picture shows part of the finished 10 foot bench in the background. I don't have any good pictures of them right now.
The two fixed benches have several 20 amp outlets on the wall behind them, Air outlets, good overhead lighting, and storage.
I strongly agree about shear panels between the legs.
On my current bench I routed a 1/2” rabbet on the inside of my legs to accept the shear panel of 1/2” plywood. This gave me recessed storage as shown.

My power strip set up and a shelf mounted to the stretchers holding sanders and a trim router that I usually leave plugged in when I’m working.
The shelf has a 1” slot cut out of the bottom so the router can be stored standing up.

On my current bench I routed a 1/2” rabbet on the inside of my legs to accept the shear panel of 1/2” plywood. This gave me recessed storage as shown.
My power strip set up and a shelf mounted to the stretchers holding sanders and a trim router that I usually leave plugged in when I’m working.
The shelf has a 1” slot cut out of the bottom so the router can be stored standing up.
Blackwolfe
Well-known member
Below is a link to a Seville Classics workbench that has a pegboard back with a shelf and task light for an idea if you want to attach pegboard to your bench. The pegboard on this bench attaches to a couple of uprights that attach to the back of the back legs. If you're rolling the bench around, I wouldn't make the height of the back to high above the mobile bench as the higher center of gravity may make very tipsy. You can also get metal pegboard panel from Seville. Some Seville classic products are available from Sam's club. Prices at Sam's are so much cheaper that it may be well worth the cost of a membership. I have the SS top work center, and the quality is excellent. The Seville work benches and work centers in my opinion are probably the best bang for the buck.

Seville Classics UltraHD® Total Organization Systems:

Seville classics at Sam's Club:

 www.samsclub.com
UltraHD® Lighted Workcenter w/ Wood Top and Pegboard
Assembled Dimensions: 48" W x 24" D x 65.5" H Solid polyurethane-coated wood top measures 1.5" thick Available finishes: Granite legs and pegboard, stainless steel drawers, and wood table top, model no. UHD20247B Graphite legs and pegboard, stainless steel drawers, and wood table top, model no...
www.sevilleclassics.com
Seville Classics UltraHD® Total Organization Systems:
Seville classics at Sam's Club:
Search for Seville Classics - Sam's Club
www.samsclub.com
Our universal Power tool 3 tier shelf may interest you, pictured with Milwaukee but will absolutely hold your DeWalt drills, batteries and chargers. We also have a few other items that may help.I don’t have a shop or anywhere to store this bench using a top mount or wall mount pegboard. It’ll have to stay in the house. Woman, nurse by trade, new to tools and repairing things myself. But I’m learning and accumulating as I go. I got this workbench that is adjustable height with option to use casters or rubber feet. Considering adding extra pegboard to this bench if you all feel it’s reasonable to do. I’ll need to be able to roll it out on the porch when I’m working on certain things, so will need to maintain ability to do that. I started out with a dewalt tstack and quickly filled it. My workspace is currently a fold out table on the porch or my dining table. Some of the things I’m storing/organizing: drills, impact driver, multiple dewalt battery chargers and batteries, staple guns, dremels, sanders, bits and attachments for all these, assorted screws, nails, brackets, etc. hand tools like saws, bolt cutters, tin snips, wrenches, screwdrivers, chisels, pliers, files, hammers, levels, tape measures, clamps, etc. plus some small pieces of scrap wood and shims. I have accumulated some basic tools, but no big stuff like saws (I wish). Some of these things can go in my tstacks and sit by the bench. Any and all suggestions and advice to optimize my bench and tools greatly appreciated.
Attachments
-
 Prybar.png4.7 MB · Views: 7
 -
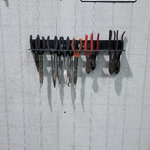 pliers wall mount top Tools.png3.8 MB · Views: 7
 -
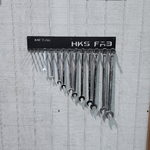 Metric2.png4 MB · Views: 6
 -
 hammer wall mount top tools.png3.9 MB · Views: 5
 -
 5 Can holder live with cans.png4.4 MB · Views: 5
 -
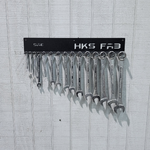 SAE2.png4.1 MB · Views: 5
 -
 Screwdriver wall mount top tools -F.png3.9 MB · Views: 5
 -
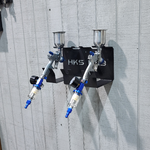 Spray Gun Holder1-W-G.png4.1 MB · Views: 8
 -
 Universal Power Tool Shelf.jpg603.8 KB · Views: 8
 -
 Vice.png4.4 MB · Views: 9