To avoid these ads, REGISTER NOW!

Fixing laminate floor issue

ourkid2000

Well-known member
Joined
Jul 1, 2008
Messages
927
Location
Nova Scotia
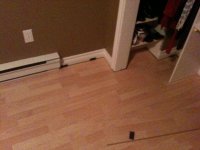
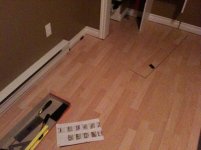
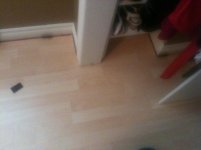
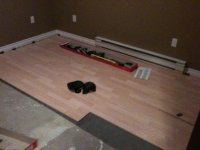
Ok folks.....it's my first laminate floor install and I may have made a rookie mistake. Not sure how to fix it.

With this flooring I am cheating a little and leaving the baseboards installed and then when I am finished I will be installing quarter-round to cover the gap.

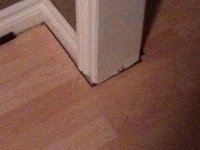
I think I screwed up though at this molding. As I was laying the flooring up to this door molding I realized that I could not get the board underneath to snap it together so I kinda just cut around it.

Anyways, looking at it now I'm not sure how I will be able to make it pretty (the quarter round will **** right up to the molding but after that I don't know what to do). Any suggestions?

If I have to replace the molding, I will if I have to.
 

Attachments
  • lamfloor 001.jpg
    lamfloor 001.jpg
    145.4 KB · Views: 46
  • lamfloor 003.jpg
    lamfloor 003.jpg
    145.9 KB · Views: 45
  • lamfloor 004.jpg
    lamfloor 004.jpg
    145.5 KB · Views: 43
  • lamfloor 002.jpg
    lamfloor 002.jpg
    133.6 KB · Views: 50
Last edited:
To avoid these ads, REGISTER NOW!

srmofo

Well-known member
Joined
Oct 15, 2009
Messages
6,161
Location
SW ohio
Cut the bottom of the door casing and install a "decorative" square block. I believe it is called a plinth block. It separates the casing and baseboard and doesnt look out of place as long as all the doors in the room have it. It also helps to install a rosette (sp?) which is the same thing except at the top corners of the door. It keeps from having to miter the corners and is an easy way to cheat the doorways in an old un-square house.

Unfortunately for you, in your hast to cheat the trim, you added a few more steps if you ever want that to look like a professional job. Hopefully you dont have many doors or windows in that room. If you only place the plinth blocks at the lower corner, it will look tacky and out of place IMHO.

This is assuming what you are referring to
 
Last edited:
OP
O

ourkid2000

Well-known member
Joined
Jul 1, 2008
Messages
927
Location
Nova Scotia
Hmm cool....I will look into that. With regards to hiring a pro, this is a budget install and it's only about 130 bucks worth of floor so it's not something I wouldn't try myself.
 

tcianci

Well-known member
Joined
Feb 7, 2009
Messages
4,242
Location
Walpole, Ma
Since laminate floors come apart pretty easily, you're still in good shape. Get yourself a multi function too, like the one HF sells. It will be the best 30 bucks you ever spent. Take up the floor till you get it clear around the door jamb, turn a piece of flooring upside down on the underlayment and use it as a guide for the multifunction tool so that you can cut off the jamb and the casing so that the flooring will slip under it. You will also want to cut into the baseboard about a half inch to the side of each casing. That lets you end the flooring under the baseboard, casing and jamb. Then apply your quarter round up to the casing...no edges will be left open and the floor can still float under the jamb, casing and baseboard. When you apply the quarter round, miter it back on itself so you have a nice finished end on the quarter round.
 

donnie

Well-known member
Joined
Jan 24, 2007
Messages
953
Location
North Carliona
What is this multi function tool you speak of, I have all which used an hand saw to cut the door jambs up, it is a PITA.
 
OP
O

ourkid2000

Well-known member
Joined
Jul 1, 2008
Messages
927
Location
Nova Scotia
Since laminate floors come apart pretty easily, you're still in good shape. Get yourself a multi function too, like the one HF sells. It will be the best 30 bucks you ever spent. Take up the floor till you get it clear around the door jamb, turn a piece of flooring upside down on the underlayment and use it as a guide for the multifunction tool so that you can cut off the jamb and the casing so that the flooring will slip under it. You will also want to cut into the baseboard about a half inch to the side of each casing. That lets you end the flooring under the baseboard, casing and jamb. Then apply your quarter round up to the casing...no edges will be left open and the floor can still float under the jamb, casing and baseboard. When you apply the quarter round, miter it back on itself so you have a nice finished end on the quarter round.

The more I think about it, the more I think this is the way to go. I haven't gone too far & shouldn't waste too much material.
 

OccupantRJ

Well-known member
Joined
May 15, 2009
Messages
11,491
Location
Eastern North Carolina
Since laminate floors come apart pretty easily, you're still in good shape. Get yourself a multi function too, like the one HF sells. It will be the best 30 bucks you ever spent. Take up the floor till you get it clear around the door jamb, turn a piece of flooring upside down on the underlayment and use it as a guide for the multifunction tool so that you can cut off the jamb and the casing so that the flooring will slip under it. You will also want to cut into the baseboard about a half inch to the side of each casing. That lets you end the flooring under the baseboard, casing and jamb. Then apply your quarter round up to the casing...no edges will be left open and the floor can still float under the jamb, casing and baseboard. When you apply the quarter round, miter it back on itself so you have a nice finished end on the quarter round.

This is the way to cure the situation. Wait till you take on a hallway with 4 doors on each side. One has to get real creative, with a lot of pre figuring where the end joints will fall.
 
OP
O

ourkid2000

Well-known member
Joined
Jul 1, 2008
Messages
927
Location
Nova Scotia
I'm looking at this again now...I don't think there's a good solution. Not one that I'm seeing anyway.

I was thinking about taking it apart like was suggested above. The only thing is that I would have to undercut that door by a lot more than you guys are figuring. These boards are 20cm wide so to meet up with the first row under the jamb, I'd have to be well into the wall before I got close to it with the 2nd row board. Then there's no way to angle the board to get it to snap into the 1st one because it's now under the wall.

See my problem?
 
To avoid these ads, REGISTER NOW!

srmofo

Well-known member
Joined
Oct 15, 2009
Messages
6,161
Location
SW ohio
Why is removing the casing such a big deal? Just pull it off, cut the casing and jambs. Cut the laminate to fit around the corner and install it. Reinstall the trim when the floor is completely finished.

I assumed you were done with the floor and unwillingly or able to remove just a few pieces. Thats why I suggested the plinth block earlier
 
OP
O

ourkid2000

Well-known member
Joined
Jul 1, 2008
Messages
927
Location
Nova Scotia
I really appreciate you guys lending the advice and suggestions by the way....

Well let me try to explain how this happened, might help. I was simply following the instructions that came with the flooring and my DIY book. I started at the other end of those boards that I am showing in my pics and worked towards that closet (perhaps I should have started in the closet?). When I got to the closet, I cut around (leaving a nasty gap).

Thinking about what you guys are saying......I see a problem, maybe I'm just being stupid. How can I get the second row of laminate boards to lock into the side of the first if it is underneath the wall? It needs that angle. The other thing I noticed is that there are metal corners installed and I figured I'd never be able to cut through it.

On the other hand, are you saying remove the casings and cut the laminate to just fit around the corners so that you can manipulate it to lock in and then put it back on later?

Sorry for all the questions fellas!
 
OP
O

ourkid2000

Well-known member
Joined
Jul 1, 2008
Messages
927
Location
Nova Scotia
That is quite cheap laminate from a local building supply company here in Canada called Kent Building supplies. It was on sale (it was like 22 bucks for 25 sq ft, LOL) and I decided that my basement carpet had to go.

Yeah, it's pretty cheap stuff but it's a budget reno and it will make a big difference to this house.

Thanks for all the help by the way folks!
 
To avoid these ads, REGISTER NOW!
Top Bottom