To avoid these ads, REGISTER NOW!

Flared wood shingle experience

Kaizen

Well-known member
Joined
Jan 9, 2015
Messages
6,948
Location
New England
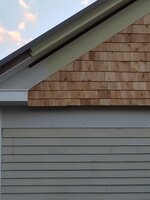
I’m installing white cedar shingles on the top of my garage sidewalls. I’m using a flared detail as shown below. The first few courses are the issue. I’m hand nailing them and using narrow shingles but I’m still splitting a lot. If I soak them in my sink for a few hours will they become more pliable so I can bend better? What happens at night when temps drop below freezing? Will they split like a frozen pipe?

59dabe2c6c92477c5c1b4cc2e162ec30.jpg


Sent from my iPhone using Tapatalk
 
To avoid these ads, REGISTER NOW!

yeldogt

Well-known member
Joined
Jan 2, 2012
Messages
18,184
You don't need to bend them -- the old traditional flare was made with straight shingles .... it's all about maintaining the head-lap.

I see some using very long shingles .. that's not how we did it. Base was built up .. not plywood.. But I'm sure double thin would work. have also seen the use of a copper flash under.
 
OP
K

Kaizen

Well-known member
Joined
Jan 9, 2015
Messages
6,948
Location
New England
You don't need to bend them -- the old traditional flare was made with straight shingles .... it's all about maintaining the head-lap.


I see some using very long shingles .. that's not how we did it. Base was built up .. not plywood.. But I'm sure double thin would work. have also seen the use of a copper flash under.


they have to bend to match the profile of the plywood. I will put up a pic in a minute. the 2nd course is most of the problem. I have a 5 inch reveal and thought about just cutting them from 16 down to say 10 but the part i would cut off is the thin part so not much help.
7b6326cedfbee47408f95fe54fbbfdfe.jpg
5902aa08e8c8a1fbb104825c2d679653.jpg
084cd066f0c453d6e0ac8132477c8591.jpg
 

Attachments

  • 084cd066f0c453d6e0ac8132477c8591.jpg
    084cd066f0c453d6e0ac8132477c8591.jpg
    724.4 KB · Views: 1
  • 5902aa08e8c8a1fbb104825c2d679653.jpg
    5902aa08e8c8a1fbb104825c2d679653.jpg
    740.2 KB · Views: 1
  • 7b6326cedfbee47408f95fe54fbbfdfe.jpg
    7b6326cedfbee47408f95fe54fbbfdfe.jpg
    123.1 KB · Views: 1
Last edited:

yeldogt

Well-known member
Joined
Jan 2, 2012
Messages
18,184
You may have to much curve without enough height -- look at the picture above -- those shingles are flat ..

There are many problems with that picture -- the shingles have no positive head lap -- they will not be water proof long term .... the underlayment must be metal. The picture looks pretty .. but the person who did it knows nothing about long term roofing and weather sealing a building .

My guess is the only way to fully bend shingles would be to steam them -- and hope of a high enough quality to stand up ..


look up head lap ... unless the shingle two above fully covers -- and shingle failure will leak,,, wood shingles -- slate roofs require three layers. It's a common misconception ..
 
OP
K

Kaizen

Well-known member
Joined
Jan 9, 2015
Messages
6,948
Location
New England
You may have to much curve without enough height -- look at the picture above -- those shingles are flat ..

There are many problems with that picture -- the shingles have no positive head lap -- they will not be water proof long term .... the underlayment must be metal. The picture looks pretty .. but the person who did it knows nothing about long term roofing and weather sealing a building .

My guess is the only way to fully bend shingles would be to steam them -- and hope of a high enough quality to stand up ..


look up head lap ... unless the shingle two above fully covers -- and shingle failure will leak,,, wood shingles -- slate roofs require three layers. It's a common misconception ..

umm i'm doing them and i do know a little about weather proofing. This is just a sidewall. First course is 2 layers. others are singles. each single will have 2 courses over it with staggered seams. i've never seen 3 layers of shingles on a sidewall. there is waterproofing under them. what does putting copper under them do if i'm just going to puncture it with a thousand nails? don't mind the single piece near the window. that is just there temporarily. other then that i don't know what you are referring to. I did my house like this 20 years ago but no flare and none of those are having a problem.
 

blkhonda1991

Well-known member
Joined
May 20, 2008
Messages
608
Location
Connecticut
did you sheath the blocking that is creating the flare? it doesnt look like you did but the detail you reference shows sheathing over that blocking to create a continuous drainage plane. Also you have some gaps in the horizontal trim/shingle joint that driven rain will get in and get behind the siding, you should put flashing over that horizontal piece or let the shingles run over it more.
 

yeldogt

Well-known member
Joined
Jan 2, 2012
Messages
18,184
You have proper head lap -- the way you are doing it. Actually you are not kicking it out all that much ... I think you may have tried to bend it too much on the first one and now it's creating a problem.

How long are you soaking them -- they should be able to flex. Did you soak over night -- when doing a barrel -- you have to bend and they need to soak.

Growing up my family had a house on the coast of ME with large kick-outs over the stone foundation -- second floor was less.
 
OP
K

Kaizen

Well-known member
Joined
Jan 9, 2015
Messages
6,948
Location
New England
did you sheath the blocking that is creating the flare? it doesnt look like you did but the detail you reference shows sheathing over that blocking to create a continuous drainage plane. Also you have some gaps in the horizontal trim/shingle joint that driven rain will get in and get behind the siding, you should put flashing over that horizontal piece or let the shingles run over it more.


Sorry I try to be brief in my posts. I used two layers of 1/4 inch sheathing with rubber waterproofing over it. Then the shingles. The trim under the shingles is just my ledger used to get the overhang of shingles even. It will be removed leaving the shingles as the drip edge.
The window also is fake. It is weatherproofed to shed water but not what I would do on a normal one.


Sent from my iPhone using Tapatalk
 
OP
K

Kaizen

Well-known member
Joined
Jan 9, 2015
Messages
6,948
Location
New England
You have proper head lap -- the way you are doing it. Actually you are not kicking it out all that much ... I think you may have tried to bend it too much on the first one and now it's creating a problem.

How long are you soaking them -- they should be able to flex. Did you soak over night -- when doing a barrel -- you have to bend and they need to soak.

Growing up my family had a house on the coast of ME with large kick-outs over the stone foundation -- second floor was less.


Haven’t tried soaking them. Thinking a few hours in hot water will help? Just them soaking up water should help lessen the splits


Sent from my iPhone using Tapatalk
 
OP
K

Kaizen

Well-known member
Joined
Jan 9, 2015
Messages
6,948
Location
New England
Wasn't this a topic on This Old House awhile ago?


Yea and they didn’t have my breaking issue that they mentioned. No real patterns or measurements that I could find for the curve. They used wacky wood also for bending. 100 bucks a sheet for that stuff! Maybe I should call ask this old house to have tommy come save me. Heck I was down the street from his brother at Christmas. Really close maybe they can fit me in


Sent from my iPhone using The Garage Journal mobile app
 

larry4406

Well-known member
Joined
Jan 27, 2006
Messages
19,323
Location
Northern Virginia
...No real patterns or measurements that I could find for the curve. They used wacky wood also for bending. 100 bucks a sheet for that stuff!...

I can't help with your shingle issue but regarding the curve, you can use normal OSB instead of the flexible plywood "aka wacky wood" but it takes a little effort.

Take normal OSB roof sheathing and cut parallel saw curfs about 1/2" apart the full width of the sheet on the back side. This will allow the sheet to follow the curve similar to a tambour door on a rolltop desk. Our carpenters do this on our homes that have curved "swoop roofs".
 
To avoid these ads, REGISTER NOW!

yeldogt

Well-known member
Joined
Jan 2, 2012
Messages
18,184
I would soak them overnight --- getting wet is not going to hurt them. Just **** them up close ... years ago with the number of houses being built w/ shingles my guess is they got installed soon after being produced ... green wood with more flex.

The last work I did on the place was an area with grooved -- We had a box for patching, but I needed to replace a whole section and ordered six boxes ... the new ones were so easy to cut and maneuver. The only difference was age

This was a house built around 1900 -- no plywood. All the curves and bump outs are skeleton framed. The lower area over the foundation just have a final drip edge ... the upper levels over bay windows etc have metal pans ...

Wood siding for roofs and walls will get damp on the underside --- but it dries out. An occasional drip down on a foundation or sill is not a problem .... but higher up they required an extra layer of protection .... that's why metal was used.

Don't use OSB ... it will rot with wood shingles. You may be able to get away with it (for a while) if used on a modern asphalt shingle roof w/ ice shield.
 
OP
K

Kaizen

Well-known member
Joined
Jan 9, 2015
Messages
6,948
Location
New England
I can't help with your shingle issue but regarding the curve, you can use normal OSB instead of the flexible plywood "aka wacky wood" but it takes a little effort.

Take normal OSB roof sheathing and cut parallel saw curfs about 1/2" apart the full width of the sheet on the back side. This will allow the sheet to follow the curve similar to a tambour door on a rolltop desk. Our carpenters do this on our homes that have curved "swoop roofs".

Thanks Larry. I did try this with half inch zip panels as i had read someone bending them in that way. Didnt work well. I ended up just with 1/4 inch ply and it bends without issue. No score needed.
 
OP
K

Kaizen

Well-known member
Joined
Jan 9, 2015
Messages
6,948
Location
New England
I would soak them overnight --- getting wet is not going to hurt them. Just **** them up close ... years ago with the number of houses being built w/ shingles my guess is they got installed soon after being produced ... green wood with more flex.

The last work I did on the place was an area with grooved -- We had a box for patching, but I needed to replace a whole section and ordered six boxes ... the new ones were so easy to cut and maneuver. The only difference was age

This was a house built around 1900 -- no plywood. All the curves and bump outs are skeleton framed. The lower area over the foundation just have a final drip edge ... the upper levels over bay windows etc have metal pans ...

Wood siding for roofs and walls will get damp on the underside --- but it dries out. An occasional drip down on a foundation or sill is not a problem .... but higher up they required an extra layer of protection .... that's why metal was used.

Don't use OSB ... it will rot with wood shingles. You may be able to get away with it (for a while) if used on a modern asphalt shingle roof w/ ice shield.

Thanks will do. have a few days of above freezing so they should dry out some before it freezes again.
 

matt_i

Well-known member
Joined
Mar 14, 2008
Messages
10,728
Location
SE Michigan
A thought if you can spare a couple of test pieces would be to just score the back of them slightly with a tablesaw kerf. Not so much the thin edge but more towards the thicker end to make them act more like a uniform thin sheet. Otherwise the thin section has to absorb more bending stress than the thick section which isn't going to move. This is just an idea, you'd have to develop the concept some more :)

Basically the same way you'd bend plywood by scoring the backside of it. I don't think that would mess up the weatherproofing of it, the kerf should open slightly obtuse due to the bend and I think that would shed water.
 
OP
K

Kaizen

Well-known member
Joined
Jan 9, 2015
Messages
6,948
Location
New England
A thought if you can spare a couple of test pieces would be to just score the back of them slightly with a tablesaw kerf. Not so much the thin edge but more towards the thicker end to make them act more like a uniform thin sheet. Otherwise the thin section has to absorb more bending stress than the thick section which isn't going to move. This is just an idea, you'd have to develop the concept some more :)

Basically the same way you'd bend plywood by scoring the backside of it. I don't think that would mess up the weatherproofing of it, the kerf should open slightly obtuse due to the bend and I think that would shed water.


Good thinking but due to all of the grain running the same direction if I cut across it then it would just weaken it. I’m soaking a bunch now and believe this will work for the two courses I’m having the issue with. Definitely going to extend the arc on the other side so not this much of an issue.


Sent from my iPhone using Tapatalk
 
OP
K

Kaizen

Well-known member
Joined
Jan 9, 2015
Messages
6,948
Location
New England
Soaking overnight worked perfect. Laid out full width shingles and no splits. I was able to push them into the shape with one hand. I have a few buckets soaking for tomorrow’s install. Thanks for everyone’s suggestions


Sent from my iPhone using Tapatalk
 

CTyankee

Well-known member
Joined
Jan 13, 2013
Messages
3,796
Location
CT
Just a some constructive criticism...Shingles should have their joints on relating courses offset by a decent amount(we usually try for at least 1") to provide maximum protection. Some of your joints look very close to each other, if not directly lined up with each other.
 
OP
K

Kaizen

Well-known member
Joined
Jan 9, 2015
Messages
6,948
Location
New England
Just a some constructive criticism...Shingles should have their joints on relating courses offset by a decent amount(we usually try for at least 1") to provide maximum protection. Some of your joints look very close to each other, if not directly lined up with each other.

you are correct. Thanks for the criticism. Only way we get better right?
Made some joint mistakes on the lower part while fighting to bend them in. Once i successfully got the damn shingle on without it breaking i noticed the joint but just left it. That part has rubber under it so shouldn't be too much of an issue. I do try for at least an inch. The paint will be doing most of the water shedding.
 

fasteddie

Well-known member
Joined
May 25, 2018
Messages
697
Location
NJ
Quote:
Originally Posted by White 99 View Post
Wasn't this a topic on This Old House awhile ago?


Yea and they didn’t have my breaking issue that they mentioned.


They never have a problem on This Old House or Ask This old House. They live in a perfect world where every floor is perfectly level, every door and window frame is perfectly square and every pipe joint and faucet handle comes apart with the slightest effort and every shut off valve ALWAYS works and never leaks.
 
To avoid these ads, REGISTER NOW!
Top Bottom