To avoid these ads, REGISTER NOW!

Floating slab insulation layout for radiant.

MrModus

Member
Joined
Jul 5, 2021
Messages
9
Hi All,

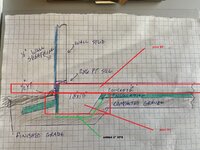
I'm a little confused on exactly how to layout my insulation for a floating slab. I'm doing a 24' x 14' garage/shed (it's grown from 20') that I'm going to run pex through for in-floor. I've attached an image of what I currently have. There's approx 10" of gravel and we're doing a 6" pad.

form-example.jpg

I don't know exactly how to lay out my insulation. I'll be doing vapor barrier, then insulation, then 6" wire mesh with 2" chairs, then zip-tying my 1/2" pex to the mesh. I know I need to insulate the slab edge, but if I put insulation up against the forms, then I'll have exposed insulation when the forms are removed. I can back fill but I'll still see a few inches of insulation as the slab is above grade a bit of course.

I would love some help to understand how the insulation should be laid out/finished. My concrete guy suggested not doing the edges, just the bottom, but everything I've read seems to indicate the heat loss will be substantial. I'm in Ontario Canada and the winters get brutal.

Thanks for your help.

Mike
 
To avoid these ads, REGISTER NOW!

stimpee

Well-known member
Joined
Aug 1, 2006
Messages
70
Location
Gallatin TN
I used this Styro Industries Stucco style foundation panel insulation on the outside perimeter of my monolithic slab. I did not put it in the forms, but cut and bonded it on the outside of the slab after pour. I live in a relatively temperate climate though (TN) where it doesn't get super cold for very long, so I didn't go down very deep with the perimeter...


Do not leave the edges BARE though, especially in Canada. You will end up with HUGE losses on the edges.
 

jasondavidmann

Well-known member
Joined
Aug 16, 2009
Messages
162
Location
Manitoba, Canada
9B476434-9100-454E-97FD-C511A537AE58.jpeg

This picture doesn’t show the rebar or pex but that is how my pad is detailed.

Plenty of pictures of my pad in my build thread.

FYI I’m building in Manitoba Canada
 
OP
M

MrModus

Member
Joined
Jul 5, 2021
Messages
9
9B476434-9100-454E-97FD-C511A537AE58.jpeg

This picture doesn’t show the rebar or pex but that is how my pad is detailed.

Plenty of pictures of my pad in my build thread.

FYI I’m building in Manitoba Canada
This is exactly what I was looking for, thanks SO much!
 

TractorJeff

Well-known member
Joined
Dec 8, 2013
Messages
3,309
Location
Elkhorn, WI
I have forced air heat in my shop and noticed last winter the heat loss from the slab melting the snow back 6 to 8 inches from the concrete. I have contemplated retrofitting insulation on the outside of the slab. Do it as the other posters have suggested!
 
OP
M

MrModus

Member
Joined
Jul 5, 2021
Messages
9
9B476434-9100-454E-97FD-C511A537AE58.jpeg

This picture doesn’t show the rebar or pex but that is how my pad is detailed.

Plenty of pictures of my pad in my build thread.

FYI I’m building in Manitoba Canada

@jasondavidmann I checked out your build thread, looks awesome.

A few follow up questions, when you added the diagonal frost barrier to the outside, It looks like about 8" down with about a 30 degree slope. I'm assuming you did that after the pad was set? I'm also assuming I put the vertical edge piece up against the form before the pour, did you attach the PT board to the foam first and put that in the form as well? I was thinking I might use some 4" treated deck screws to screw the PT board through the foam to leave about 1.5" of thread hanging out the other side to get secured by the concrete. Was there any trick when you did the frost barrier part? Just dig down and grade it about 30 degrees then put dirt on top? Any concern of it shifting? Any tricks to get it to stay in place?
 
To avoid these ads, REGISTER NOW!

jack stand

Well-known member
Joined
Feb 29, 2012
Messages
3,304
Location
Lakes Region Maine
This is a small (living space) addition I added and it was my first use of this "frost protected shallow foundation". Here in Maine the normal depth for frost footings is 4', this would have required me to have a foundation contractor with forms come in and pour footings, then set the form panels, pour and then strip them. I wanted to avoid this so I went this route.
this is my excavation
DSCN8279.jpg
The painted line ^^^ and the rebar outlines the finished size of the room (14x14). This overdig to the exterior is for the buried foam that is key in keeping the the cold from penetrating the slab and possibly end up heaving the building. Corners are recommended to extend further than walls. My depth under the surrounding grade is only 24".

I've had concrete form disasters before and I may have gone "overboard" with this form, but it didn't blow out.DSCN8286.jpg This was also when a 2x4 $2.
I dry stacked those 8" block to save concrete and allow for my under slab insuation to meet the vertical insulation with no funky angles to dig and remain in place surviving the concrete placement.
DSCN8289.jpeg
^^^ The shorter foam is to the interior where the under slab foam will sit in the edge for complete coverage. The foam against the form wood is 24" and is the actual form, the 'crete is poured directly against it. That's partially why the forms look so overdone, it's to support the foam board/concrete.
DSCN8307.jpg
^^ This is ready to pour. Notice the PT blocks fastened to the outside foam. Later they will get a PT 2x10 screwed to it covering the foam from the siding to the grade. Exposed foam was always a problem to disguise or cover otherwise. This works well in this close to grade situation.
The horizontal foam is already under that gravel that's there to help support the foam until it's set up.

DSCN8736.jpg
It was poured late November and I wasn't going to build the addition over the winter.
This pic was early April after spending the winter under a layer of hay covered with plastic and ready to build on. Notice the PT lumber, it's screwed to those blocks I cast into the concrete and will become the outside edge of the foundation. (walls & siding will "flush out" with this surface.

Like I said, this is living space and the slab has only a few degree difference from the interior using a infra red temp gun at it during very cold periods, much, much better than other areas of our building done with conventional 4' frost walls with foam ONLY on the interior of the poured wall. It may be a little much for a garage or shop, but the details are similar as to the foam detail.
I can't answer for jason, but google *FPSF, it's where I got my information, and it works.
*frost protected shallow foundation
 

Attachments

  • DSCN8736.jpg
    DSCN8736.jpg
    275.1 KB · Views: 8
OP
M

MrModus

Member
Joined
Jul 5, 2021
Messages
9
This is a small (living space) addition I added and it was my first use of this "frost protected shallow foundation". Here in Maine the normal depth for frost footings is 4', this would have required me to have a foundation contractor with forms come in and pour footings, then set the form panels, pour and then strip them. I wanted to avoid this so I went this route.
this is my excavation
DSCN8279.jpg
The painted line ^^^ and the rebar outlines the finished size of the room (14x14). This overdig to the exterior is for the buried foam that is key in keeping the the cold from penetrating the slab and possibly end up heaving the building. Corners are recommended to extend further than walls. My depth under the surrounding grade is only 24".

I've had concrete form disasters before and I may have gone "overboard" with this form, but it didn't blow out.DSCN8286.jpg This was also when a 2x4 $2.
I dry stacked those 8" block to save concrete and allow for my under slab insuation to meet the vertical insulation with no funky angles to dig and remain in place surviving the concrete placement.
DSCN8289.jpeg
^^^ The shorter foam is to the interior where the under slab foam will sit in the edge for complete coverage. The foam against the form wood is 24" and is the actual form, the 'crete is poured directly against it. That's partially why the forms look so overdone, it's to support the foam board/concrete.
DSCN8307.jpg
^^ This is ready to pour. Notice the PT blocks fastened to the outside foam. Later they will get a PT 2x10 screwed to it covering the foam from the siding to the grade. Exposed foam was always a problem to disguise or cover otherwise. This works well in this close to grade situation.
The horizontal foam is already under that gravel that's there to help support the foam until it's set up.

DSCN8736.jpg
It was poured late November and I wasn't going to build the addition over the winter.
This pic was early April after spending the winter under a layer of hay covered with plastic and ready to build on. Notice the PT lumber, it's screwed to those blocks I cast into the concrete and will become the outside edge of the foundation. (walls & siding will "flush out" with this surface.

Like I said, this is living space and the slab has only a few degree difference from the interior using a infra red temp gun at it during very cold periods, much, much better than other areas of our building done with conventional 4' frost walls with foam ONLY on the interior of the poured wall. It may be a little much for a garage or shop, but the details are similar as to the foam detail.
I can't answer for jason, but google *FPSF, it's where I got my information, and it works.
*frost protected shallow foundation
That looks awesome. I've done a ton of FPSF reading and there is a LOT of varying, and in some cases conflicting info so my head is spinning a bit. I appreciate you guys sharing your knowledge.
 

jack stand

Well-known member
Joined
Feb 29, 2012
Messages
3,304
Location
Lakes Region Maine
The primary thing is to protect the "footer, thickened edge slab, ect" from the outside cold sucking all the ground heat and allowing damp soil to crystalize and freeze. I believe the rest of "it" is to save energy in your heated space, if that simplifies things any.
I put a very small slope in the horizontal (buried) foam away from the building thinking that any surface water (rain) that made it down through the 8-10" of dirt would be turned out, thinking that dry soil can't freeze much, but I'm not a scientist. My foam is at the bottom of the ditch (2') for simplicity digging.
Around here experienced builders all agree that an inch of foam is equal to a foot of earth cover in terms of frost.
 
OP
M

MrModus

Member
Joined
Jul 5, 2021
Messages
9
The primary thing is to protect the "footer, thickened edge slab, ect" from the outside cold sucking all the ground heat and allowing damp soil to crystalize and freeze. I believe the rest of "it" is to save energy in your heated space, if that simplifies things any.
I put a very small slope in the horizontal (buried) foam away from the building thinking that any surface water (rain) that made it down through the 8-10" of dirt would be turned out, thinking that dry soil can't freeze much, but I'm not a scientist. My foam is at the bottom of the ditch (2') for simplicity digging.
Around here experienced builders all agree that an inch of foam is equal to a foot of earth cover in terms of frost.
More great advice thank you. This forum is amazing.
 

jasondavidmann

Well-known member
Joined
Aug 16, 2009
Messages
162
Location
Manitoba, Canada
@jasondavidmann I checked out your build thread, looks awesome.

A few follow up questions, when you added the diagonal frost barrier to the outside, It looks like about 8" down with about a 30 degree slope. I'm assuming you did that after the pad was set? I'm also assuming I put the vertical edge piece up against the form before the pour, did you attach the PT board to the foam first and put that in the form as well? I was thinking I might use some 4" treated deck screws to screw the PT board through the foam to leave about 1.5" of thread hanging out the other side to get secured by the concrete. Was there any trick when you did the frost barrier part? Just dig down and grade it about 30 degrees then put dirt on top? Any concern of it shifting? Any tricks to get it to stay in place?

The only insulation that I’ve installed so far is under the 6” portion of the pad. I will add the vertical after I strip forms later this weekend. It will be attached with pressure treated plywood and Tapcon concrete screws.

The wing (horizontal) insulation will come later. The only reason I added slope to it is because I don’t want to run the vertical the full 18”. The vertical will be 12” and the wing is 4” thick, so it will be 2” above the bottom of the thickened edge.

I’m not concerned about it shifting other than maybe in front of the garage door. I will plan to dig that up at sometime when I pour a driveway. At that time I’ll put horizontal insulation under the driveway for a distance.
 

Mr onetwo

Well-known member
Joined
Apr 6, 2011
Messages
2,002
Location
Coastal Maine
if you can, do it in 2 separate pours...much easier to correctly layout tubing to within 6" of the perimeter.
 

Attachments

  • 9B476434-9100-454E-97FD-C511A537AE58.jpeg
    9B476434-9100-454E-97FD-C511A537AE58.jpeg
    494 KB · Views: 38
OP
M

MrModus

Member
Joined
Jul 5, 2021
Messages
9
if you can, do it in 2 separate pours...much easier to correctly layout tubing to within 6" of the perimeter.
I'm curious about the additional 2" xps there on the slope and under the thickened concrete. Is that recommended? Most of what I've seen doesn't insulation under the thickened portion. I'm not sure why.
 

Mr onetwo

Well-known member
Joined
Apr 6, 2011
Messages
2,002
Location
Coastal Maine
code required up here in Maine. If you are heating a slab you want to eliminate as many "cold bridges" as possible.The detailing on this type of slab is very fiddly. I did footings and stem walls on the new addition I am doing on my house right now. It matched the existing foundation and was much easier to insulate and detail.
 
To avoid these ads, REGISTER NOW!
Top Bottom