In my local Meijers store produce section there is rough surface textured black colored tile (VCT?) around the produce cases. I wonder if anyone knows what brand,type, cost, ease of installatio etc. this tile is? How would it hold up on a garage floor?


You are using an out of date browser. It may not display this or other websites correctly.
You should upgrade or use an alternative browser.
You should upgrade or use an alternative browser.
Floor Tile
- Thread starter blh
- Start date
Garage Flooring
ALLIANCE MEMBER
Have a look at this thread http://www.garagejournal.com/forum/showthread.php?t=154284
Thanks for the link. Two things come to mind that I don't think would affect the tile I am talking about. It has a sort of matte finish so I would not worry about a wax shine. Also since it is black with a little bit of flakes color in it I don't think stains from tires would be a consideration. My garage is insulated but not heated but even I the coldest weather the water I set out for the cat has never frozen.
Is it more like vinyl/rubber or more like stone/porcelain?
If it's VCT, I don't think you would want black in a garage for two reasons. One is that if you dropped anything on it, it's going to be very hard to see where it went. Two is that it will **** up light and make the place seem pretty dark.
But there are lots of VCT colors, including a lot of shades of gray. I think it's only the really light colors that have problems with tire stains.
It is rubbery looking tile so I am assuming it is VCT. I see your point about the dark color. I like the texture of the flooring because it has a textured finish. Since they use it around produce cases where the misters spray the produce I assume it would be somewhat skid resistance. I want a low upkeep product. My floor is so stained up I don't know if I could ever get it clean enough for epoxy
Ceramic or porcelain floor tile is pretty cheap. You can find porcelain tiles on sale at Lowe's for $1/sf. Floor tile is not slippery, and is stronger (in many ways) than the concrete it's sitting on. I put mine down on an 83-year-old slab that was oil-stained, uneven and ugly. This is a picture of the floor after I'd hit it with an $80 pressure washer and filled in some of the big problems with patching concrete.

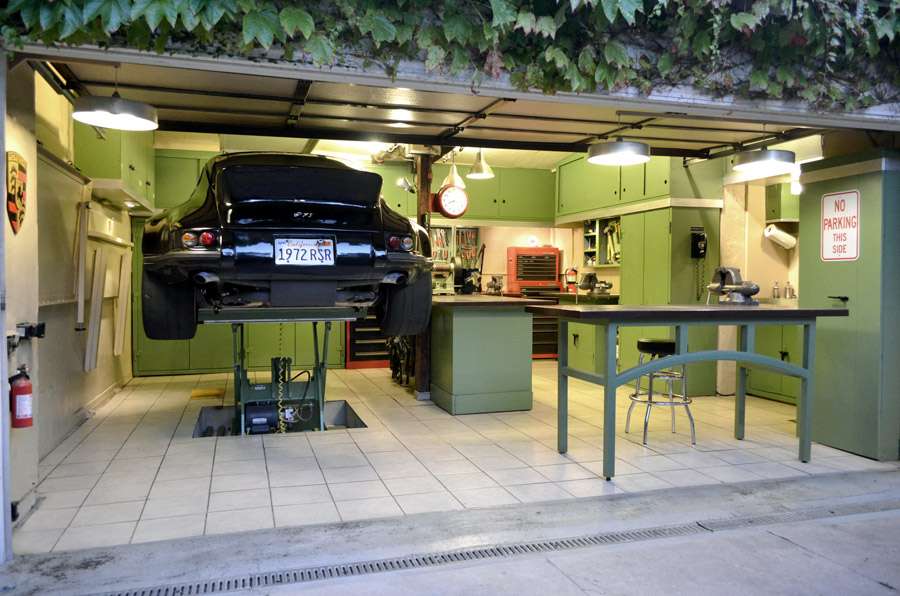
I used .59/sf ceramic tiles from Home Depot, and put it in myself (my first tile installation -- I only barely knew what I was doing). I've had the floor now for four years, and it's held up great. I've rolled engines over it, jacked cars up on it, dropped tools. In this picture, the car is sitting on top of the tiles that are on top of my lift.
It's very strong, because of the way the thinset adhesive was used. This is a quick clip of me hitting a tile with a four pound sledge hammer. Notice how the camera jumps from the impacts.
Last edited:
Stee6043
Well-known member
Jack, how did you handle the transition from the tile to your driveway? I assume you did something to "ramp" up?
MileHigh
Active member
Jack, what do you mean strong because of the way thinset was used? I see they have some cheap thinset at Lowes $10 for a 50lb bag, but I also saw higher end polymer thinset for 5x the price but says it holds up better to the weather etc... thoughts?
Did you fill your expansion joints with anything special or just the thin set?
Did you fill your expansion joints with anything special or just the thin set?
Last edited:
This was the first time I'd ever installed tile, so there are things that I would probably do differently if I did it again. I used the same vinyl patching concrete to create a bevel from the edge of the tiles to the concrete at the opening of the garage. There are bullnose tiles and also bullnose metal pieces that can do the same thing better. I used some concrete adhesive underneath where I did it, though, and it's held up surprisingly well.
In indoor/bathroom/kitchen type applications, the installer will typically dab an adhesive on for the sake of installation speed and also reducing the overall amount of adhesive or thinset that's being used. Since no one drives a truck through a bathroom, this is usually just fine. But it leaves open spaces under the tiles. Like concrete, tile is very strong in compression, but fairly brittle when you ask it to bridge over an open space. So if there are spaces underneath it, it will likely break. The better way to install in a garage or commercial setting is to 'double butter' the thinset, which means you apply it over the entire surface underneath where the tile will sit, and also apply it all the way across the underside of the tile itself. The trowel you use to make the thinset's thickness uniform cuts empty rows between lines of thinset, but applying it to both surfaces insures you'll have a very good percentage of coverage of thinset.
I used the basic thinset and basic sanded grout from Home Depot. I used a dark color for the grout so it would not show stains.
Jack, how did you handle the transition from the tile to your driveway? I assume you did something to "ramp" up?
I certainly won't answer for Jack, but on the tile floor project in my garage, there is really not much of a transition between the tile and the cement driveway. The tile ends just about where the garage doors come down and contact the driveway, so I could really not do much of a ramp in that area. But, what I have seems to work just fine .... (you can kinda see the darker markings where the seal on the bottom of the garage floor meets with the cement driveway slab)


Did you fill your expansion joints with anything special or just the thin set?
Again, I can't answer for Jack, but on my tile floor project, I just used "Ultraflex 1" thinset dry mortar from Lowes. With my 10% military discount, it cost me about $11.31 per 50 lb bag.
Did nothing about the existing expansion joints except to spead the mortar evenly over everything.

That looks pretty great!
When I finished my floor, my wife saw it and immediately suggested we turn the room into something other than a garage. I smiled, but then moved all the garage stuff back in that same afternoon.
When I finished my floor, my wife saw it and immediately suggested we turn the room into something other than a garage. I smiled, but then moved all the garage stuff back in that same afternoon.
marty_p
Well-known member
When I finished my floor, my wife saw it and immediately suggested we turn the room into something other than a garage. I smiled, but then moved all the garage stuff back in that same afternoon.
So Jack, how was it sleeping in your garage that night???

Hey, whatever it takes.So Jack, how was it sleeping in your garage that night???

carreradt, I used a basic notched trowel. I later learned that there are different styles of trowel for different coverage. But I just used the first one I saw on the shelf.
"So if there are spaces underneath it, it will likely break. The better way to install in a garage or commercial setting is to 'double butter' the thinset, which means you apply it over the entire surface underneath where the tile will sit, and also apply it all the way across the underside of the tile itself. The trowel you use to make the thinset's thickness uniform cuts empty rows between lines of thinset, but applying it to both surfaces insures you'll have a very good percentage of coverage of thinset."
How do you prevent the spaces with a notched trowel? Buttering the tile solves this?
How do you prevent the spaces with a notched trowel? Buttering the tile solves this?
Mike14k
Well-known member
I'm starting to think tile is a good thing. I see it at Home Depot in the .60 per / tile price.
My garage floor is only 6 years old, but had a couple coats of paint (Behr garage floor paint) that is flaking off in some places.
If I power wash the floor really well with a degreaser, do you think the tile will stick well enough ?? Or do I need to really scrape the paint off with a paint remover ??
Thoughts ???
Olyar15
Well-known member
"So if there are spaces underneath it, it will likely break. The better way to install in a garage or commercial setting is to 'double butter' the thinset, which means you apply it over the entire surface underneath where the tile will sit, and also apply it all the way across the underside of the tile itself. The trowel you use to make the thinset's thickness uniform cuts empty rows between lines of thinset, but applying it to both surfaces insures you'll have a very good percentage of coverage of thinset."
How do you prevent the spaces with a notched trowel? Buttering the tile solves this?
This video I think shows how the notched trowel works. While they don't back butter the tile, I think this would help ensure enough mortar is beneath the tile for even coverage.
JakeKohl
Well-known member
This video I think shows how the notched trowel works. While they don't back butter the tile, I think this would help ensure enough mortar is beneath the tile for even coverage.
Many trowels have a notched side and a flat side. Use the flat side to back-butter the tile and the notched side to apply to the floor. Notches come in various depths - read the application notes on the thinset for your floor type and size of the notches in the trowel needed. There is probably something to be said for matching tile type, floor type, and thinset type...but I couldn't say what that is!
I do know, however, that is important that the concrete floor be able to absorb water for the thinset to bond properly. If it has paint or sealer on it, it will not allow a good bond and probably won't hold up very well.
Zeke
Well-known member
I'm starting to think tile is a good thing. I see it at Home Depot in the .60 per / tile price.
My garage floor is only 6 years old, but had a couple coats of paint (Behr garage floor paint) that is flaking off in some places.
If I power wash the floor really well with a degreaser, do you think the tile will stick well enough ?? Or do I need to really scrape the paint off with a paint remover ??
Thoughts ???
Scrape what you can and seal the floor with the correct sealer (glue) that combines with the admix can can fortify your thinset with. That's how you handle a non porous surface.I do know, however, that is important that the concrete floor be able to absorb water for the thinset to bond properly. If it has paint or sealer on it, it will not allow a good bond and probably won't hold up very well.
MileHigh
Active member
Seems like my thread was hijacked from my question to a discussion of Jack's tile job.
Sorry kind of did. But it seems like you've already sold yourself on going the VCT route anyways. Your last statement/concern was over your concrete being too oily and stained for epoxy. The truth your surface as-is is probably not great then for adhesive, thinset or epoxy. If you rented a diamond grinder, I'm sure epoxy and ant-slip additive would work great.
I personally just decided on the tile route as it's must easier to do as a one man show and at my own pace. I found some awesome 12x24 3/8" thick PEI5 (1000lb rating) porcelain tile on CL for .48/sqft! Although I much rather would have had to unload a few gallon pails out of my truck instead of 3,000lb of tile but hey, the price was right!
ScaldedDog
Well-known member
I found some awesome 12x24 3/8" thick PEI5 (1000lb rating) porcelain tile on CL for .48/sqft! Although I much rather would have had to unload a few gallon pails out of my truck instead of 3,000lb of tile but hey, the price was right!
Hey man, I think you bought the tile I looked at. The guy had 1800sf and needed to get it out of his buddy's garage, right? I'm *really* anxious to see how it turns out. I wanted it - bad - but couldn't make the color work.
Mark
MileHigh
Active member
Do you have any pictures posted?
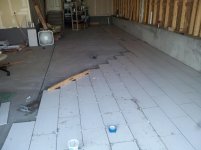
I haven't started the project yet, but I attached a picture of the tile. Just moved and still unpacking/hunting for tools.
Hey man, I think you bought the tile I looked at. The guy had 1800sf and needed to get it out of his buddy's garage, right? I'm *really* anxious to see how it turns out. I wanted it - bad - but couldn't make the color work.
Mark
YES! I wrote him close to when he first posted and he said it was all gone. Then he texted me two days later and said he had a little over 600sqft left. I wanted 1000 to do my laundry room too but at least it would be enough for the garage. Pain in the **** to load since "his buddy" had a non-running Camaro in the driveway so I couldn't just back up to the garage. Then I had a moving container in my driveway so I couldn't back in to mine. But it should turn out OK. What do you mean you couldn't make the color work? I'm going to do some dark pewter grout, gray cove base and probably paint the concrete footers gray to really bring it out. It does look a little beige sometimes.
Attachments

Last edited:
MileHigh
Active member
BLH, here's an updated picture with some of the tile down...
Any of you guys that have done ceramic/porcelain tile installs, what was your average pace of sqft/hr for setting? I feel like mine is taking forever, but it's getting there.
I have about 1/3 of the garage done. Going to stop soon and grout one side so I can move everything else over to it and get it out of the way.
Attachments
Dakota00
Well-known member
A quick suggestion, when laying after the tile is in place. Use a sponge and a bucket of water. Ring out the sponge and wash the thin-set off the tiles. Makes for such an easy job to clean and it looks better. Also cleaning the fresh thin-set between the joints, use a simple sharpen pencil, works great!!
As for pace, which really doesn't matter as you're doing the work yourself. Depending on the tiles, spacing in joints and the floors level. About 100-150sqft a day.
As for pace, which really doesn't matter as you're doing the work yourself. Depending on the tiles, spacing in joints and the floors level. About 100-150sqft a day.
Last edited:
Sorry about the detour, blh. Sometimes I talk too much.
Did you decide which way you were going to go with your floor?
(And not to detour again, but that looks awesome, Dakota!)
Did you decide which way you were going to go with your floor?
(And not to detour again, but that looks awesome, Dakota!)
Dakota00
Well-known member
Jack, I never sad anything bad about the quality of his work. Which looks great! I'm just trying to give him a few tips to make his life easier to clean the joints and tiles.
MileHigh
Active member
Dakota, thanks for the tips. The pic was taken mid day, I usually give the tiles a quick wipe down when I get the water bucket out to clean my tools each day. Ive never heard of the pencil trick, I just always drag the spacers through the joints to clear them out.
Its going really slow with the floor being so uneven and using the larger tiles. Ive also had to go back and pop a few out that slid a little overnight, but only when I didnt mix the mud quite right. Im hoping to make some real progress this weekend though.
Its going really slow with the floor being so uneven and using the larger tiles. Ive also had to go back and pop a few out that slid a little overnight, but only when I didnt mix the mud quite right. Im hoping to make some real progress this weekend though.
Dakota00
Well-known member
MileHigh,
Another tip(s) dude, when you're done laying for the day. Clean the edge of the last row(s) of fresh tiles and place something straight like a 2x4 or straight edge on the edge of the tiles. Place 2 or 3 boxes of tiles resting against or on the 2x4, this will hold the tiles in place so they don't move overnight. Next morning remove boxes of tiles, remove the 2x4 on the edge of the tiles clean 2x4 if you need later.
Keeps everything nice and straight for the next morning!!
Also it would be better and easier to finish off one row at a time, instead of doing a section at a time. When ever you need a 2x4 or straight edge to hold the fresh tiles in place while working along the row use it. It's a big help!!!
Don't forget to add a little weight on top of the straight edge if needed