To avoid these ads, REGISTER NOW!

Folding Welding Table Build

quadrcr87

Well-known member
Joined
Jul 5, 2013
Messages
1,036
Location
Travelers Rest, SC
Some of you may have seen my post in the welding projects thread already but I decided to make a build thread as well.
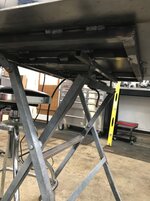
Project Plan:
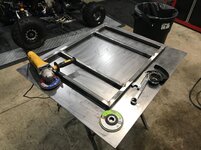
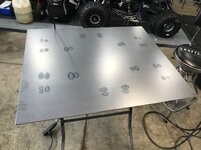
36” x 30” 3/16” steel top
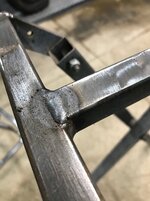
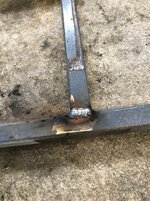
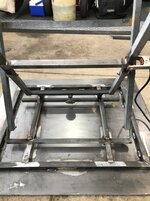
1” .1875 tubing frame
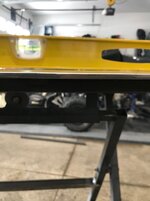
4” lip on perimeter for easy clamping
Folding design to clear floor space when not in use
Reasonably portable to move around garage
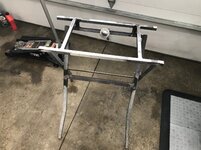
Utilize old chop saw stand

The welder: Lincoln Pro Mig 140 w/ HF stand
.025 solid wire and 75/25 mix gas
f597ccd83f798445a74f5b74bc77898a.jpg

The old Hitachi saw base as a starting point
1f1b31d4cf99462eae108a8d01e60e32.jpg
3b633e30e435b2ef65b5c5b1e22f65ca.jpg


Sent from my iPhone using Tapatalk
 

Attachments

  • f597ccd83f798445a74f5b74bc77898a.jpg
    f597ccd83f798445a74f5b74bc77898a.jpg
    271.9 KB · Views: 2
  • 3b633e30e435b2ef65b5c5b1e22f65ca.jpg
    3b633e30e435b2ef65b5c5b1e22f65ca.jpg
    264.2 KB · Views: 3
  • 1f1b31d4cf99462eae108a8d01e60e32.jpg
    1f1b31d4cf99462eae108a8d01e60e32.jpg
    296.3 KB · Views: 4
To avoid these ads, REGISTER NOW!
OP
Q

quadrcr87

Well-known member
Joined
Jul 5, 2013
Messages
1,036
Location
Travelers Rest, SC
Fist step was to finish welding some joints that they missed in manufacturing. A good opportunity to practice my welding since it’s been a few years since I used gas and not flux core.
2ac5f4da669f8689d3a3b013cd577ef3.jpg
da0167b7bd4d4d18e28d288b10e36ca3.jpg

3b8618e7ac8b932982d9de1bb5cd12ea.jpg

Next I added a 1” tube to support the legs. The opposite side already had a strap to allow it to clear when collapsed.
b8258825a58a47821b2f8eb8559dfd80.jpg
0038d076f61ce64703b96dbf99cbd6ee.jpg


Sent from my iPhone using Tapatalk
 

Attachments

  • 2ac5f4da669f8689d3a3b013cd577ef3.jpg
    2ac5f4da669f8689d3a3b013cd577ef3.jpg
    327.9 KB · Views: 0
  • 0038d076f61ce64703b96dbf99cbd6ee.jpg
    0038d076f61ce64703b96dbf99cbd6ee.jpg
    150.4 KB · Views: 0
  • b8258825a58a47821b2f8eb8559dfd80.jpg
    b8258825a58a47821b2f8eb8559dfd80.jpg
    250 KB · Views: 1
  • 3b8618e7ac8b932982d9de1bb5cd12ea.jpg
    3b8618e7ac8b932982d9de1bb5cd12ea.jpg
    197.2 KB · Views: 0
  • da0167b7bd4d4d18e28d288b10e36ca3.jpg
    da0167b7bd4d4d18e28d288b10e36ca3.jpg
    375.5 KB · Views: 0
OP
Q

quadrcr87

Well-known member
Joined
Jul 5, 2013
Messages
1,036
Location
Travelers Rest, SC
Set the 3’ x 4’ plate on top to layout my cut. I was happy to find that the table was very stable even at this size!
cb70f9cd74e73e6933c6ecb58e6a5323.jpg
Wishing I had a plasma cutter I attacked it with a Dewalt angle grinder with a cut off disk. It took a full disk but it got it done.
71b6bfe912a40402c2bb70477a64a24e.jpg
Next up was cutting a 45* miter in the 1” tubing. Wishing I had a chop saw but the cut off disk got it done. I tried the sawsall but was struggling to keep the blade square. I'm sensing a theme here...need more tools. I see a dry cut saw in my future.
32baf94660091f93f2690add0e600779.jpg

After a process of cutting/grinding/fitting/welding it started to take shape. I spaced the center supports at the same width as my folding table frame. This way the tubes will lay parallel and I can just weld the seam. First ill attach it to the table top.
6bba867abded941c61934e578a980675.jpg
33f1208779fcd899817666f5b139df18.jpg
Drilled some small vent holes before closing it up
23c651bab326f255145a8be2e4ee5117.jpg
610a9e2c9445e56a466e1b663e9534d5.jpg
I ground the welds on 1 side flush to mate up to the top plate. I can see a little bow in the top but it’s close enough for my work. Haha
3ebb5c70a4274d719d4d99d7f76b4c2e.jpg


Sent from my iPhone using Tapatalk
 

Attachments

  • cb70f9cd74e73e6933c6ecb58e6a5323.jpg
    cb70f9cd74e73e6933c6ecb58e6a5323.jpg
    284.1 KB · Views: 0
  • 32baf94660091f93f2690add0e600779.jpg
    32baf94660091f93f2690add0e600779.jpg
    227.6 KB · Views: 0
  • 33f1208779fcd899817666f5b139df18.jpg
    33f1208779fcd899817666f5b139df18.jpg
    189.2 KB · Views: 0
  • 23c651bab326f255145a8be2e4ee5117.jpg
    23c651bab326f255145a8be2e4ee5117.jpg
    208.6 KB · Views: 0
  • 610a9e2c9445e56a466e1b663e9534d5.jpg
    610a9e2c9445e56a466e1b663e9534d5.jpg
    167 KB · Views: 0
  • 3ebb5c70a4274d719d4d99d7f76b4c2e.jpg
    3ebb5c70a4274d719d4d99d7f76b4c2e.jpg
    256.6 KB · Views: 0
  • 6bba867abded941c61934e578a980675.jpg
    6bba867abded941c61934e578a980675.jpg
    236.9 KB · Views: 0
  • 71b6bfe912a40402c2bb70477a64a24e.jpg
    71b6bfe912a40402c2bb70477a64a24e.jpg
    233.2 KB · Views: 0
Last edited:
OP
Q

quadrcr87

Well-known member
Joined
Jul 5, 2013
Messages
1,036
Location
Travelers Rest, SC
Now onto the fun part welding the top to the support frame. I made the frame and solid enough that I can remove it from the folding frame in case I decide to make it a fixed table by building a new base later on.

25978fcd3089def850ea9641040c98f1.jpg
I need to pick up some more clamps. I'm thinking the vice grip style with the long throat to get closer to the center of the table.

de4ca70d1e4039a7a3d0d177cd351a2c.jpg
9993561d4784758adfa8e7d6bcfe9805.jpg
71bd998f618c25761b4b250c33104977.jpg
It looks like I got plenty of heat in the welds but my welds were not consistent in size. I decided it was unnecessary to measure and mark the length of each bead so I went for it.
f61394583d690dcf0a665fb8882b63dc.jpg
As you can see despite my efforts in clamping I have a slight dip in the center of the plate.
52c56f6861860cc8775a3dd50d578e56.jpg


Sent from my iPhone using Tapatalk
 

Attachments

  • 25978fcd3089def850ea9641040c98f1.jpg
    25978fcd3089def850ea9641040c98f1.jpg
    258.9 KB · Views: 0
  • de4ca70d1e4039a7a3d0d177cd351a2c.jpg
    de4ca70d1e4039a7a3d0d177cd351a2c.jpg
    174.6 KB · Views: 0
  • 9993561d4784758adfa8e7d6bcfe9805.jpg
    9993561d4784758adfa8e7d6bcfe9805.jpg
    252.8 KB · Views: 0
  • 71bd998f618c25761b4b250c33104977.jpg
    71bd998f618c25761b4b250c33104977.jpg
    200.2 KB · Views: 0
  • f61394583d690dcf0a665fb8882b63dc.jpg
    f61394583d690dcf0a665fb8882b63dc.jpg
    225.6 KB · Views: 0
  • 52c56f6861860cc8775a3dd50d578e56.jpg
    52c56f6861860cc8775a3dd50d578e56.jpg
    131.9 KB · Views: 0
Last edited:
OP
Q

quadrcr87

Well-known member
Joined
Jul 5, 2013
Messages
1,036
Location
Travelers Rest, SC
To finish up the welding and attach to the base I had to lay it on the ground and set the folding frame on top.
fa71a82ebdab2de45f77bfc74f33d520.jpg
Welding the tubes together
57ff50e81b93d50f010e16b68ba16c7e.jpg
46e0a867bd76b3b1f484b24081f07e41.jpg
Folded up as one unified table. It’s a beast but it is portable. Just watch your toes when you lay it down to fold up!
f9505cba9247f99fb294eb80a7eae9a2.jpg
4f23dff96efc80fad30fbf8e3e8edeb0.jpg
All finished and ready for some welding projects. I still plan to put a coat of black paint on the legs and bottom. I may even add some adjustable feet if I’m feeling crazy.
1e623f370e0b5b7df780ec0c9b0d9955.jpg
1a119632f725aaa3aa898e640ac18f77.jpg


Sent from my iPhone using Tapatalk
 

Attachments

  • fa71a82ebdab2de45f77bfc74f33d520.jpg
    fa71a82ebdab2de45f77bfc74f33d520.jpg
    263.5 KB · Views: 2
  • 1e623f370e0b5b7df780ec0c9b0d9955.jpg
    1e623f370e0b5b7df780ec0c9b0d9955.jpg
    219.3 KB · Views: 0
  • 57ff50e81b93d50f010e16b68ba16c7e.jpg
    57ff50e81b93d50f010e16b68ba16c7e.jpg
    187.7 KB · Views: 0
  • 46e0a867bd76b3b1f484b24081f07e41.jpg
    46e0a867bd76b3b1f484b24081f07e41.jpg
    254.2 KB · Views: 0
  • f9505cba9247f99fb294eb80a7eae9a2.jpg
    f9505cba9247f99fb294eb80a7eae9a2.jpg
    272.6 KB · Views: 0
  • 4f23dff96efc80fad30fbf8e3e8edeb0.jpg
    4f23dff96efc80fad30fbf8e3e8edeb0.jpg
    276 KB · Views: 0
  • 1a119632f725aaa3aa898e640ac18f77.jpg
    1a119632f725aaa3aa898e640ac18f77.jpg
    230 KB · Views: 2

Kaizen

Well-known member
Joined
Jan 9, 2015
Messages
6,948
Location
New England
Nice build. How does the folding work out? Do you have to put it on the side and then fold?


Sent from my iPhone using Tapatalk
 
OP
Q

quadrcr87

Well-known member
Joined
Jul 5, 2013
Messages
1,036
Location
Travelers Rest, SC
Nice build. How does the folding work out? Do you have to put it on the side and then fold?
It folds up really easy but I do need to lay it on its side first. I tried to collapse it from the standing position and the top is just too heavy to do it safe and keep all 10 fingers. The threaded clamp that holds it when setup is really solid. I may add something to hold it when collapsed as well.


Nice project to share with the membership.

But you know the rules that each new project requires at least one new tool to complete it. ( or three or four)

Don't worry I followed the rules and bought some new tools! I just underestimated how many I needed.
lol.gif

attachment.php
 
Last edited:
To avoid these ads, REGISTER NOW!

FallibleFlyer

Well-known member
Joined
Nov 18, 2011
Messages
159
Location
Arizona
Very cool table! I had been debating making a folding table for a few years just never got to it in time :) Interested to see how it holds up after some use. Nice clean work btw
 

larry4406

Well-known member
Joined
Jan 27, 2006
Messages
19,325
Location
Northern Virginia
Nice job!

What is the round disc with threaded stud welded to it?

Maybe add some rollers to the edge so you can push it like a wheelbarrow while folded.
 

Stooge

Well-known member
Joined
Mar 24, 2013
Messages
3,533
Location
South Shore, MA
Nice job,I like it! And I want one!

Though I feel like this is the type of project I would have a measurement slightly off somewhere and it would just be a wobbling, rickety mess
 
OP
Q

quadrcr87

Well-known member
Joined
Jul 5, 2013
Messages
1,036
Location
Travelers Rest, SC
man, same welder and cart ...now i'll need to build one of these too :beer:
So far the welder has worked out very well. I bought it from a pawn shop in brand new condition and saved a bunch.

Very cool table! I had been debating making a folding table for a few years just never got to it in time :) Interested to see how it holds up after some use. Nice clean work btw
Thanks, I expect it to hold up well. You will see it put to use in future projects.

Nice job!

What is the round disc with threaded stud welded to it?

Maybe add some rollers to the edge so you can push it like a wheelbarrow while folded.
The round disk is actually the knob that you tighten down to lock the table when it is setup. It threads into a block of steel and the treaded rod clamps down on the tube when it is saddled against the angle iron piece. I thought about wheels but it's easy enough to carry that I don't think I'll add any. I may add a handle at the balance point though.

What’s up with the “vent” holes? What’s the purpose? Nice by the way

The vent holes are drilled in any tube that will be fully welded on both ends. It gives the pressure and gas inside the tube a place to escape to prevent a blow out on your final weld closing in the tube. Probably not necessary on my ugly welds but it's something I've learned to do along the way.

Nice job,I like it! And I want one!

Though I feel like this is the type of project I would have a measurement slightly off somewhere and it would just be a wobbling, rickety mess

The easiest way to start it to find an old saw base like I did. The new saws use much lighter aluminum stands most of the time so you can probably find the old heavy steel ones cheap. Maybe a garage sale or craigslist.
 
Last edited:

audioworks04

Well-known member
Joined
Oct 6, 2015
Messages
141
Location
Olathe KS
This is a great idea, sold my large very heavy welding table when I moved due to lack of space at the new house and have missed it ever sense. Even have a brand new stand that would be perfect for this. Thank you!
 
OP
Q

quadrcr87

Well-known member
Joined
Jul 5, 2013
Messages
1,036
Location
Travelers Rest, SC
I am reviving my thread from the dead as I have finally painted the table. It has served me very well and I am still really liking the design. I rarely collapse the table but it is nice when I need the space to work on my truck. I find myself using this table for multiple things in addition to welding. The only shortcoming that it has is that the surface is not perfectly flat. This makes welding up large frames a challenge but I wouldn’t want to add weight with a thicker top.

Just cleaned it up with a quick wire wheel. I was surprised it hadn’t really rusted much in the Midwest humidity.
IMG_6232.jpg
Self etching primer
IMG_6233.jpg
Final coat was a grey hammer tone from rustoleum
IMG_6235.jpg
I can finally say this thing is finished and it matches my new workbench frame
IMG_6251.jpg
Here is the workbench I just completed this week. The full build thread is in my sig below.
IMG_6189.jpg

While I had the paint out I cleaned up and painted my welding tool rack. I designed this to be able to mount to the welder cart or the welding table. I find it spends 99% of its time on the welder.
IMG_6247.jpg
IMG_6249.jpg

Thanks for following along!


Sent from my iPhone using Garage Journal
 
To avoid these ads, REGISTER NOW!
Top Bottom