To avoid these ads, REGISTER NOW!

Forgotten Unisaw Project

187 speed

Active member
Joined
Mar 25, 2014
Messages
34
Location
Central Illinois
So this is my first "build thread" here on the Garage Journal. I am hoping to make it as informative and entertaining as I can and hopefully it will be fairly quick from start to finish.

A little background on this adventure and the saw to set the stage. I had been away from the GJ for awhile but was brought back knowing I was getting ready to embark on the garage remodel in my new home (well 3 year old home). So when I came back it was around the time Ryan posted his article and video on his Unisaw project. I am drawn to vintage tools especially those tools I have a use for. I was so fascinated by the Unisaw story and how well Ryan's turned out I just had to have one for myself...for my garage remodel you know.

I began looking on Craigslist and Facebook marketplace only to find everything way to far away and priced at the cringe point. I work swing shift as an operating engineer (control room operator) at a power plant so I was sitting at work at 2am just browsing the latest listings on Facebook marketplace and there it was a 1947 Delta Unisaw "project or parts". I couldn't hardly believe it from the pictures, everything looked brand new except the top and it was only $200. I immediately messaged the guy knowing I wouldn't hear back until the next day at the earliest. I got back a message while I was sleeping that next day with more details of the saw. It had been a project of a friend of his father who had been in the middle of restoring it when he passed away. This guy bought all of the contents of the garage for a couple of items and was selling off the rest. It didn't have a motor, motor cover or any wiring and the top was pitted but the rest of the machine looked like it was fresh out of the factory. I made the deal and recruited a buddy of mine to help haul it home in the middle of a terrible rain storm. Fast forward about a month, I finally finished up the sheet metal work on a 70 Chevelle 396SS for a friend and have room to get this saw put together. I ordered a mobile base kit, a motor pulley and on the advice of an electrician friend I sourced an original 3 phase bullet motor and a VFD.

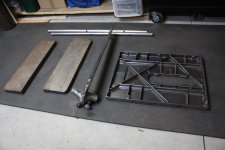
Parts just started arriving today so I kinda laid everything out to piece it together in my mind. I still need to source hardware and wiring for it but I will do that locally next week. Like I said I am starting my garage remodel so these to projects are getting planned at the same time. My next days off are Wednesday and Thursday of next week so hopefully I can have the saw assembled and running by Thursday sometime.
 

Attachments

  • IMG_1127.jpg
    IMG_1127.jpg
    68.9 KB · Views: 265
  • IMG_1130.jpg
    IMG_1130.jpg
    153.5 KB · Views: 232
  • IMG_1131.jpg
    IMG_1131.jpg
    149.1 KB · Views: 210
  • IMG_1133.jpg
    IMG_1133.jpg
    146.9 KB · Views: 212
  • IMG_1135.jpg
    IMG_1135.jpg
    119.4 KB · Views: 187
To avoid these ads, REGISTER NOW!

JVB

Well-known member
Joined
Feb 27, 2014
Messages
742
Location
N.W. PA
Nice pick up . I tossed around the idea of buying an older unisaw. At this point in life with 3 kids under 8, I do not have the time to invest in a build. I am lucky to get a few hours here and there in the garage. I ended up with a newer cabinet saw of lesser quality (IMO) but it works well. Looks like you have a solid base to get you going. Best of luck on your project, I am sure it will turn out great.
 
OP
1

187 speed

Active member
Joined
Mar 25, 2014
Messages
34
Location
Central Illinois
Just curious, why 3 phase?

You will have to excuse me as I am still learning about cabinet saws and especially the Unisaw. My electrician friend (who also is a hobby wood worker) explained that the motor would be cheaper (which it was) because they are less desired, it would be built more robust thus lasting much longer and paired with the VFD would allow for soft start, variable speed and smoother operation. All of those points made sense to me and I was able to find very easily a 3HP 3 phase motor that originally came on a Rockwell/Delta Unisaw so the originality of it is also kind of neat to me.
 
OP
1

187 speed

Active member
Joined
Mar 25, 2014
Messages
34
Location
Central Illinois
Nice pick up . I tossed around the idea of buying an older unisaw. At this point in life with 3 kids under 8, I do not have the time to invest in a build. I am lucky to get a few hours here and there in the garage. I ended up with a newer cabinet saw of lesser quality (IMO) but it works well. Looks like you have a solid base to get you going. Best of luck on your project, I am sure it will turn out great.

I know how involving kids can be, I have a son and between work and his sports it is pretty taxing I can't imagine 3 young ones!! Admittedly I probably should not have taken on this project since I already have so much going on but luckily I am able to justify throwing money at this and I have come to realize thats how projects are knocked out fast.
 
OP
1

187 speed

Active member
Joined
Mar 25, 2014
Messages
34
Location
Central Illinois
Well I stopped by the Lumber store on my way home from work and picked up a piece of 3/4" birch plywood so I could get the mobile base put together. I am sure some of you are wondering why I went with this particular mobile base over an all steel version. The reason why is because I eventually plan on building a cabinet under the saw for storage and hopefully a router lift and wanted to be able to utilize the same mobile base.

IMG_1141.jpg

It was a pretty simple process with decent instructions. Cut the plywood to size, set the brackets on the wood and mark the holes.

IMG_1142.jpg

It did call for a 1/2" drill bit for the mounting holes which was weird because of the size of screw that was used. I opted for a 3/8" instead and just made sure I was precise with my holes.

IMG_1144.jpg

Admittedly I messed up on one of the screws and started it a bit crooked which in turn stripped the threads a bit. Luckily the kit came with two different length screws so you can double up the wood. I had to grab a tap real quick and clean the threads up, screwed in the longer one and then trimmed it off to match the length of the others.

IMG_1150.jpg

I know a doctor who restored a plane bolt by bolt by himself, I asked him how he completed such a massive task. He told me that he simply completed something everyday, some days that took five minutes some days it took fifteen hours but something was checked off the list each day. I plan on keeping this approach on this saw project and my garage project. Tomorrows plan is to pick up some bolts for the top at the hardware store on the way home and try to get it installed on the cabinet before my wife gets home from yoga. :thumbup:
 

JVB

Well-known member
Joined
Feb 27, 2014
Messages
742
Location
N.W. PA
Progress is progress, good work on the base. Curious to see the shape of the main top.
 
OP
1

187 speed

Active member
Joined
Mar 25, 2014
Messages
34
Location
Central Illinois
Progress is progress, good work on the base. Curious to see the shape of the main top.

Thanks the base was a simple project but pretty happy with how it rolls and locks down. The top is pretty rough, I am going to attempt to sand it down and finish it with my Eastwood SCT tool then wax it. If I am not happy with the results I will start looking for another top, I have seen several for sale but want to try to save this one first.
 

Max

ALLIANCE MEMBER
Joined
Jun 16, 2018
Messages
3,325
Location
Georgia
Congrats on your project. I have an 80s unisaw and I love it.

Sanding the top is a very last resort. The top needs to be flat more than it needs to be solid. (Note that many saws have extension wings that are a grid with holes in them.). I’d try chemicals or electrolosis to get the rust out, clean/wax it, and use it.

Ignoring the visual aspects, all the top needs to be is flat and have wood slide well over it. Once you sand it is never flat again, unless you have a friend with a surface grinder...

Max
 
OP
1

187 speed

Active member
Joined
Mar 25, 2014
Messages
34
Location
Central Illinois
Congrats on your project. I have an 80s unisaw and I love it.

Sanding the top is a very last resort. The top needs to be flat more than it needs to be solid. (Note that many saws have extension wings that are a grid with holes in them.). I’d try chemicals or electrolosis to get the rust out, clean/wax it, and use it.

Ignoring the visual aspects, all the top needs to be is flat and have wood slide well over it. Once you sand it is never flat again, unless you have a friend with a surface grinder...

Max

Thanks I am really looking forward to using this when its done. I have remodeled three houses and built lots of cabinetry with a circular saw, a router and a saw guide so it will be a real treat to have some proper tools for once.

The surface rust is completely removed from the top I simply want to smooth the edges of the pits, I am going to use fine sand paper on an orbital and just smooth it up and hopefully not create an uneven surface then finish it off with pretty much a polished surface using the fine finishing pad on the SCT tool. I have a feeling I will be searching for a top in the future but I am going to do my best to use this one for awhile. s
 

guy48065

Well-known member
Joined
Aug 12, 2012
Messages
637
Location
Calibration Lab
Mind if I ask what that motor set you back? I have a 1957 Delta shaper with the enormous 1HP single phase and intend to replace it with a 3P so I can use a VFD for variable speed, braking and reversing in one small package.
 

Maui

Well-known member
Joined
Sep 16, 2012
Messages
2,863
Location
Upstate NY
Rather than going at it with an orbital sander there is a better way to touch up that top that should do a decent job of keeping it flat too. If you have a very flat work table or other flat reference surface (a granite surface plate is ideal here but most people don't have one) what you can do is to lay down a full sheet (or more) of very find grit wet sanding paper on that surface. Think of the wet sand paper used in automotive body work. Make sure you wet down the back side of the paper before you lay it down onto your reference surface. No adhesive is typically needed to bond the paper to the flat reference surface using this technique. The water alone should do the trick. Once the sand paper is down, push on the surface to squeeze any extra water out from beneath it and absorb it with a paper towel. This will form enough of a bond with the table surface so that it shouldn't move. Now lightly wet the top of the sand paper. Take the table saw top and flip it upside down so that you are placing the surface you want to smooth in contact with the fine grit sand paper. Pass the top over the sandpaper in a figure 8 pattern, being very careful to not press down with any force. The weight of the top alone will be more than enough. You want to use a light touch here, and you may have to actually lift up on the table a little bit. I've done this before with cast iron tables that were excessively rusty, and it works beautifully when done correctly. You may need to practice a little on a scrap part to figure out how to get it right. But once you do, it works great! And clean up is a snap. Just lift up the sand paper off of the table and wipe everything off.
 
OP
1

187 speed

Active member
Joined
Mar 25, 2014
Messages
34
Location
Central Illinois
Mind if I ask what that motor set you back? I have a 1957 Delta shaper with the enormous 1HP single phase and intend to replace it with a 3P so I can use a VFD for variable speed, braking and reversing in one small package.

I found it for $200 on ebay plus $65 shipping. It had been bench tested and guaranteed to work.

Rather than going at it with an orbital sander there is a better way to touch up that top that should do a decent job of keeping it flat too. If you have a very flat work table or other flat reference surface (a granite surface plate is ideal here but most people don't have one) what you can do is to lay down a full sheet (or more) of very find grit wet sanding paper on that surface. Think of the wet sand paper used in automotive body work. Make sure you wet down the back side of the paper before you lay it down onto your reference surface. No adhesive is typically needed to bond the paper to the flat reference surface using this technique. The water alone should do the trick. Once the sand paper is down, push on the surface to squeeze any extra water out from beneath it and absorb it with a paper towel. This will form enough of a bond with the table surface so that it shouldn't move. Now lightly wet the top of the sand paper. Take the table saw top and flip it upside down so that you are placing the surface you want to smooth in contact with the fine grit sand paper. Pass the top over the sandpaper in a figure 8 pattern, being very careful to not press down with any force. The weight of the top alone will be more than enough. You want to use a light touch here, and you may have to actually lift up on the table a little bit. I've done this before with cast iron tables that were excessively rusty, and it works beautifully when done correctly. You may need to practice a little on a scrap part to figure out how to get it right. But once you do, it works great! And clean up is a snap. Just lift up the sand paper off of the table and wipe everything off.

Thank you for the suggestion, I know the method you are referring to pretty well. I was a machinist/millwright in a past life and would finish certain surfaces on a granite table like that. I wish I had a machined tabletop or surface stone but don't. I'm not going to do much on the top just run across it really. I may just use a scotch bright pad and some oil and see what that does first.
 
To avoid these ads, REGISTER NOW!
OP
1

187 speed

Active member
Joined
Mar 25, 2014
Messages
34
Location
Central Illinois
Tonight is going to be a short post because of a very early start time at work tomorrow but I promise I made some good progress on the saw. First thing was to get the holes tapped out from the paint especially since these are fine threaded bolts.

IMG_1158.jpg

After that I got the top and wings bolted on, bolting those wings on by yourself can be tricky, not really heavy not really awkward but just enough of both to pull out a few four letter words.

IMG_1164.jpg

Once it was all bolted together I realized just how bad the top was, I will be looking to either replace the top in the future or have it surface ground. So tonight I soaked it in WD40 scrubbed it with a green scotch bright pad and cleaned it with break clean.

IMG_1165.jpg

I wasn't super happy with how that turned out so i soaked it again and broke out the SCT tool with the red scotch bright finishing drum. I placed little to no pressure on it and moved fast and even. It did a much better job of cleaning the top up.

IMG_1171.jpg

Once it was all wiped down and looked as good as its going to get I decided I needed to protect it. I thought I had some furniture wax but apparently it got tossed. I decided to try out Colonite 845 on it, it is the slickest wax I've ever used and I know it has industrial applications.This is a thick paste wax that needs to be turned to liquid to apply evenly. I warmed up the bottle by placing it in my favorite beer cup full of hot water until it turned to liquid.

IMG_1177.jpg
IMG_1179.jpg

Like any other wax I applied it with a microfiber applicator, waited for it to dry then removed it. I put two coats on for good measure so I will check and see how slick it is tomorrow after its fully cured.

IMG_1181.jpg

I did get a couple other small parts completed but I will save those for tomorrow when hopefully I have a little more time to write. I know that my method of cleaning and treating the top is probably somewhat controversial but I promise it is pretty trashed and I will find a better solution in the future. Thanks again for all of the feedback, suggestions and encouragement too guys. I really do appreciate all of the interaction.
 

Slupie

Well-known member
Joined
Dec 19, 2010
Messages
162
Location
Bartlett, IL
Tonight is going to be a short post because of a very early start time at work tomorrow but I promise I made some good progress on the saw. First thing was to get the holes tapped out from the paint especially since these are fine threaded bolts.

IMG_1158.jpg

After that I got the top and wings bolted on, bolting those wings on by yourself can be tricky, not really heavy not really awkward but just enough of both to pull out a few four letter words.

IMG_1164.jpg

Once it was all bolted together I realized just how bad the top was, I will be looking to either replace the top in the future or have it surface ground. So tonight I soaked it in WD40 scrubbed it with a green scotch bright pad and cleaned it with break clean.

IMG_1165.jpg

I wasn't super happy with how that turned out so i soaked it again and broke out the SCT tool with the red scotch bright finishing drum. I placed little to no pressure on it and moved fast and even. It did a much better job of cleaning the top up.

IMG_1171.jpg

Once it was all wiped down and looked as good as its going to get I decided I needed to protect it. I thought I had some furniture wax but apparently it got tossed. I decided to try out Colonite 845 on it, it is the slickest wax I've ever used and I know it has industrial applications.This is a thick paste wax that needs to be turned to liquid to apply evenly. I warmed up the bottle by placing it in my favorite beer cup full of hot water until it turned to liquid.

IMG_1177.jpg
IMG_1179.jpg

Like any other wax I applied it with a microfiber applicator, waited for it to dry then removed it. I put two coats on for good measure so I will check and see how slick it is tomorrow after its fully cured.

IMG_1181.jpg

I did get a couple other small parts completed but I will save those for tomorrow when hopefully I have a little more time to write. I know that my method of cleaning and treating the top is probably somewhat controversial but I promise it is pretty trashed and I will find a better solution in the future. Thanks again for all of the feedback, suggestions and encouragement too guys. I really do appreciate all of the interaction.

Great score on the Uni. I have bought a PM 66 years ago and did partial restoration on it. Clean up the top the best you can and use the heck of it.
My PM 66 top has some pitting, scuffs and wear grooves but it doesn't affect the performance of the saw.

Look at the composition/contents of the wax you used. It might transfer to wood during cutting and you might have finishing issues. Cast iron is porous so the wax will embed into it. On my PM 66 I use SC Johnson Paste Wax (yellow can), can is less than $10 and lasts awful long time. When I store the saw for longer period of time I put nice even coat on and leave it without buffing. Five minutes of buffing before use and it is ready to go.
 

guy48065

Well-known member
Joined
Aug 12, 2012
Messages
637
Location
Calibration Lab
I would be tempted to bolt the wings on & take the top to be surface ground. But only IF the top could be improved satisfactorily without thinning the miter gage slots & insert pocket.

Pretty sure only a few thousandths can be removed before the accessories wouldn't fit.
 

kenc184

Well-known member
Joined
Feb 25, 2012
Messages
718
Location
Nor Cal
I have a 1950 with the original 1HP bullet repulsion-induction motor and it's my vague recollection that the later unisaw motors require you to hack the cabinet opening somewhat in order for it to clear on tilt. Wish I could be more definitive on that, but I have seen Unis with the later style motor and the cabinet modified in a non beautiful way.
 

shoot summ

Well-known member
Joined
Jun 8, 2010
Messages
2,952
I think you are chasing a rainbow on grinding the top. Expensive to do, little real benefit other than looks(I get it), and the risk of affecting the miter slots, and throat plate.

If it has deep pits fill it with JB Weld and smooth it out. Once you use it for a few years you will forget about the small spots you filled.

I've used car wax for decades on my saw top with no issue in regards to finishing.

I'm in the midst of a Unisaw build myself, will have to start a thread on it, made a custom mobile base using a modified pallet jack head for the lift.
 
OP
1

187 speed

Active member
Joined
Mar 25, 2014
Messages
34
Location
Central Illinois
Great score on the Uni. I have bought a PM 66 years ago and did partial restoration on it. Clean up the top the best you can and use the heck of it.
My PM 66 top has some pitting, scuffs and wear grooves but it doesn't affect the performance of the saw.


Look at the composition/contents of the wax you used. It might transfer to wood during cutting and you might have finishing issues. Cast iron is porous so the wax will embed into it. On my PM 66 I use SC Johnson Paste Wax (yellow can), can is less than $10 and lasts awful long time. When I store the saw for longer period of time I put nice even coat on and leave it without buffing. Five minutes of buffing before use and it is ready to go.

You may be right, I may just use it as is and enjoy it for the used tool it is. If I have trouble with the Colonite transferring I will pick up some of that Johnson wax thank you for the suggestion.

I would be tempted to bolt the wings on & take the top to be surface ground. But only IF the top could be improved satisfactorily without thinning the miter gage slots & insert pocket.

Pretty sure only a few thousandths can be removed before the accessories wouldn't fit.

Yeah I was worried how machining it would throw off the miter groves, If I still had access to the equipment at my old job I would attempt it all but I really wouldn't want to pay someone to experiment with it.

I have a 1950 with the original 1HP bullet repulsion-induction motor and it's my vague recollection that the later unisaw motors require you to hack the cabinet opening somewhat in order for it to clear on tilt. Wish I could be more definitive on that, but I have seen Unis with the later style motor and the cabinet modified in a non beautiful way.

Thanks for the heads up, I plan on putting the motor on tomorrow so I will see how the tilt is effected. I hope it doesn't effect it but if it does I will do it the correct way, I am a fairly capable metal worker and have done a lot of custom sheetmetal work on hot rods and muscle cars.

I think you are chasing a rainbow on grinding the top. Expensive to do, little real benefit other than looks(I get it), and the risk of affecting the miter slots, and throat plate.

If it has deep pits fill it with JB Weld and smooth it out. Once you use it for a few years you will forget about the small spots you filled.

I've used car wax for decades on my saw top with no issue in regards to finishing.

I'm in the midst of a Unisaw build myself, will have to start a thread on it, made a custom mobile base using a modified pallet jack head for the lift.

Yeah grinding the top probably isn't viable. The Colonite cured over night and is so slick, I am seriously shocked at how easy wood glides across it. You definitely need to start a thread on your saw restoration. Hopefully other guys see what these old saws can be and the ones that are being discarded will be saved!!
 

Slupie

Well-known member
Joined
Dec 19, 2010
Messages
162
Location
Bartlett, IL

Slupie

Well-known member
Joined
Dec 19, 2010
Messages
162
Location
Bartlett, IL
You are a terrible influence Slupie!! lol

Hahaha. I have 1939 Delta 6" jointer and 1941 DP220 bench drill press that needs to be repainted and put back together, and of course my pride and joy 86 PM 66.

JvEhmVZsqZhdqbZ21ZIiVvp1JHSlTkwqia8yNKkauJtRsipcbBtu6dasdn-GK0nX9Ze6Q3e8iKfa8Ns3kvbNvjcgpXzFrzwe9_6TsXEKU9Awm1iBtAmJHJGuyqr2pEHt1o1mLe_P_13fvXopJccyJrBZlSA5VI2fpeoxgSW3h6jCr-xjzJ73_F8h99DmTlVKNZ4bGf0CvNgvKRnHx6KmqxJWab5atFzbq_Lg4Hnybo3PlLgJwzbpKmZj1tZNfVEuLgS-HpnH6Oa5F1jOokOSpJlNOTLFzoR_kofsNYjm8E3-MzsbsmyEPALrnPsycTN6MpxsYtBJ0qMkgypHBJfRyPLtdcimlGYSa_oxCnGVaF3eF9IQ_KVLzauzCzjsDw1xYti3En462VQX66hUfWePFH3DcI_pN5--jk6brwS4EwNoW7ju64j5WZWrz6V8Brha9DFYmzf0RpM2kmcsao7IE-9wqtWhoimJhQTOA9glCEXbcZzQjvSeUggjtg_D8-_2aXZ1di9PU0YXhyBBsAKAu2PNX0o5ftWi0xMQr_1KkhIW2T593UnIprWakphny90HFpdmtq6Z1Ebi3SRSZMYdiX1gSRmTmDigQEyJnRX3UAfp7Kkxf9RxyiEToCLRhmq_tCVwjY6sDaP8lXHiDRJajnSdOIZD8iM=w1024-h683-no
 
Last edited:
OP
1

187 speed

Active member
Joined
Mar 25, 2014
Messages
34
Location
Central Illinois
Well tonight will be another quick update. With the extreme cold temps here in the midwest all of the delivery services have been suspended so I am still waiting on some final bits to finish up the saw. I was able to spend a few hours out in the garage today but mainly cleaning and painting an old cabinet. I did however finish up the restoration on the miter gauge that came with the saw.

IMG_1183.jpg

It was already sandblasted so i basically just took it apart and cleaned it up. I then used a 3M roloc disc to polish up the gauge and the lock down surface.

IMG_1190.jpg

I taped off the face and through a couple of coats of satin black on it. Just as it started to tack up I took some thinned on a paper towel and gently wiped down the polished surfaces.

IMG_1199.jpg

Once it was all dry I resembled it and reset the square using my machinist square. I will probably do a more thorough job calibrating it on the saw once everything is setup.

IMG_1208.jpg
 

rslaback

Well-known member
Joined
Jul 24, 2010
Messages
4,064
Location
Westcentral Wisconsin
I have that same base under my table saw. I would suggest rotating the saw (or the casters) 90 degrees. With the fixed casters perpendicular to the push when you are feeding material, the saw is more stable. Otherwise you are relying on just the front two feet to keep the saw from moving.

I like the maneuverability better that way too as it allows it to travel in the narrow direction, requiring less clearance.
 

gungatim

Well-known member
Joined
Jan 8, 2013
Messages
8,101
Location
west mich
just a comment on wax, I used to use Johnson's paste wax on my machine surfaces, it works great and lasts a long time. but I got lazy and now just use some spray furniture polish (no brand pledge knock off). it works great.

they say anything with silicone can get on your wood and affect finishing, but I have had zero issue with that despite furniture polish containing silicone.

great job on the saw, I agree forget grinding the top, when I did mine I used a ROS with a scotchbrite, then hand polished with 3000 grit wet dry paper on a leftover piece of marble tile I had similar to what Maui posted but in reverse.
 
OP
1

187 speed

Active member
Joined
Mar 25, 2014
Messages
34
Location
Central Illinois
I have that same base under my table saw. I would suggest rotating the saw (or the casters) 90 degrees. With the fixed casters perpendicular to the push when you are feeding material, the saw is more stable. Otherwise you are relying on just the front two feet to keep the saw from moving.

I like the maneuverability better that way too as it allows it to travel in the narrow direction, requiring less clearance.

I had thought about that when assembling everything but the way i plan on storing it along the wall between two cabinets I wouldn't be able to park it in there. If it causes any issues I will rotate it and figure out a different storage solution. Thanks for the suggestion.

just a comment on wax, I used to use Johnson's paste wax on my machine surfaces, it works great and lasts a long time. but I got lazy and now just use some spray furniture polish (no brand pledge knock off). it works great.

they say anything with silicone can get on your wood and affect finishing, but I have had zero issue with that despite furniture polish containing silicone.

great job on the saw, I agree forget grinding the top, when I did mine I used a ROS with a scotchbrite, then hand polished with 3000 grit wet dry paper on a leftover piece of marble tile I had similar to what Maui posted but in reverse.

Thanks for the tip, the Colonite I put on it is really slick but I plan on trying some Johnsons wax when its time to recoat it.

Hahaha. I have 1939 Delta 6" jointer and 1941 DP220 bench drill press that needs to be repainted and put back together, and of course my pride and joy 86 PM 66.

JvEhmVZsqZhdqbZ21ZIiVvp1JHSlTkwqia8yNKkauJtRsipcbBtu6dasdn-GK0nX9Ze6Q3e8iKfa8Ns3kvbNvjcgpXzFrzwe9_6TsXEKU9Awm1iBtAmJHJGuyqr2pEHt1o1mLe_P_13fvXopJccyJrBZlSA5VI2fpeoxgSW3h6jCr-xjzJ73_F8h99DmTlVKNZ4bGf0CvNgvKRnHx6KmqxJWab5atFzbq_Lg4Hnybo3PlLgJwzbpKmZj1tZNfVEuLgS-HpnH6Oa5F1jOokOSpJlNOTLFzoR_kofsNYjm8E3-MzsbsmyEPALrnPsycTN6MpxsYtBJ0qMkgypHBJfRyPLtdcimlGYSa_oxCnGVaF3eF9IQ_KVLzauzCzjsDw1xYti3En462VQX66hUfWePFH3DcI_pN5--jk6brwS4EwNoW7ju64j5WZWrz6V8Brha9DFYmzf0RpM2kmcsao7IE-9wqtWhoimJhQTOA9glCEXbcZzQjvSeUggjtg_D8-_2aXZ1di9PU0YXhyBBsAKAu2PNX0o5ftWi0xMQr_1KkhIW2T593UnIprWakphny90HFpdmtq6Z1Ebi3SRSZMYdiX1gSRmTmDigQEyJnRX3UAfp7Kkxf9RxyiEToCLRhmq_tCVwjY6sDaP8lXHiDRJajnSdOIZD8iM=w1024-h683-no

That is a beautiful saw!!
 

250

Well-known member
Joined
Oct 16, 2014
Messages
537
Location
West of the Sierras
I'm a little surprised that it took till page 2 for someone to mention OWWM.org. I don't know this for sure, I'm more into the powermatic stuff, but the Uni saw is probably the most restored item on that site. Its very easy to get lost, then find yourself trying to figure out how to move some piece of equipment with toothpicks and a prius.

The uni saw specific link slurpie listed above is a pretty good place to start, but I noticed in my very quick scan that the table hasn't been tackled yet. It would be highly recommended to stop and filter through the Uni threads (don't have to be a member to search) before cutting anything for that motor.

That community is probably the definitive source for de-rusting techniques. My first resto was a powermatic 65 cabinet saw, came from a school at some point, table has some pitting and some deep scratches, both deep enough that they remain. I used the scotchbright, some with power, come with elbow grease. What I did on my most recent rusty table is a modified evaporust bath. I wasn't in the position to remove the table so I covered it in blue shop towels, saturated the towels in evaporust, covered it all with cling wrap and let it sit. It works pretty well, but you have to get the bubbles out, or it will leave stains. Still needed a little work after but much easier than some of the other methods. I'm pretty sure I got the idea from OWWM.

Good luck.
 
To avoid these ads, REGISTER NOW!
Top Bottom