To avoid these ads, REGISTER NOW!

Forming some sheet steel - will this work?

b-body-bob

Well-known member
Joined
Oct 10, 2011
Messages
1,621
Location
Almost Heaven
I've got a problem to solve here, think I have a plan, but would like a sanity check before I screw up the part.

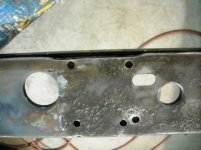
Basically, I've got a replacement body part stamped out of 16 ga steel that isn't stamped quite right. It should have a formed depression to match a dip in the part it welds to but it doesn't. The attached photo shows the OEM part clamped to the new part making the difference obvious. The depression is about 1/4" deep.

What I'm thinking of doing, is cutting slits in the new part to match the bend in the OEM part, clamping a piece of angle to it to limit the bend, then wailing on it with a hammer until I get the clearance I need. Once it's welded in the car, the slits won't matter since they don't show but I'll probably weld them up anyway.

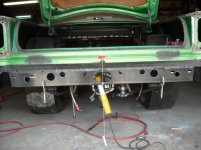
The other attachment shows the part I'm dealing with, it's the black part clamped to the car. You can see at the oval holes how it's hanging down too low. Those should line up with holes in the shiny frame parts you can see through the holes in the new part.

Can any of you experienced metal shapers see anything wrong with my plan, or suggest another way to do it? Thanks in advance for any advice, tips, or criticism.
 

Attachments

  • DSCN0926.jpg
    DSCN0926.jpg
    80.2 KB · Views: 340
  • DSCN0883.jpg
    DSCN0883.jpg
    89.5 KB · Views: 363
To avoid these ads, REGISTER NOW!

NASTYZEN

Well-known member
Joined
Jun 11, 2010
Messages
2,823
Location
St-Colomban,Que. Canada
Maybe get a plate ,say 1/2 thick or so and at least a couple of inches wide. cut the shape on the edge of it and clamp it or tack welding it to your new part on the inside. To use as a bucking bar.
Next heat up the flange and hammer it to shape. Maybe use a chunk of aluminum to beat on so as to not mark up your part to much.

Best of luck and let us see how you made out.
 

Provincial

Well-known member
Joined
Sep 21, 2011
Messages
6,856
Location
Near Salem, OR
Bob, I have made offsets like that before by clamping a piece of flat bar between the existing flange and a piece of heavy angle iron. The flat bar needs to be thick enough to make the right offset so the angle iron is positioned as a "die."

In this case I would also clamp the face of the part that is being formed to the face of the angle iron to prevent it from buckling outward. I would use more flat bar to spread out the clamping force past the area that is being worked.

I think you are right to cut slots and weld them later because it gives the metal a place to escape to when you beat on it. Place your slots so they will end up at each end of the dip at the lower corner. Start hammering near the center of the dip and work the metal toward the slots. Same with the top flange, starting at the top and working toward the bottom corner of the dip. Try to roll the sheet metal over the angle iron to move the excess metal of the dip out to the edge of the flange. If the flange becomes too wide from the forming, it is easy to trim off the excess.

I grind the sharp corner of angle iron to the radius I want on the sheet metal. I also use a piece of steel plate to hammer on so I am not hammering directly on the sheet metal. This keeps the sheet metal from stretching as much and also avoids hammer marks. I always think in terms of where I want to push the metal, and make sure it has a place to go. If you do that there will be far less distortion when you are done.
 
OP
B

b-body-bob

Well-known member
Joined
Oct 10, 2011
Messages
1,621
Location
Almost Heaven
Thanks for the ideas. I went out to work on it last night, but got sidetracked by fitting another part, and surprise surprise it doesn't fit like it should either. So much for correct restoration parts.

I'll get to work on this over the weekend, will reply back once I'm making progress.
 

Kevin54

MEMBER EMERITUS
Joined
Jan 12, 2005
Messages
29,341
Location
Urbana, Ohio
Why can't you heat the flat part up with a torch and peen it down to match the original part? Shouldn't take too much to do it.
 

MP&C

Well-known member
Joined
Oct 21, 2009
Messages
4,400
Location
Leonardtown, MD
Even with the part being 16 ga, I would think only being off 1/4" could be corrected without having to notch and weld. It wouldn't take all that much persuasion hammering into a hollow to move the panel that much.
 

Jack Burton

Well-known member
Joined
May 22, 2009
Messages
105
I'd probably just cut the slits as the OP said and hammer a pipe of similar OD through it, then tack it up.

I'm quite certain someone makes a circular flanging tool for this though. Should look similar to a chassis punch set. EDIT: Dimple dies...lol

By the same token, you could bore a hole in a plate of your desired OD, lay the part on there and hammer a a smaller pipe through it.

It all seems like a waste of time and money though since no one will ever see it and your beast:rocker: doesn't look all that factory correct anyways:D
 
Last edited:
OP
B

b-body-bob

Well-known member
Joined
Oct 10, 2011
Messages
1,621
Location
Almost Heaven
I'd probably just cut the slits as the OP said and hammer a pipe of similar OD through it, then tack it up.

I'm quite certain someone makes a circular flanging tool for this though. Should look similar to a chassis punch set. EDIT: Dimple dies...lol

By the same token, you could bore a hole in a plate of your desired OD, lay the part on there and hammer a a smaller pipe through it.

It all seems like a waste of time and money though since no one will ever see it and your beast:rocker: doesn't look all that factory correct anyways:D

Yeah Jack while working on a floor patch yesterday I was looking and thinking some more and once it's all together that will never be seen because there's a bumper reinforcement that hides it from view.

I'm thinking now that all it needs is to be cut, then that part hammered flat, make the 90* bend made a 1/4" lower than where it is now, and trim the extra length off as needed. In other words, just step it down to clear the trunk pan.

You're right, not much factory correct about the car at all. Was a full time race car, I'm doing enough to make it safe and street legal. The hard part is I never even owned a welder until I started down this road.
 
To avoid these ads, REGISTER NOW!

gerahead

Member
Joined
Nov 3, 2011
Messages
12
'69 Road Runner with a Dana rear end, hummmmmm............thinkin' I 'd like to see more :rocker: L8r
 
OP
B

b-body-bob

Well-known member
Joined
Oct 10, 2011
Messages
1,621
Location
Almost Heaven
It's really nothing special just a gutted out old 69-1/2 bracket car.

If the temp in the garage is 100 or less I'm going to try to finish the trunk floor patch tonight, that has to go in before the part being modified can be dealt with.
 

gerahead

Member
Joined
Nov 3, 2011
Messages
12
b-body,
I'm in a similar situation. Replacing a rear quarter on a 71 ******* and find that the lower part of the trunk floor extension is rotted away. Now I need to finish getting the extension installed so that I can get back to the quarter. L8r

Jim
 
OP
B

b-body-bob

Well-known member
Joined
Oct 10, 2011
Messages
1,621
Location
Almost Heaven
I finally got the trunk patch finished and some time to work on this. I picked up some 1" wide by 3/16" steel, ground the edges to an angle, and welded them at the right width to a piece of angle.

I've been pounding on the new part trying to form it and getting nowhere. Either I need to heat it, or cut it, to get it to bend. I don't have an O/A setup, just a Mapp gas torch so cutting it might be the route I have to take.

I'm off work tomorrow, and this thing is getting bent before I go back to work one way or the other. Comments are welcome ...
 
OP
B

b-body-bob

Well-known member
Joined
Oct 10, 2011
Messages
1,621
Location
Almost Heaven
Update, I was able to get it to cooperate everywhere except where it has a 90* bend as it transitions from the horizontal flange to the vertical cross member, so I'm thinking a little split is needed there so it can bend.
 
OP
B

b-body-bob

Well-known member
Joined
Oct 10, 2011
Messages
1,621
Location
Almost Heaven
I split it but it still doesn't want to bend like I need it to. I'm going to move on, get both sides the same, and if it still won't fit the countours in the trunk floor I'll just cut the lip off right there and fix it up after the part is in the car.

I'm making some progress welding up the holes where I took the factory part out at the spot welds - the AMD part isn't as wide so I can't use the same holes for my plug welds. Hopefully I can get that done before I run out of shielding gas ... almost there now.
 
To avoid these ads, REGISTER NOW!
Top Bottom