To avoid these ads, REGISTER NOW!

Found a Stanley Grinder Model 677

Junkman

Well-known member
Joined
Dec 18, 2006
Messages
6,639
Location
Northeastern CT
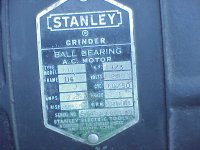
I found this grinder today, and decided that I couldn't live without it. One side has a home made tool rest, and even though the data plate says it is 220 volt, someone has wired it to run on 110. I would like to find the correct tool rest, and also a wiring diagram to wire the unit to run on 220 volt. Any idea of how old it is? thanks Junkman
 

Attachments

  • MVC-014L.JPG
    MVC-014L.JPG
    88.1 KB · Views: 92
  • MVC-013L.JPG
    MVC-013L.JPG
    96.9 KB · Views: 84
  • MVC-015L.JPG
    MVC-015L.JPG
    96.3 KB · Views: 103
To avoid these ads, REGISTER NOW!

MattT

Well-known member
Joined
Feb 20, 2010
Messages
3,201
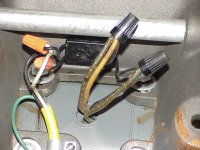
How many wires are there under the cover plate running into the motor? Any caps?

And how is it behaving under load?
 

exmaxima1

Well-known member
Joined
Jun 25, 2011
Messages
6,343
Location
Midwest
That grinder was made by Kingston-Conley, who also made similar grinders for other companies in the 40's/50's (ie, Atlas, Miller Falls, Walker-Turner). While spare parts are rare, at least you know there will be alternative brands to search from. That's a really nice grinder, and the "slow" version that runs at 1750 rpm. Essentially intended for tool sharpening, not production grinding.

To convert back to 220volt operation you would need to separate the winding sections and wire them in series. For 110volt use they would be wired in parallel, assuming they used a conventional winding configuration. With no colors codes it will be tricky to find the winding halves, as well as the starting windings. If it runs on 110 now, I would leave it alone.

BTW, it is possible that it is still wired for 220, but that the previous owned just slapped on a 120v plug. It will run but have only 1/4 the normal power.
 
OP
J

Junkman

Well-known member
Joined
Dec 18, 2006
Messages
6,639
Location
Northeastern CT
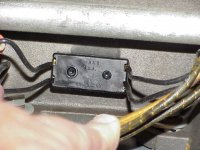
There is no cap, and there are 4 wires coming out of the motor. 2 black with stripes, 1 black, and one white. There is a on / off switch that has 2 wires on each side. The previous owner I assume wired it to work on 110, and it will start and run, but it is extremely slow starting. He tied 2 of each of the 4 wires coming out of the motor to one of each of the two switch wires on one side, and then put the hot and neutral to the other two switch wires.
 

Attachments

  • MVC-001L.JPG
    MVC-001L.JPG
    87.6 KB · Views: 19
  • MVC-002L.JPG
    MVC-002L.JPG
    88.3 KB · Views: 19
  • MVC-003L.JPG
    MVC-003L.JPG
    87.3 KB · Views: 18
  • MVC-004L.JPG
    MVC-004L.JPG
    85.3 KB · Views: 20
Last edited:
To avoid these ads, REGISTER NOW!

454ragtop

Well-known member
Joined
Mar 24, 2008
Messages
5,011
Location
Carver, MA
Since it starts slow, good chance it is already wired for 230, and somebody just slapped a 115 plug on it. Might ask about it in the electrical section over at OWWM, someone there can likely tell you how to check with a meter whether it is wired for 115 or 230.
 

humber2

Well-known member
Joined
Feb 13, 2011
Messages
1,768
Location
Downunder
I think you could confirm the windings are for a split phase motor by undoing one screw connector, separating the wires, and measuring each wire back to the plug.

There should be the main or run winding with a much lower resistance.

My thoughts are that this is a 230 Volt motor made for Worldwide markets given the 50 and 60 Hz ratings.
 

6PTsocket

Well-known member
Joined
Mar 12, 2014
Messages
4,593
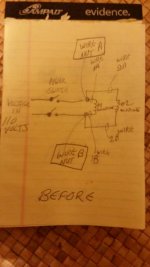
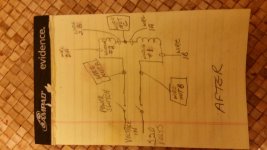
It looks like you have a DPST (2 contacts) switch which is normal for 220 volts, with two hots, wired to the two run windings wired in parallel which correct for 110. I agree, it looks like the previous owner took a 220 grinder and rewired it for 110. Make a drawing of the wires held by those two wire nuts. Lets call them group A and group B. Remove the nuts and separate the wires. With a meter on ohms find which wires from each wire nut group coming out of the motor give you a reading. These are the two run windings. Lets call them windings 1 and 2. It is arbitrary which you call 1 and 2 Make temporary tags of masking tape if it will help . Remove the wire from winding 1 from group A and put the nut back on the two remaining wires. Pull the number 2 winding wire from the group B wires and reinstall the nut on the remaining 2 wires You now have two loose wires. Tie them together with an additional wire nut. Change the plug for a 220 plug and you should be good to go. If it is hard to follow I will make drawings if that helps. As stated above, the wundings are in parallel and we want to put them in series. If the motor runs, the windings are phased correctly. If you follow my directions you will not lose that and have to start experimentally reversing winding connections.

Sent from my SM-G900V using Tapatalk
 
OP
J

Junkman

Well-known member
Joined
Dec 18, 2006
Messages
6,639
Location
Northeastern CT
Thanks.. I will do that this weekend. Right now, I am running in overdrive trying to get caught up with a whole lot of other things that need attention first.. Will post how I make out... thanks again... Junk
 

6PTsocket

Well-known member
Joined
Mar 12, 2014
Messages
4,593
I made a couple of diagrams. Pictures are usually better than verbal descriptions.20180606_213709.jpg20180606_213750.jpeg

Sent from my SM-G900V using Tapatalk
 
OP
J

Junkman

Well-known member
Joined
Dec 18, 2006
Messages
6,639
Location
Northeastern CT
I made a couple of diagrams. Pictures are usually better than verbal descriptions.20180606_213709.jpg20180606_213750.jpeg

Sent from my SM-G900V using Tapatalk

Followed your instructions, and in the end, I realized that what the previous owner had done, was to just remove the 220 volt plug from the wire, and replace it with a 110 volt plug. All that I had handy was a L6-30 plug, so I tried that, and it works like a champ. Quiet, smooth running, and not a vibration to be felt. I will be removing this plug, and will be replacing it with either a 15 or 20 amp plug. Just need to do the research to see which one is correct for the current draw.
Thanks again to all that responded. Now, all I need to find are the correct eye shields to make it safe for use. In the old days, I would have thrown them away, but in old age, I realize how important my eyes are to my longevity. If my eye sight were to ever fail, with my luck, I will walk into the side of a bus and get run over by the car behind the bus.:lol_hitti
 
To avoid these ads, REGISTER NOW!
Top Bottom