To avoid these ads, REGISTER NOW!

Freddy's 22' x 28' Storage Barn

freddyaudiophile

Well-known member
Joined
Aug 3, 2011
Messages
49
Location
New Brunswick, Canada
Hi folks: Just found this forum a few weeks back... Started a thread on here about my 22'x28' second garage build.

Since I live up where it is cold, I opted for traditional footings, frost wall, and wire-mesh-reinforced concrete slab. Construction is 2"x6" with a storage loft upstairs. The frost wall is composed of ICF (insulated concrete forms) from Nudura.
 

Attachments

  • P7125275.jpg
    P7125275.jpg
    104.8 KB · Views: 140
  • P7175290.jpg
    P7175290.jpg
    110.1 KB · Views: 142
  • P8065462.jpg
    P8065462.jpg
    91.9 KB · Views: 164
Last edited:
To avoid these ads, REGISTER NOW!
OP
F

freddyaudiophile

Well-known member
Joined
Aug 3, 2011
Messages
49
Location
New Brunswick, Canada
A few more progress shots... progress has slowed a bit, as the contractor has been bouncing from job to job and we have been waiting on some of the sub-trades to get their stuff done as well.

Recent progress: 5 windows and man door installed and flashed; custom-bent aluminum window trim installation is in progress; electrical done (dedicated 100A entrance); conduit installed (for alarm system coverage), and the ICF forms have been parged. The electricians are due back today to install the sub-panel in the basement and bring the buried cable in from outside and connect the two together.

Yep, she's a work in progress... :)
 

Attachments

  • P8245548.jpg
    P8245548.jpg
    149.9 KB · Views: 89
  • P8305717.jpg
    P8305717.jpg
    150.5 KB · Views: 97
OP
F

freddyaudiophile

Well-known member
Joined
Aug 3, 2011
Messages
49
Location
New Brunswick, Canada
A few more progress shots from over the last few weeks... Thus far, the underground power has been connected and the exterior work (siding, soffitt, metal trim around the windows and eaves, rain gutter, etc.) has all been completed. All of the electrical has been done inside, including 120v and 240v outlets.

Inside, all of the walls have been insulated and vapour barrier installed and sealed. OSB has been put up on the ceilings and walls and I have some of the interior primed with Zinsser BIN oil primer, sealer and stain blocker. The builder capped the ICF stub wall with wood (2x8 top runner and PT 2x6 scribed to the sloping floor) to make it nice and rugged, and also trimmed out the windows. Need to finish the priming this weekend since the contractor was nice enough to let me borrow his mobile staging... If I'm courageous enough, I might even try to get the first coat of gray paint on the walls.

Today, the contractor had some crushed rock delivered and the driveway extended to meet up with the new garage in the backyard. It is not shown in the night photo.

My garage door is back ordered and should be here next week...
 

Attachments

  • P9155752.jpg
    P9155752.jpg
    134.1 KB · Views: 185
  • P9125741.jpg
    P9125741.jpg
    144.4 KB · Views: 140
  • P9085728.jpg
    P9085728.jpg
    136.2 KB · Views: 164
  • P9125744.jpg
    P9125744.jpg
    148.3 KB · Views: 128
  • P9125745.jpg
    P9125745.jpg
    141.4 KB · Views: 163
Last edited:

Omphaloskeptic

Well-known member
Joined
Oct 11, 2008
Messages
2,346
Location
Ultima Ratio, Wa.
That is a good looking building. A very clean and simple design; I like it!

What is the status and purpose of the upper floor?

By the by, considering your moniker, how about some pics of your sound system(s)?
 
OP
F

freddyaudiophile

Well-known member
Joined
Aug 3, 2011
Messages
49
Location
New Brunswick, Canada
Thanks for the compliments... that was my goal -- a clean and simple design; classical Colonial architecture (matching our house).

My plan for the upstairs was to use it solely for storage. As most families would, we have miscellaneous junk scattered all throughout our house (a 3,000+ sq. ft. 2-storey with finished basement) and need a place to consolidate it all. So, that was the plan for the upstairs -- seasonal outdoor stuff, outdoor furniture, yard tools, kids toys, bikes, camping gear, etc.

I am looking forward to being able to get all of my tools together in one place, instead of having stuff spread through 3 different locations now (furnace room, current garage, and a separate storage room). This barn is meant to be a multipurpose space -- part barn, part woodworking shop, part storage, part automotive shop.

My online handle goes back for years... back when I had bundles of exceptional quality audio gear... I don't any more... :( I grew out of that phase of my life... got married, had kids, etc... As a bare minimum though, I did wire up the new barn for interior speakers... They run back to a source location on the back wall underneath the stairs...
 

Attachments

  • P9125748.jpg
    P9125748.jpg
    145.9 KB · Views: 131
  • P9125749.jpg
    P9125749.jpg
    149.5 KB · Views: 155
  • P9125747.jpg
    P9125747.jpg
    147.9 KB · Views: 133
Last edited:

Omphaloskeptic

Well-known member
Joined
Oct 11, 2008
Messages
2,346
Location
Ultima Ratio, Wa.
Nice space upstairs, almost too nice to use just for storage. lol

Since you live where it's very cold, is there any plan to isolate the two levels for heating considerations?
 
OP
F

freddyaudiophile

Well-known member
Joined
Aug 3, 2011
Messages
49
Location
New Brunswick, Canada
I am going to use a 4800W electric heater to heat the whole barn... and keep it around 8 degrees Celsius all winter... since it is all just for storage upstairs, I don't see the need in separating the upstairs from the downstairs for heating purposes.
 
OP
F

freddyaudiophile

Well-known member
Joined
Aug 3, 2011
Messages
49
Location
New Brunswick, Canada
Here are the latest progress shots... actually, it is nearly done! Yeah!

Over the last few weeks, I have managed to finish priming and got two coats of gray paint on the walls. I just need to finish cutting in around the ceiling and put the second coat on the walls behind the stairs (as they only have one coat right now). I was going to leave the stairs white but I think I will drown them in two coats of gray as well. After discovering that a 10'x8' R-16 garage door was a special order item here, I had to wait 2 weeks for my back ordered garage door to arrive and get installed. It arrived a few days ago and was installed yesterday.

I bought a bunch of lumber and 3/4" G1S plywood to start building my benches and cabinets after all the painting is done (which will hopefully be this weekend).

Anybody know any easy way to remove oil paint from concrete? I've pretty much dislocated my shoulder from scraping the floor with two floor scrapers of different sizes but I cannot get all of the droplets of oil primer off... I might try WD-40...

Incidentally, **after** I got all done rolling on the second coat of gray paint, I had the not-so-brilliant idea of possibly running my orbital sander over the **** joints and caulking any gaps (such as in corners where two boards meet) to see if I can make it look nicer. I might try a seam this weekend and see how it turns out. I did buy 2 tubes of Alex caulking and will fill in any crevices with that (like others on here have done).
 

Attachments

  • P9285845.jpg
    P9285845.jpg
    125.3 KB · Views: 157
  • P9285847.jpg
    P9285847.jpg
    144.6 KB · Views: 101
Last edited:

ronaldo0017

New member
Joined
Sep 28, 2011
Messages
1
I bought a bunch of lumber and 3/4" G1S plywood to start building my benches and cabinets after all the painting is done
 
To avoid these ads, REGISTER NOW!

jwillis

Banned
Joined
Aug 24, 2010
Messages
5,225
Location
SW Ohio
That is so nice!! You really did a great job!! No offense, but it looks like the old village town hall or an old church. That's what I really like about it. Great job!!
 
OP
F

freddyaudiophile

Well-known member
Joined
Aug 3, 2011
Messages
49
Location
New Brunswick, Canada
Great looking build! Any pics of the 2nd floor/truss framing?

Here you go. They call these "storage room trusses" here as they are not designed for permanent living spaces, only occasional use. These have 2x10's as bottom chords (with a gusseted **** joint) instead of X-braced (open web) or I-beam-type chords seen in other types of trusses. This was a decision on my part mind you as the first question asked by the contractor focused around what I wanted to use the upstairs for. Incidentally, a fellow up the road from me used the same contractor to build a 28' x 42' garage/wood shop with an all-out 'man cave' bonus room over top (with dormers, a few big screens, bar, pool table, beer fridge, bathroom, etc.). The trusses used on that one are called bonus room trusses as they have X-braced (open web) sections all the way around.

Even though the contractor told me that there might be some minor bounce in the floor upstairs, I have not noticed any yet (and I'm quite picky mind you). I've been up there jumping around on my flat feet and intentionally thrashing around... no bounce, at least not yet. The subfloor upstairs is 3/4" T&G OSB that is glued and screwed down to the bottom chords on the trusses.

Let me know if these photos satisfy your inquiry...
 

Attachments

  • P7265311.jpg
    P7265311.jpg
    150 KB · Views: 58
  • P7285323.jpg
    P7285323.jpg
    144.3 KB · Views: 56
  • P7285320.jpg
    P7285320.jpg
    143.4 KB · Views: 57
  • P8095496.jpg
    P8095496.jpg
    148.7 KB · Views: 53
  • P8095497.jpg
    P8095497.jpg
    146.2 KB · Views: 61
Last edited:
OP
F

freddyaudiophile

Well-known member
Joined
Aug 3, 2011
Messages
49
Location
New Brunswick, Canada
I spent most of the (Canadian) Turkey Day weekend demolishing a pile of lumber that was sitting in one corner of my new barn... This is what I ended up with...

All the benches are 2"x6" framed, with 3/4" good one side plywood tops mounted flush (removed 3/4" on the inside 2"x6" supports every 16" o.c.)... the plywood is 24" deep (basically ripped down the middle) which makes for a 27" deep bench counting the 2"x6" across the front and back. The floor supports are 2x4. The left bench is 16' long; the back bench is 8' long.

The storage cabinet is 6' tall, 27' deep (to match the bench) and is 43" or so wide (which happened to be the nearest stud). There are 3 shelves inside it. The side panels were tricky as I had to scribe them down to the floor and around the wooden cap that conceals my ICF wall stub. Once I frig-jigged around to get the first one fitting good, I just cut out a tracing of it on another piece of plywood to make the second side. I made the doors and front of the cabinet on the same sheet of plywood by doing a series of plunge cuts with my circular saw. I was not sure as to how it would turn out, but it was quite simple once I drew all the guidelines and started cutting.

The two shelving cabinets (similar to redman43's) are 3' tall and 48" wide and 14" deep, all 3/4" plywood and 2x4. Originally, I was going to mount them above the bench but decided to leave them sitting directly on top of the benches as shown.

I was not crazy about peg board but found that my local HomeDepot had some slatwall, so I bought 2 sheets of it ($45 each). By ripping it down the middle, I was able to get a 2' section above each work bench. In doing so, I quickly discovered that this stuff is meant for creating wall displays in department stores as opposed to garage storage. My HD does not sell any hooks and brackets for hanging garage things and stuff so I will have to look elsewhere. However, most peg board accessories will fit, so I can buy peg board bits and pieces to store tools above the workbenches. (Wal-Mart and Canadian Tire sell their own brand of track panel components, but they only fit the track panel sections they sell!) I do have two more 4'x4' pieces of slatwall that I was going to rip into 1 foot sections and place them throughout the barn for storage of ladders and stuff. I might have to hit the net to find some decent slatwall accessories that fit a standard 3" o.c. slatwall....

Needless to say, I was really peaved when I discovered that one!!!
 

Attachments

  • PA105920.jpg
    PA105920.jpg
    135.4 KB · Views: 87
Last edited:
OP
F

freddyaudiophile

Well-known member
Joined
Aug 3, 2011
Messages
49
Location
New Brunswick, Canada
Over the last week or so, I have been slowly moving things from my current storage areas (2-car attached garage, storage room, furnace room) out to the new barn and finding new homes for things as I go. I must say that it is nice to finally be able to amass all my **** in one place. I am also using this opportunity to purge some junk and seldom used stuff in the process.

I did find a local store that carried slat wall hangers and accessories and I have most of my yard tools hung up off the floor. I need another 2 sheets of slat wall to finish hanging up various things as I have done throughout the new barn. In case anybody was curious, the hooks and hangers I have are VersaTrac from NewAge Products Inc. They seem plenty rugged to me... nearly every one of them will hold 50 lbs. Also, I discovered that not all peg board accessories will work in the slat wall as the pegs themselves are not long enough; Bulldog branded stuff from Wal-Mart (of all ****** places) works perfectly and those bits are fairly cheap as well. The only problem is that I go there and buy whatever peg board hooks they have, and then wait 2 or 3 days for them to get more, and then I repeat the process again. :) 
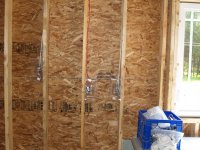
In case anybody was wondering, I have the slat wall secured to the 2"x6" studs using 3" #10 wood screws, counter-sunk with a #8 bit (nice snug fit).

I figure still have about another 4 hours of moving **** to do before I deem it finished. I have a floor standing toolbox that is mostly filled with power tools and those will end up in the plywood storage cabinet. It has 3 drawers of assorted wrenches and all those will end up above the 16' bench on slat wall. My goal is to get rid of the floor standing toolbox altogether, and I think it just might be possible after all....

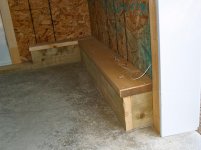
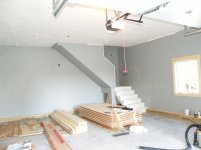
I need to find a decent place to store my 8 winter wheels/tires along with the assorted bits of OSB sitting underneath the 16 foot bench on the floor (the longer pieces are stacked vertically to the right of the plywood storage cabinet).

I must say that I do like all of the slat wall space, especially the two 8 foot pieces over the workbenches.

I would be open to suggestions as to further things that can be done to help organize, etc. A co-worker suggested building some rolling carts that would fit underneath the smaller 8' workbench, as I don't really have any sort of mobile shop table of sorts... so one of those is on my list.

As you can see, my little fellow (5 year old) has laid claim to his share of the floor space directly behind the man door for his toys... :)
 

Attachments

  • PA175933.jpg
    PA175933.jpg
    130.2 KB · Views: 69
  • PA175931.jpg
    PA175931.jpg
    133.1 KB · Views: 58
  • PA175934.jpg
    PA175934.jpg
    133.4 KB · Views: 58
  • PA175938.jpg
    PA175938.jpg
    134.7 KB · Views: 58
  • PA175935.jpg
    PA175935.jpg
    128 KB · Views: 55
  • PA175932.jpg
    PA175932.jpg
    125.9 KB · Views: 56
  • PA175936.jpg
    PA175936.jpg
    129.6 KB · Views: 52

Rich215

Member
Joined
Jan 3, 2011
Messages
9
Location
Coventry, Ct.
Freddy,

I noticed in some of your pics that it appears you taped the vapor barrier around the electrical boxes. I've never seen that before. Is it a special tape made for that purpose?
 
OP
F

freddyaudiophile

Well-known member
Joined
Aug 3, 2011
Messages
49
Location
New Brunswick, Canada
Yes, that is code in this neck of the woods... actually, a vapour boot is installed first and then the electrical box is installed inside of that. Once the wires are run into through the vapour boot and into the electrical box, the hole for the wires is then taped and sealed to the vapour boot. Then, when the vapour barrier is installed, the vapour boot is sealed to the vapour barrier with red tape. The stuff we used was called Tuck Tape but I've seen other types of air-sealing tape used as well. As far as I know, Tuck Tape is a Canadian brand but there are countless others out there.

If you check back through my photos, there is a shot of the taping and sealing down around the exterior windows. Here, code dictates that the strip along the top has to be the red (Tuck Tape) tape while metal-based flashing tape must be used down sides and bottom. I have some left over in the barn and can grab a pic of it if you want but you could Google Tuck Tape as well... here is a shot of the metal flashing tape and the outlets with vapour boots installed.
 

Attachments

  • P8175507.jpg
    P8175507.jpg
    139.6 KB · Views: 24
  • P8255557.jpg
    P8255557.jpg
    145.3 KB · Views: 34

Rich215

Member
Joined
Jan 3, 2011
Messages
9
Location
Coventry, Ct.
Thanks for the info. That's an interesting way of sealing the electrical boxes. Around here we just use the foam that goes under the cover plates.
 
OP
F

freddyaudiophile

Well-known member
Joined
Aug 3, 2011
Messages
49
Location
New Brunswick, Canada
10/12... I wanted to go 12/12 but there is a bump-out on the front of our house with a 10/12 pitch on that, and the contractor absolutely refused to do 12/12 on the barn because of the slight difference in pitch. I am happy I listened to him as it really matches the house nicely now. My contractor was a total fanatic about little details like that... I know the night before he placed the order for the roof trusses, he came by my place to double check the original house floor plans (from 2004) for himself to ensure that he had the roof pitch correct. It took me darn near an hour to find them... :)

In terms of upstairs space, it is 11' 8" or 12" wide by 27' long (interior dimensions; not including the little jog for the stairs). My contractor strapped out the downstairs ceiling and walls and ceiling upstairs after it was insulated and sealed as well.
 
Last edited:

OhioSiouxFan

Well-known member
Joined
Oct 17, 2011
Messages
110
Location
Northwest Ohio
and the contractor absolutely refused to do 12/12 on the barn because of the slight difference in pitch. I am happy I listened to him as it really matches the house nicely now.

My contractor was a total fanatic about details little like that...

A great contractor is a fabulous thing. Mine is a former US Marine who works with his two sons. I just told him, "Build it like you would build it if it was yours."

Anyway, mine is a 22 X 30 with a storage attic like yours, but the roof pitch is a bit lower and thus my attic ceiling will be too. I'll start a garage thread when I'm further into the project (just poured footings yesterday).
 
OP
F

freddyaudiophile

Well-known member
Joined
Aug 3, 2011
Messages
49
Location
New Brunswick, Canada
That was basically the same philosophy that my contractor used as well... even though they used nails shot with an air nailer to tack things together, they came behind with screws driven in with an impact gun. When they built the walls, the 2"x6" wall studs are glued with PL400 Premium (when they meet up with the top and bottom plates), tacked together with air nails, and then have at least 3 screws driven into them at each joint. And my top and bottom plates are all double 2"x6" (when code here only requires singles, top and bottom). Granted I ended up paying for all those little things in the end, it really made for a heavy-duty build in the process. And I've received many compliments from people as it was being built -- one guy showed up with his wife one day when I was painting and demanded an impromptu tour along with a list of all the subcontractors that had worked on the job.

Even though most (if not all) builders now use air-powered tools exclusively to save on labour, I often find that the guys shooting nails often miss studs entirely as they have no way of knowing if they've hit them or not. Not the case here; he made one of his guys pull out nails by hand with pliers that missed a few of the studs and do them over. I watched the guys like a hawk whenever they were onsite and I was thoroughly impressed with everything they did... They really knew their trade and knew how their boss wanted things done as well. And he was not afraid to give them **** (in private) when they were not meeting his standard...
 
To avoid these ads, REGISTER NOW!
Top Bottom