mbalka
Active member
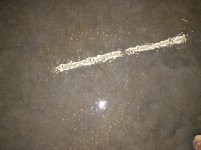
Part two of the installation. Now the "glamour shots." The polyurea was really thick and took some time to get spread out. May have had something to do with the temp at time of application, which was at the low end of Citadel's recommendations (40 or so outside, 65 inside with heat. I'm sure the slab was closer to 40 than 65.) But having expansion joints helped with judging how far the stuff was supposed to spread.
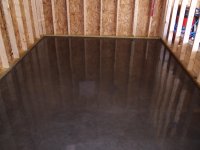
Here's that same shot from the steps earlier showing the sill plate, now coated and sealed. Just a little shadow of a bump there now, but it is totally hidden anyway.
View media item 7527
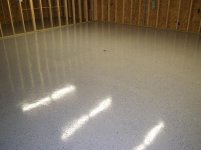
A shot of the bay that houses the diesel pickup. I did not elect to use the gloss topcoat; just the basecoat after assurance that it would have a good bit of gloss on its own. Man, were they right. It is pretty glossy by itself. The down side may be long term durability, because I tend to really bang stuff around in my shop, but we'll see over time.
View media item 7526
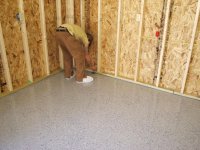
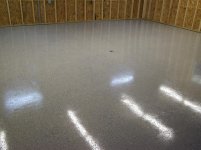
This is the shot of the side where Mrs' Murano goes. It doesn't get beat up like my side, but I tend to roll the tools, jacks, boxes over there rather than jockey cars, mostly out of laziness, so it will get some abuse too. She gets that side 'cuz its close to the steps.
View media item 7528
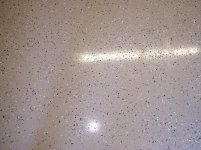
Here's a good closeup of the amount of flake I used. Not much, just enough to trick your eye into ignoring the imperfections in the pour of the slab. I really like a floor with no chip; makes it so much easier to find what you dropped, as I tend to do at the most inopportune time, but the chip does look better over a wide area. You can also see just a bit of what looks like orange peel at the doorway. Those are fiberglass strands that poked up after the etch. I wasn't at the house when they poured the slab, so I didn't know they strand reinforced it. But I will say that the poly flowed for what seemed forever and the strands kind of got "sucked" back into suspension, similiar to powder coating. You can't tell what they are, but they look a little orange-peely in a few minor places. I could have knocked them down with some sandpaper or grinding, but I was under a time constraint to get this done in a three day stretch.
View media item 7529
Now the homage to my Cornwell guy, Joe. Here is the garage all put back together and in use for a week now. The floor is looking great, cleans up all the road grime and salt with a damp mop, and reflects a ton of light to brighten things up. As I told the guys at Citadel, I am really pleased with the results. I am partial to other colors besides gray, but it is growing on me.
View media item 7530
Now next week I will start working on the shop next door. Smaller area, so I should be able to knock that out easier than this one. Hopefully, I'll get shots of that area up in a couple of weeks.
MB
Here's that same shot from the steps earlier showing the sill plate, now coated and sealed. Just a little shadow of a bump there now, but it is totally hidden anyway.
View media item 7527
A shot of the bay that houses the diesel pickup. I did not elect to use the gloss topcoat; just the basecoat after assurance that it would have a good bit of gloss on its own. Man, were they right. It is pretty glossy by itself. The down side may be long term durability, because I tend to really bang stuff around in my shop, but we'll see over time.
View media item 7526
This is the shot of the side where Mrs' Murano goes. It doesn't get beat up like my side, but I tend to roll the tools, jacks, boxes over there rather than jockey cars, mostly out of laziness, so it will get some abuse too. She gets that side 'cuz its close to the steps.
View media item 7528
Here's a good closeup of the amount of flake I used. Not much, just enough to trick your eye into ignoring the imperfections in the pour of the slab. I really like a floor with no chip; makes it so much easier to find what you dropped, as I tend to do at the most inopportune time, but the chip does look better over a wide area. You can also see just a bit of what looks like orange peel at the doorway. Those are fiberglass strands that poked up after the etch. I wasn't at the house when they poured the slab, so I didn't know they strand reinforced it. But I will say that the poly flowed for what seemed forever and the strands kind of got "sucked" back into suspension, similiar to powder coating. You can't tell what they are, but they look a little orange-peely in a few minor places. I could have knocked them down with some sandpaper or grinding, but I was under a time constraint to get this done in a three day stretch.
View media item 7529
Now the homage to my Cornwell guy, Joe. Here is the garage all put back together and in use for a week now. The floor is looking great, cleans up all the road grime and salt with a damp mop, and reflects a ton of light to brighten things up. As I told the guys at Citadel, I am really pleased with the results. I am partial to other colors besides gray, but it is growing on me.
View media item 7530
Now next week I will start working on the shop next door. Smaller area, so I should be able to knock that out easier than this one. Hopefully, I'll get shots of that area up in a couple of weeks.
MB
Last edited:
")