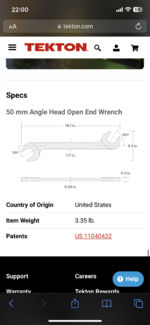
So I recently picked up a 3d printer and have had luck making a few small things that I have designed in fusion 360. (Drawer dividers/trays/tig tube dividers etc. I have the full set of tekton angle wrenches which I would like to design a tray for so that that all sit vertically, I found a pic of another design in the “Everything 3d printer” thread that I really like , however, with the full set I need it to hold 27 wrenches so it’s not going to be something I can just download and print (6mm-27mm)
My question for you guys is what would be the most efficient method for designing this? I’m not a pro but have a decent grasp of the concepts in F360. Should I model each wrench individually and then use the model to cut an impression of a larger body? Or make a large body and cut the dimensions of each wrench out individually? Thanks in advance for any help.
My question for you guys is what would be the most efficient method for designing this? I’m not a pro but have a decent grasp of the concepts in F360. Should I model each wrench individually and then use the model to cut an impression of a larger body? Or make a large body and cut the dimensions of each wrench out individually? Thanks in advance for any help.